Glean in Microsoft Teams: Admin guide
Glean in Microsoft Teams brings Glean's enterprise search and generative AI experience directly into Teams, so users can find information, ask questions, and get personalized answers without leaving their flow of work.
This guide walks administrators through the requirements and setup process to deploy the Glean app in Microsoft Teams, publish it to their organization, and complete the integration in the Glean Admin console.
If you want to set up a dedicated Microsoft Teams app for a specific agent, use the Microsoft Teams service credential flow instead. With service credentials, admins can create the credential in Admin console and connect it from agent builder.
Legacy setups configured through Add Agent on the Teams connector page will continue to work.
For the new dedicated agent flow, see Set up Microsoft Teams service credential.
Requirements
You need admin access to each of the following portals to complete the setup:
- Azure portal — to create the Azure Bot and configure app permissions.
- Teams Developer Portal — to create and configure the Glean app package.
- Teams Admin Center — to publish the app and manage deployment to users.
- Glean Admin console — to complete the integration by entering the credentials collected during setup.
Setup overview
Phase 1
Set up Azure Bot and Glean app
Create Azure Bot · Configure app · Set up Teams package
Collect: Application (client) ID, Client secret
→
Phase 2
Deploy via Teams Admin Center
Publish app · Manage access · Pin to sidebar
Collect: Glean in Microsoft Teams App ID
→
Phase 3
Enable in Glean Admin console
Enter credentials · Save · Share user guide
Integration complete
Phase 1: Set up Azure Bot and Glean app
Create the Azure Bot
-
In the Azure portal, search for Azure Bot in the search bar and select it from the Marketplace results (not Services). Alternatively, go directly to the Create an Azure Bot page.
-
Click Create, then on the Basics tab, configure the following:
Field Value Bot handle GleanSubscription Your Azure subscription Resource group Click Create new Region Select the Azure region closest to your Glean deployment. For example, if your deployment is in GCP europe-west4, select West Europe; if it is in AWSus-west-2, select West US 2.Pricing tier Select the F0 (Free) tier. Standard channels such as Microsoft Teams offer unlimited messaging at this tier. For a full breakdown of channel types and messaging limits, refer to the Azure Bot Services pricing page. Type of App Single Tenant Microsoft App ID Create new Microsoft App ID 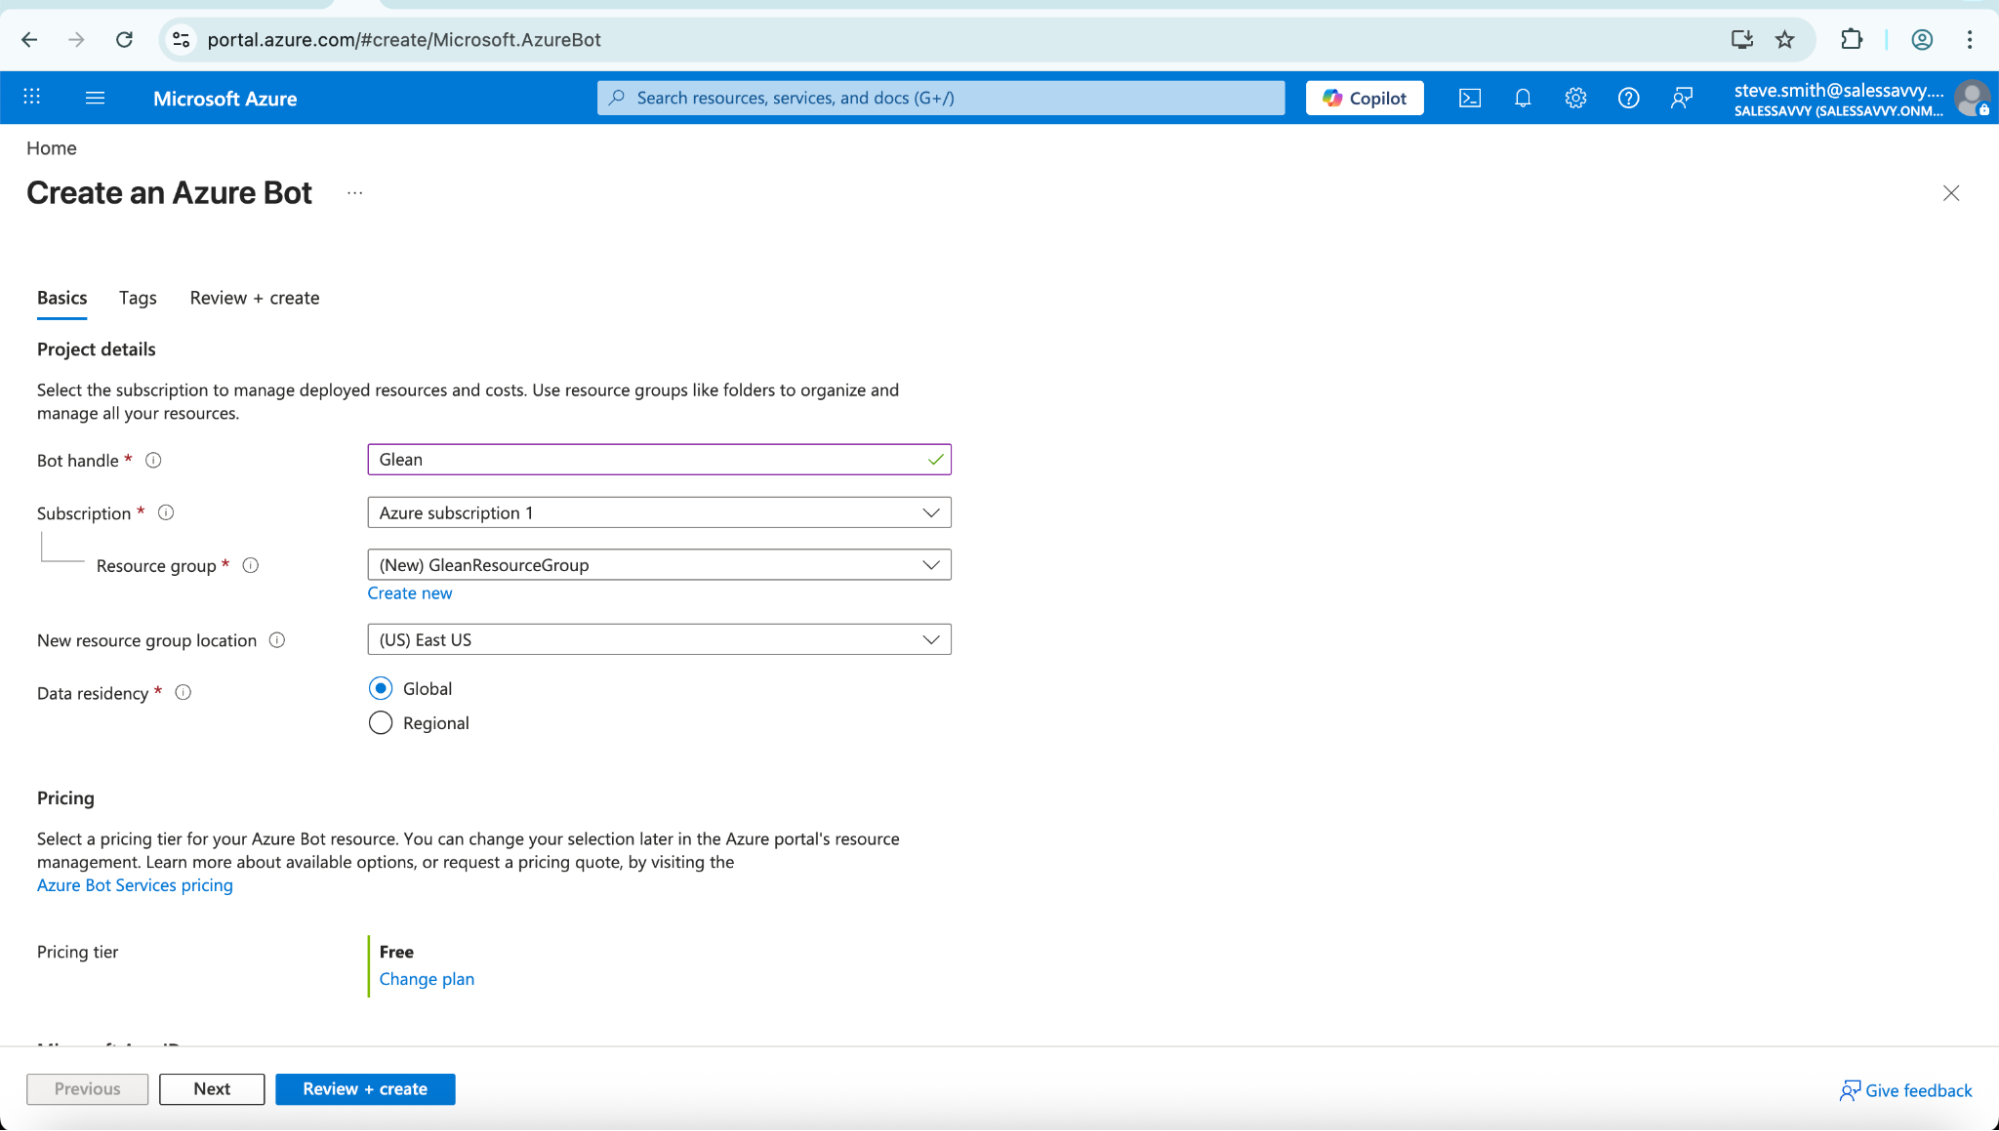
-
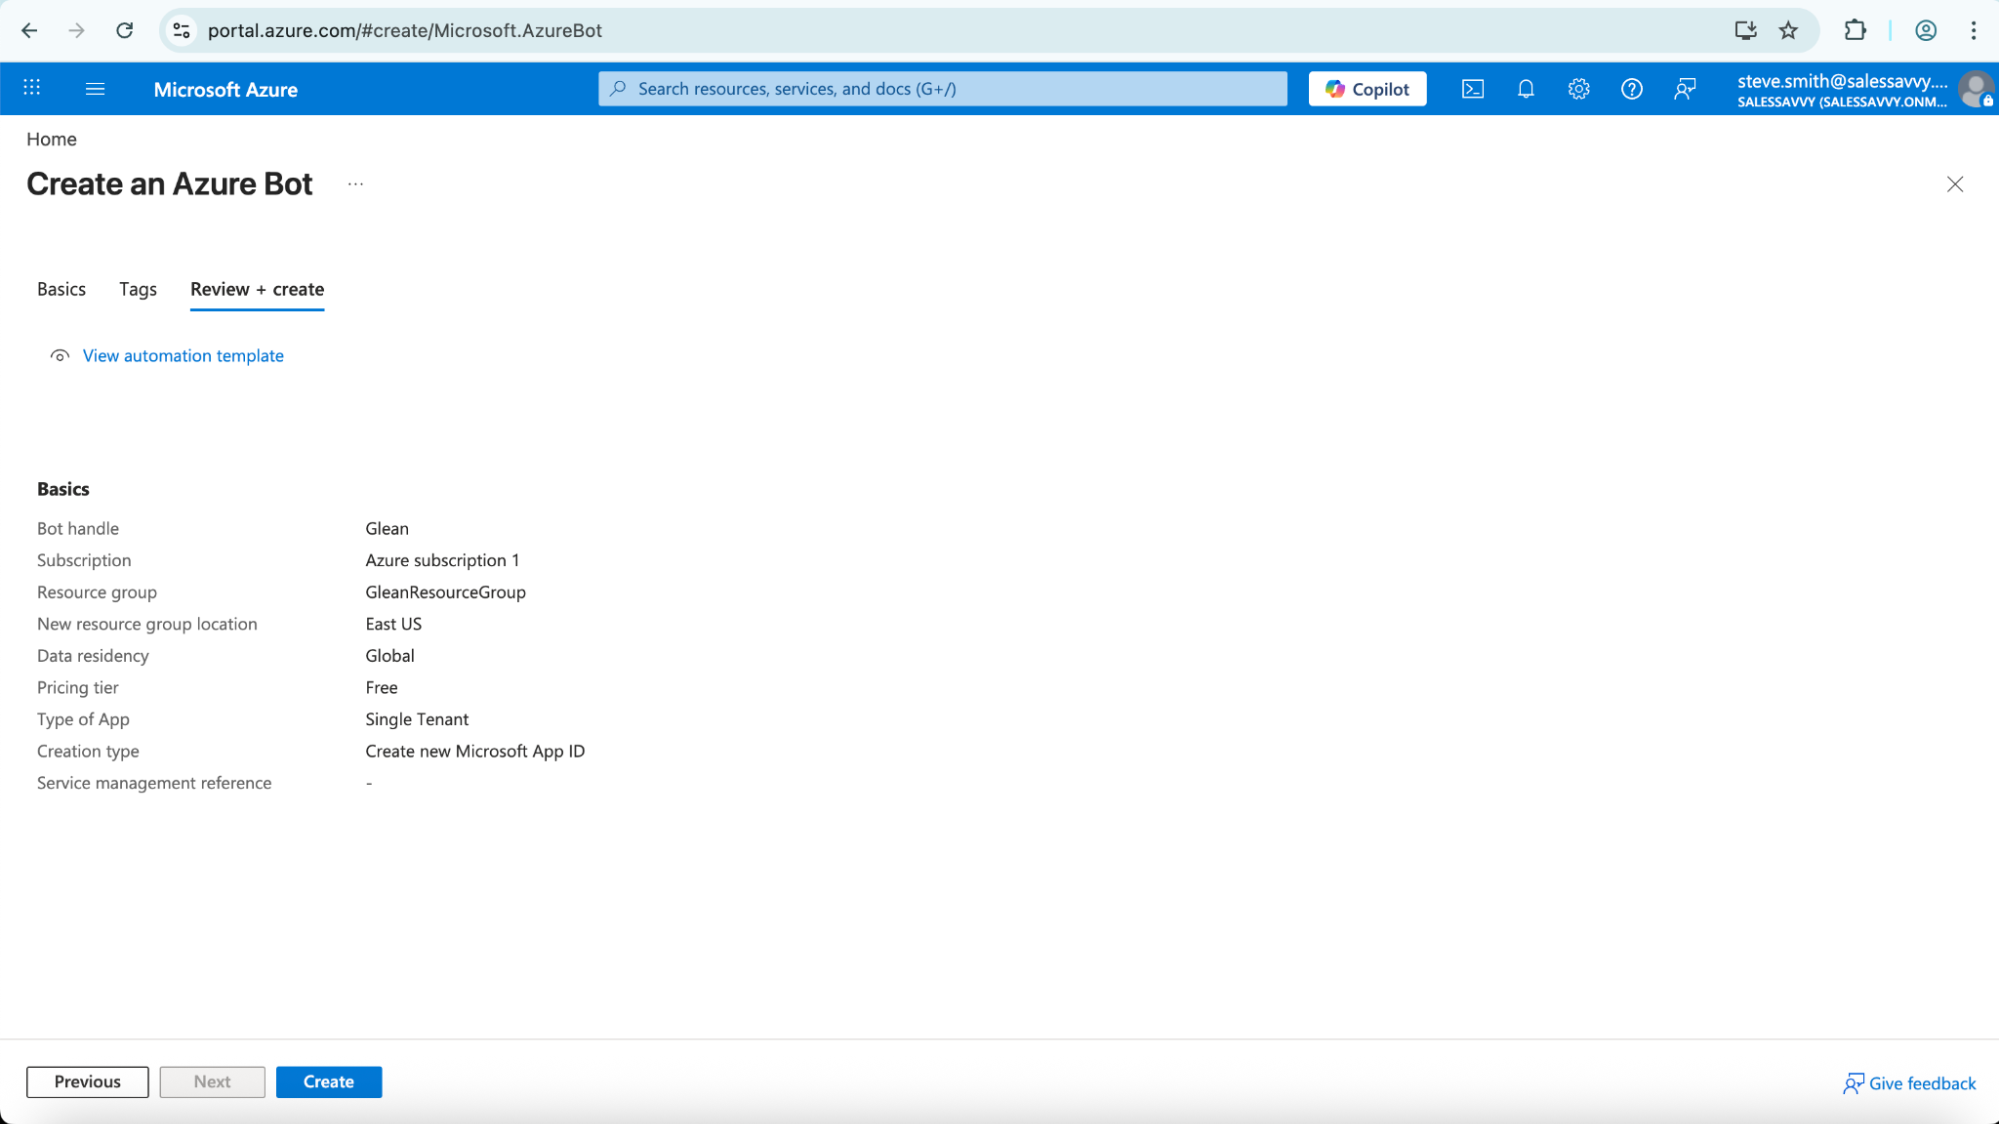
Click Review + create, review the configuration, then click Create.
-
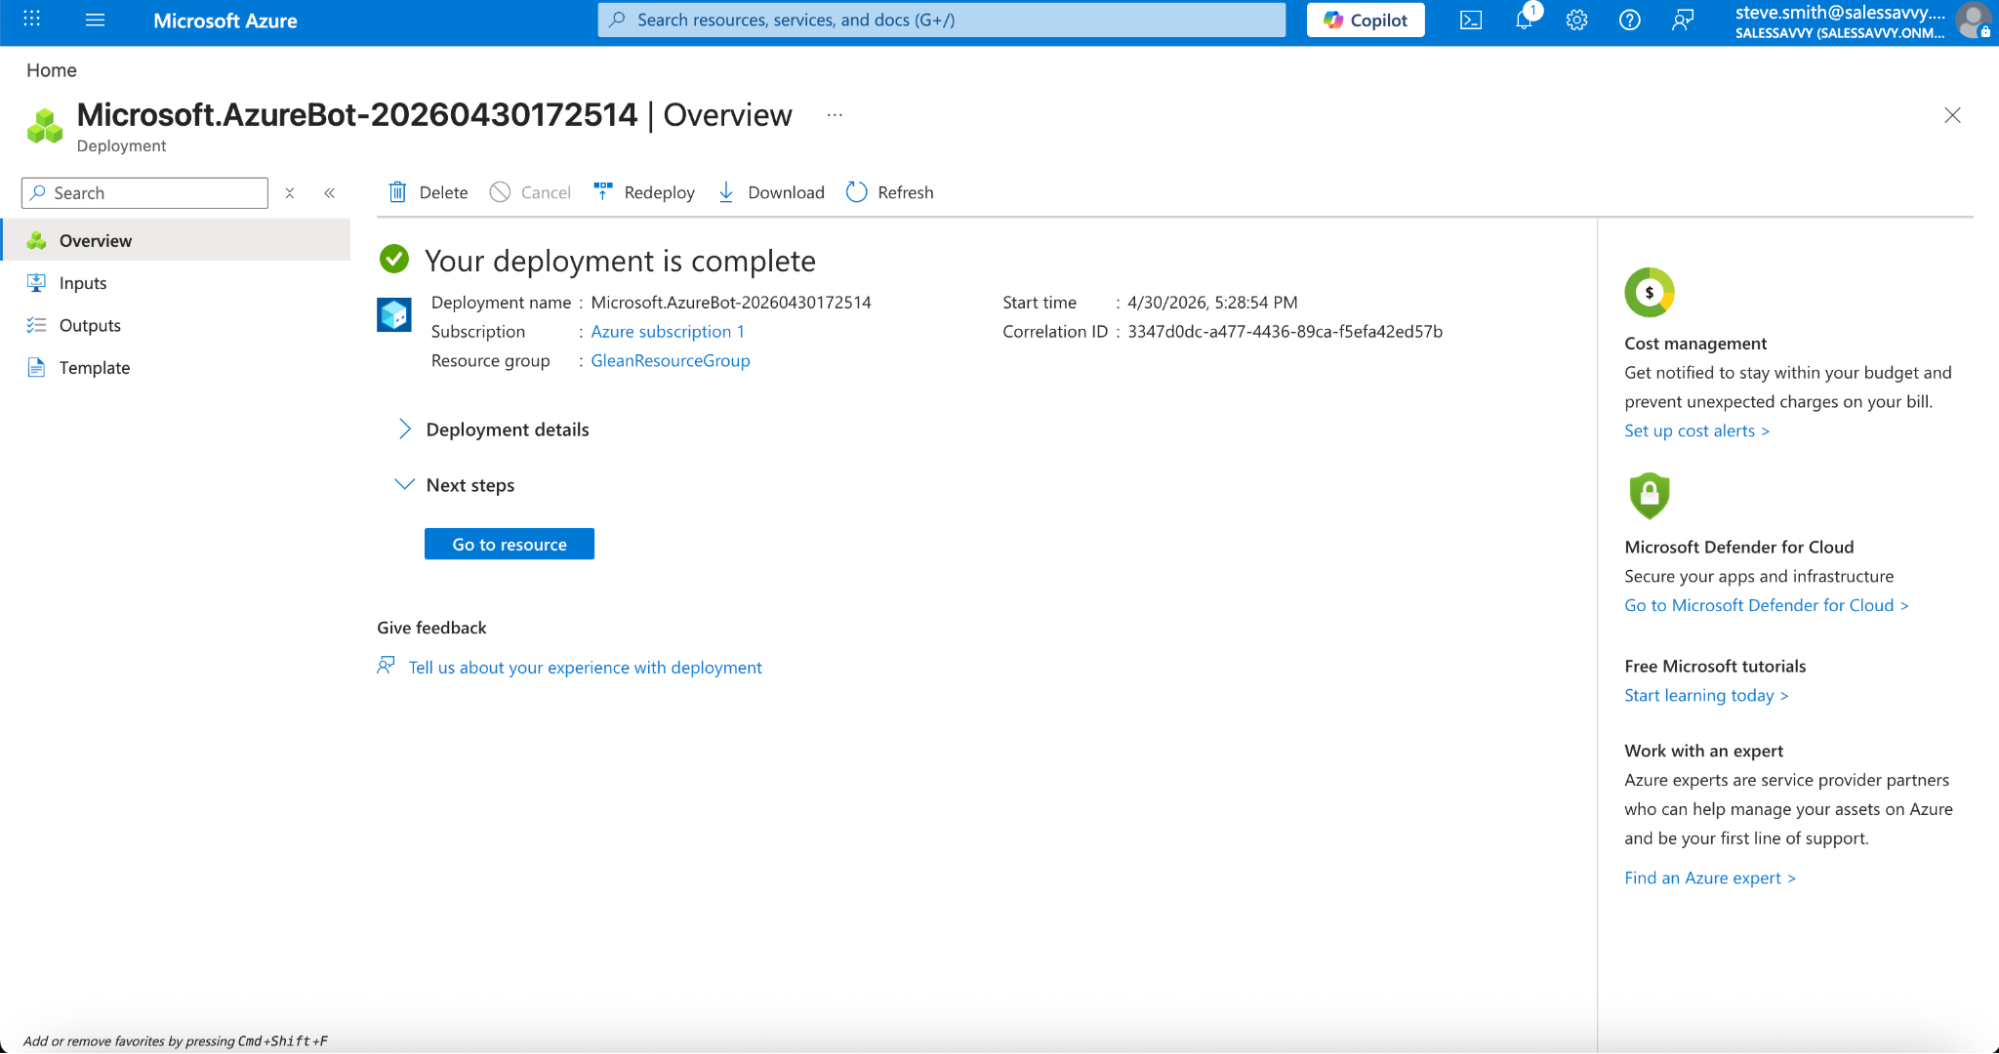
When the deployment completes, click Go to resource.
Configure the bot
-
In the bot resource, select Bot profile in the left navigation. Upload the Glean color icon and set the display name to
Glean. -
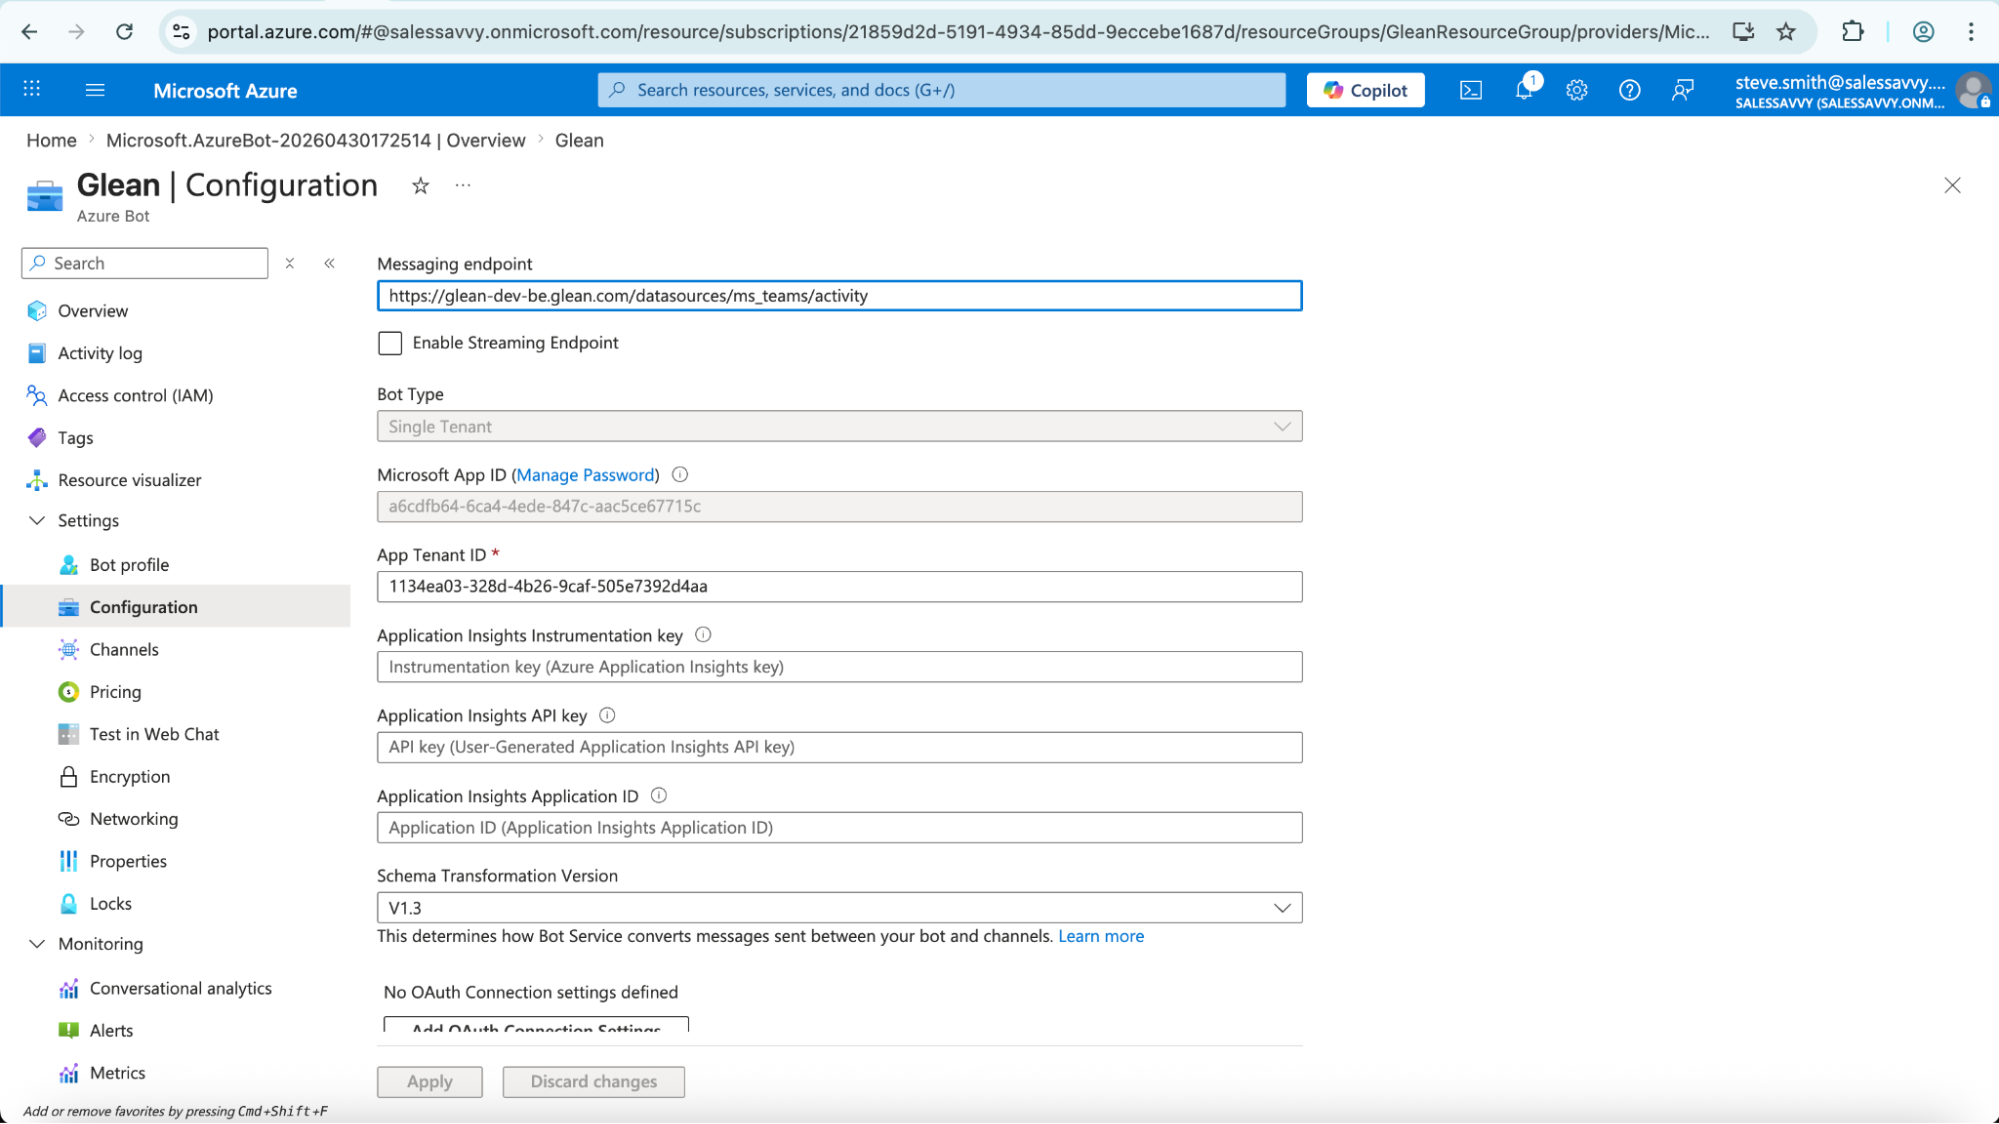
Select Configuration in the left navigation. In the Messaging endpoint field, enter your Glean backend URL followed by
/datasources/ms_teams/activity. For example:https://[your-instance]-be.glean.com/datasources/ms_teams/activity.Verify that Microsoft App Type is set to Single Tenant, then click Apply.
-
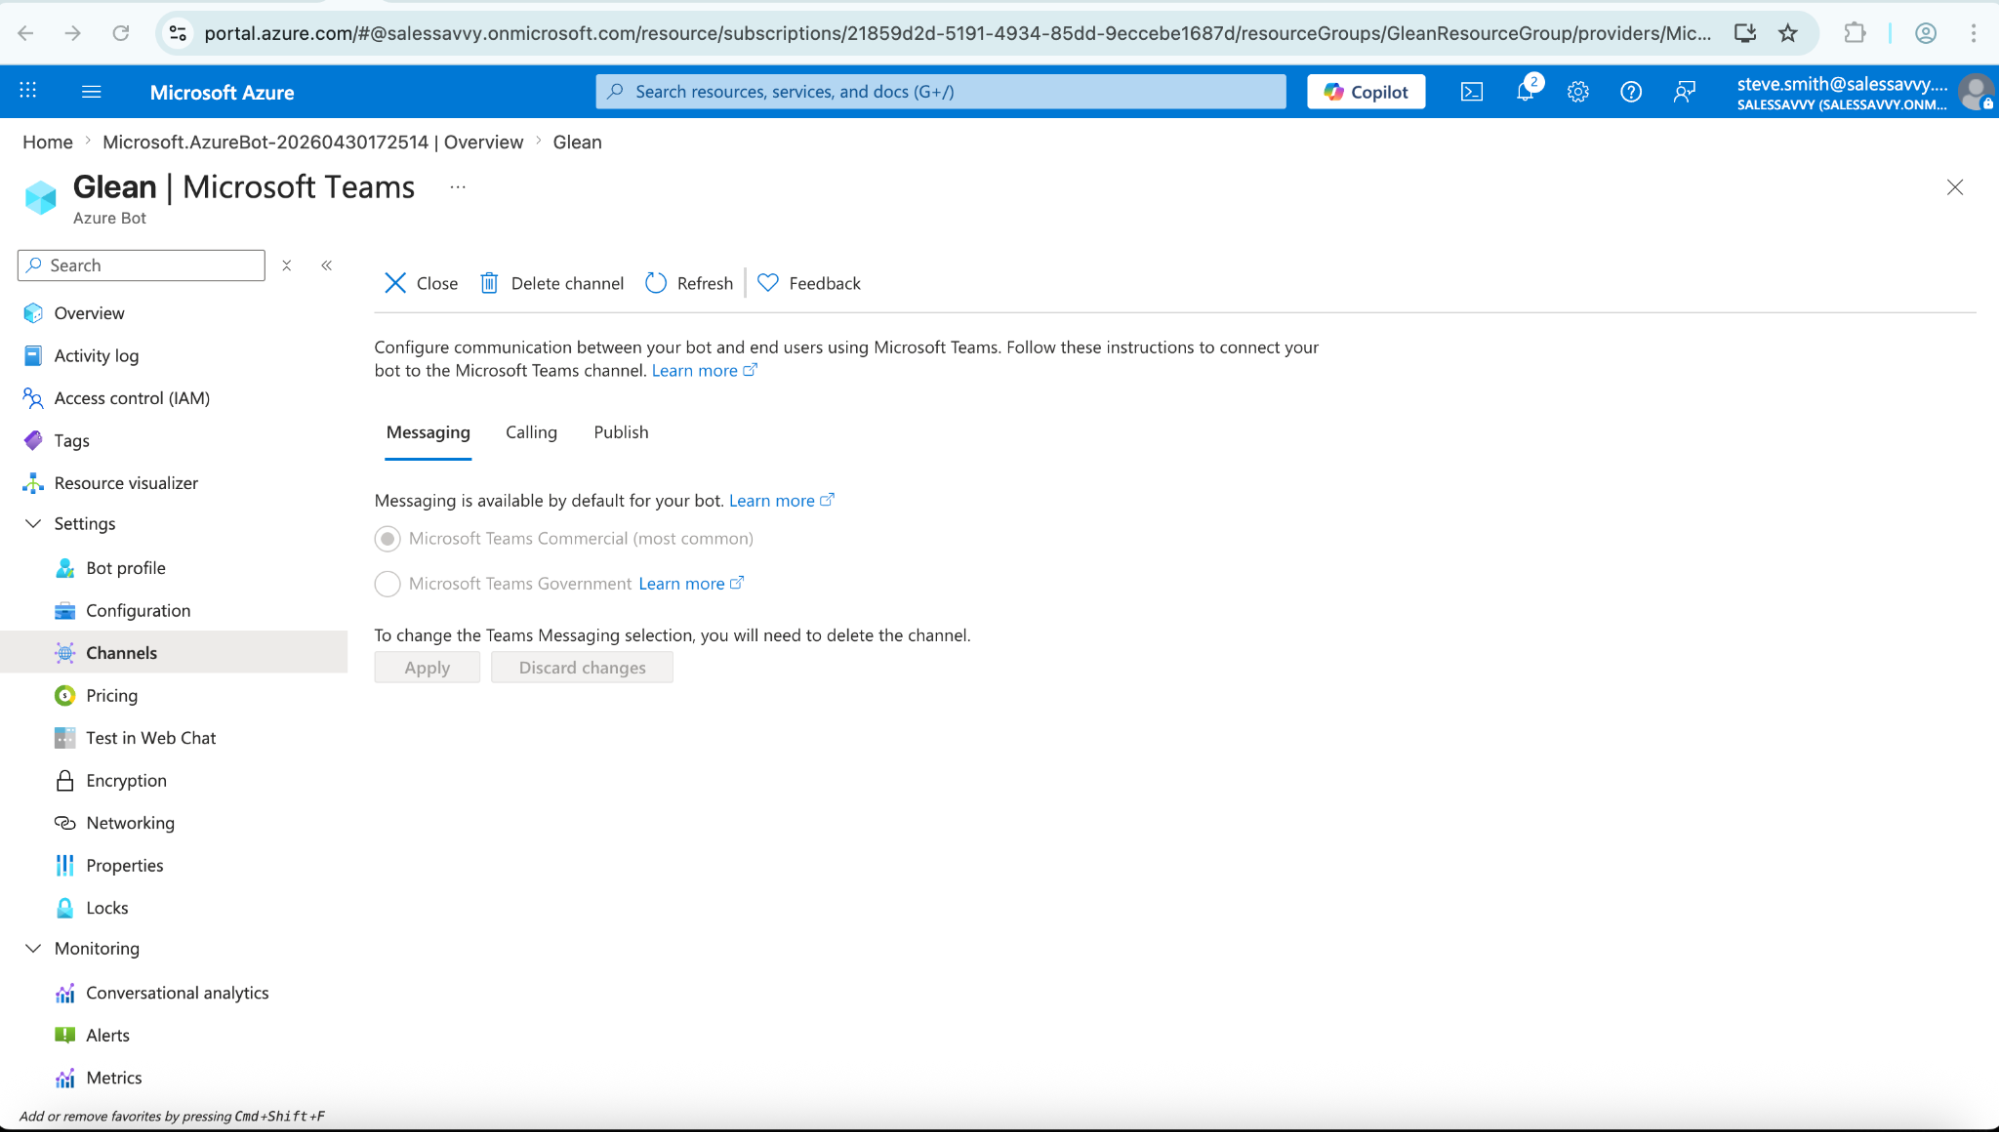
Select Channels in the left navigation. Under Available channels, click Microsoft Teams. Select Microsoft Teams Commercial and click Apply.
-
Select Configuration again and click Manage Password (next to the Microsoft App ID field). On the Certificates & secrets page, click New client secret, add a description, then click Add.
noteCopy the client secret value immediately — you cannot retrieve it after navigating away. You will need this value in Phase 3.
-
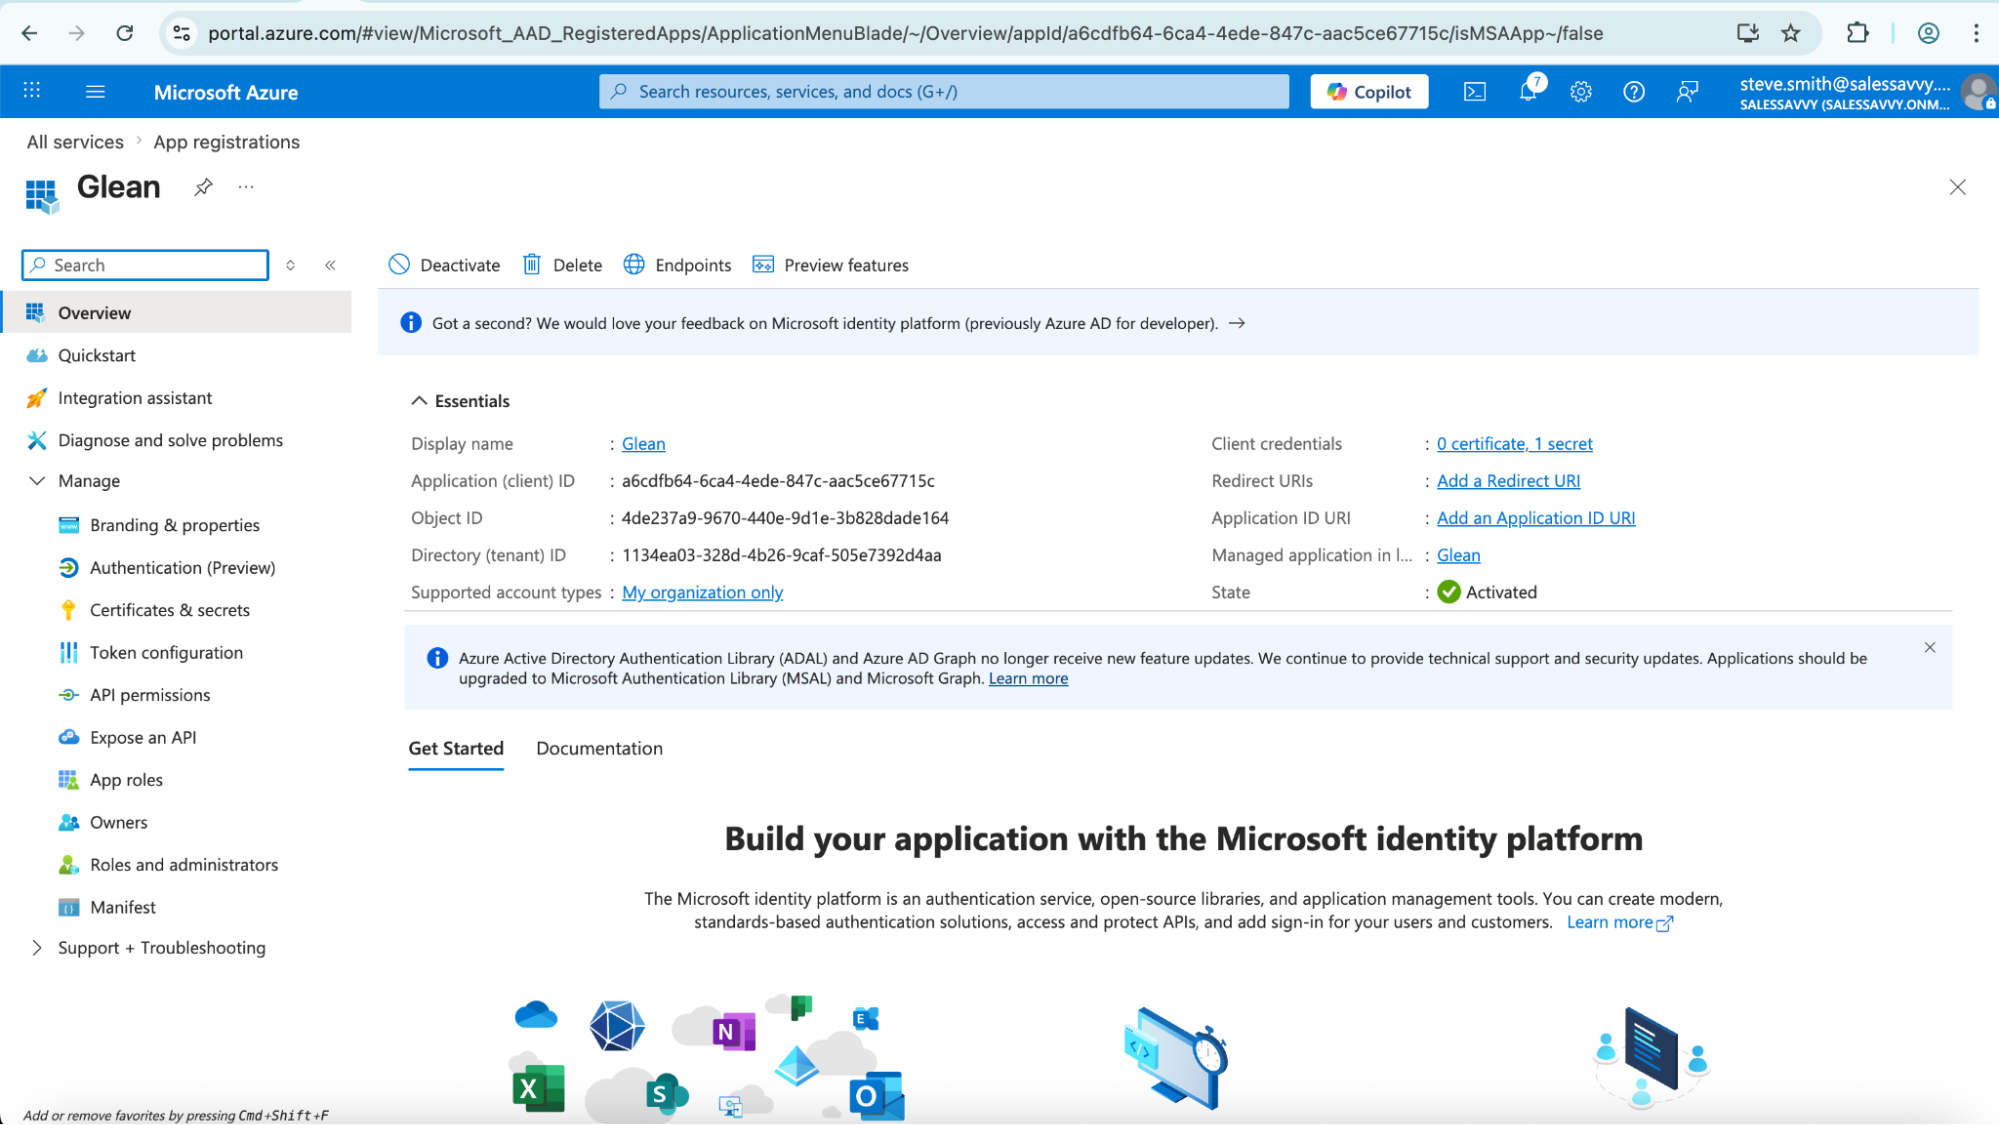
Select Overview in the left navigation and copy the Application (client) ID. You will need this value in Phase 3.

Create the Glean app
-
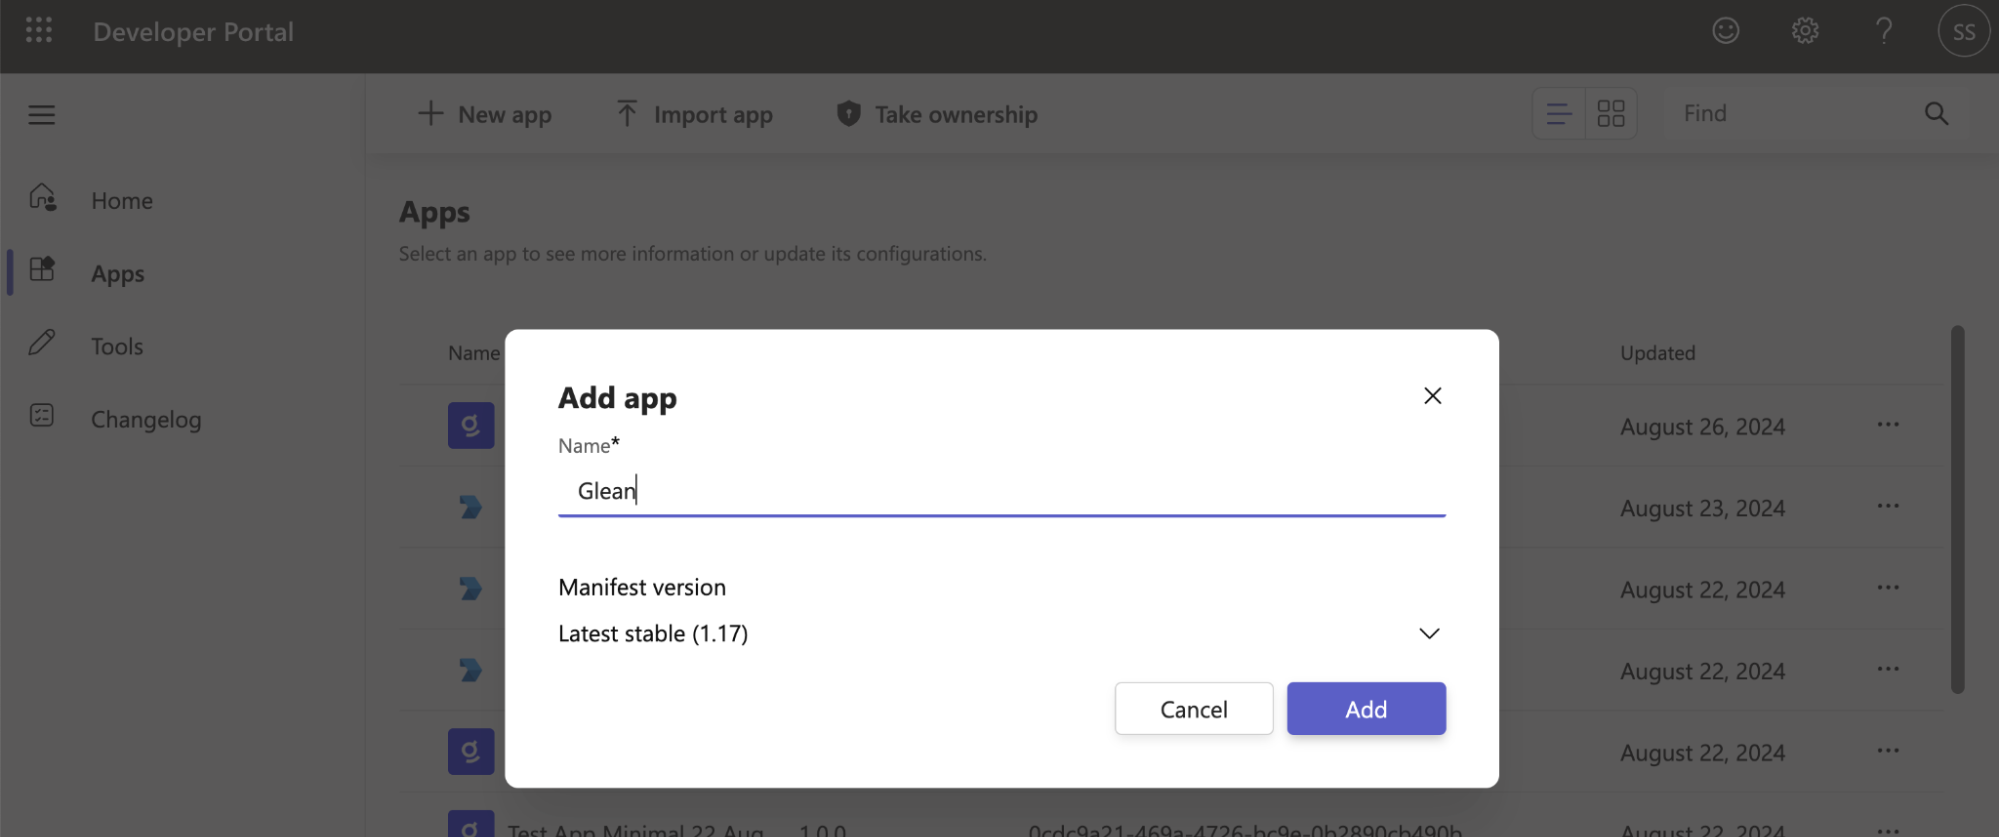
Go to the Teams Developer Portal. In the left navigation, select Apps, then click + New app.

-
In the Add app dialog, enter
Gleanas the name and click Add.noteThis is the name that appears in the Teams Admin Center and to end users in Microsoft Teams.
-
In the Basic information tab, fill in the following fields:
Field Value Short description Trusted search and generative AI for work. Long description Glean unlocks your company's knowledge and enables powerful work AI for everyone. Developer or company name Glean Work Website https://www.glean.com Privacy policy https://www.glean.com/privacy-policy Terms of use https://www.glean.com/terms -
In the Application (client) ID field, paste the Application (client) ID you copied earlier, then click Save.
Customize branding
-
In the left navigation, select Branding. Upload the color icon and outline icon, and set the accent color to
#343ced.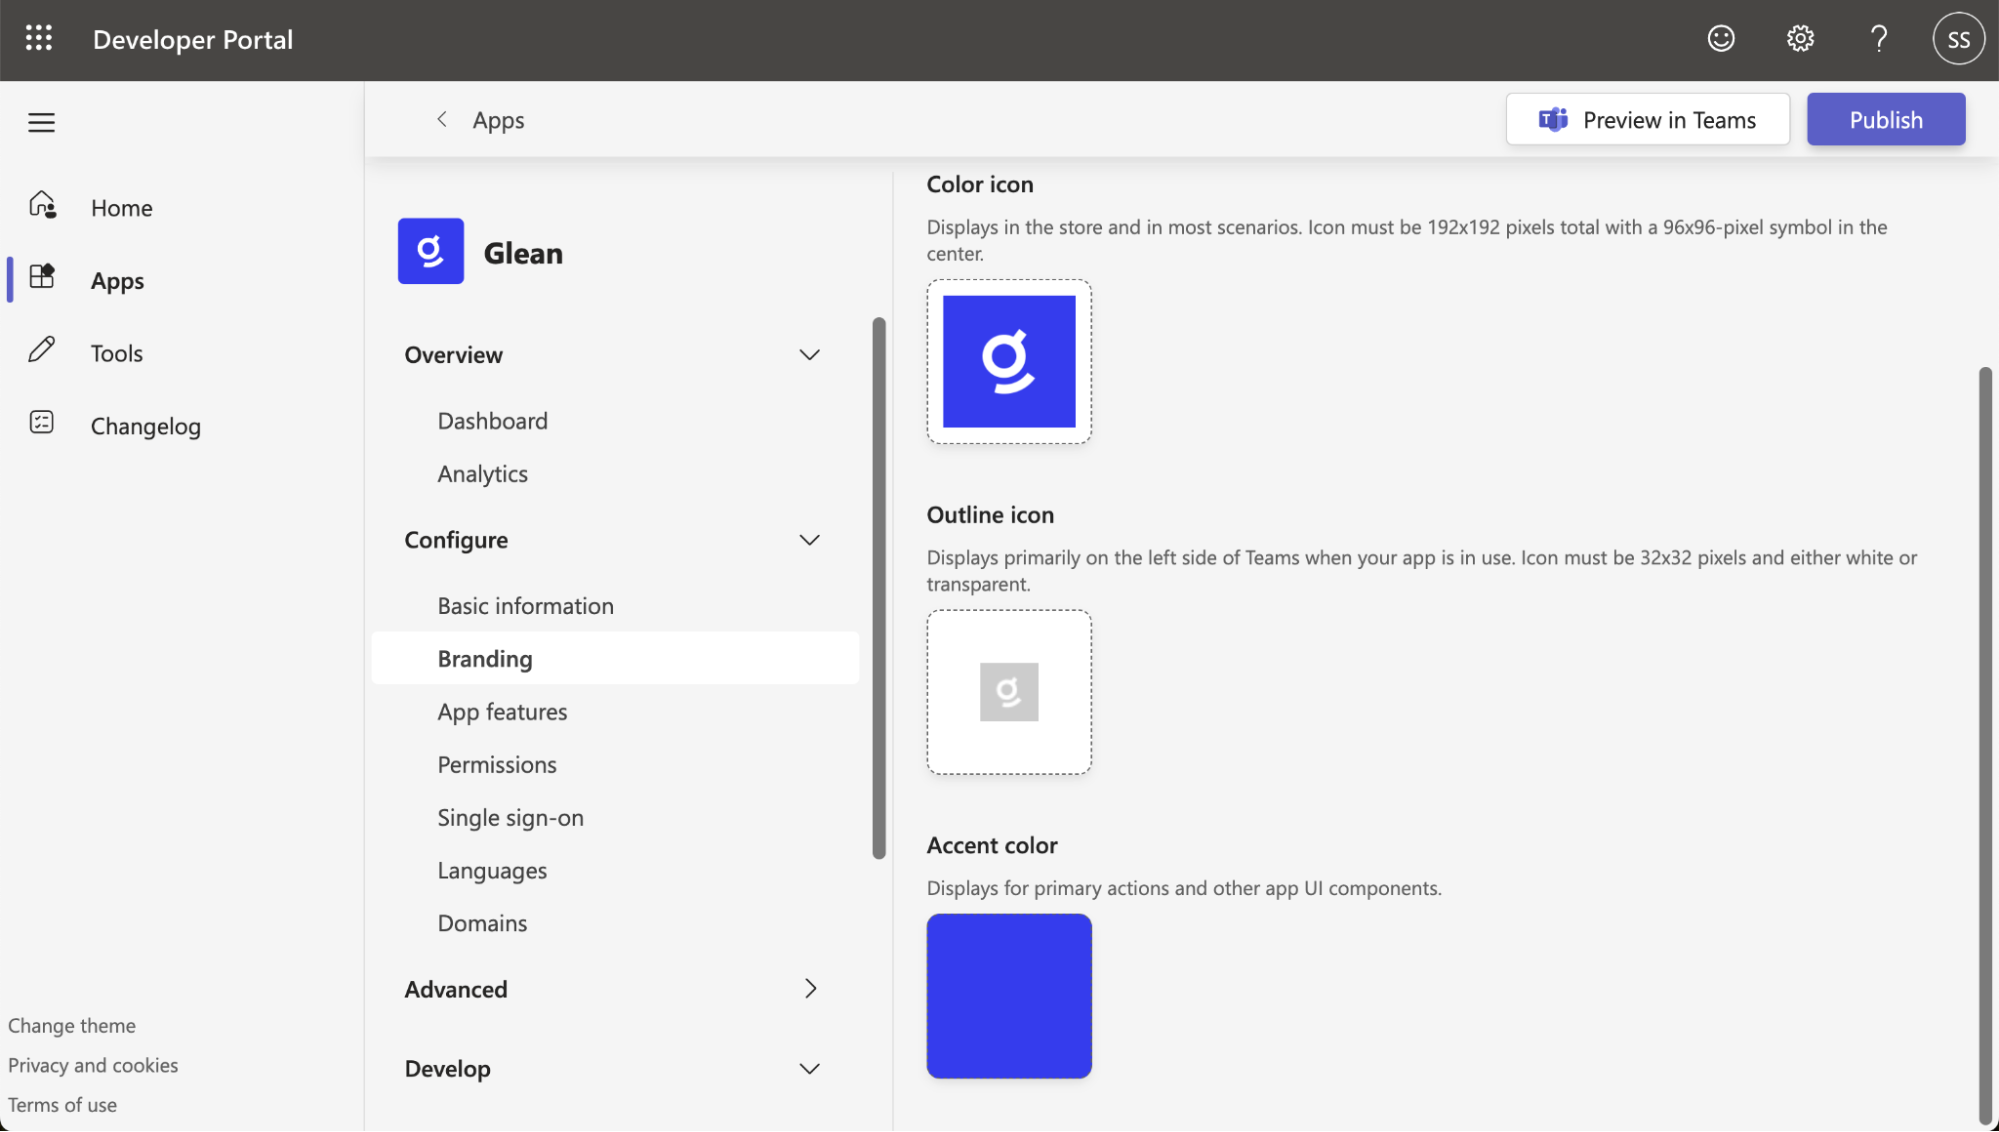

Configure app features
-
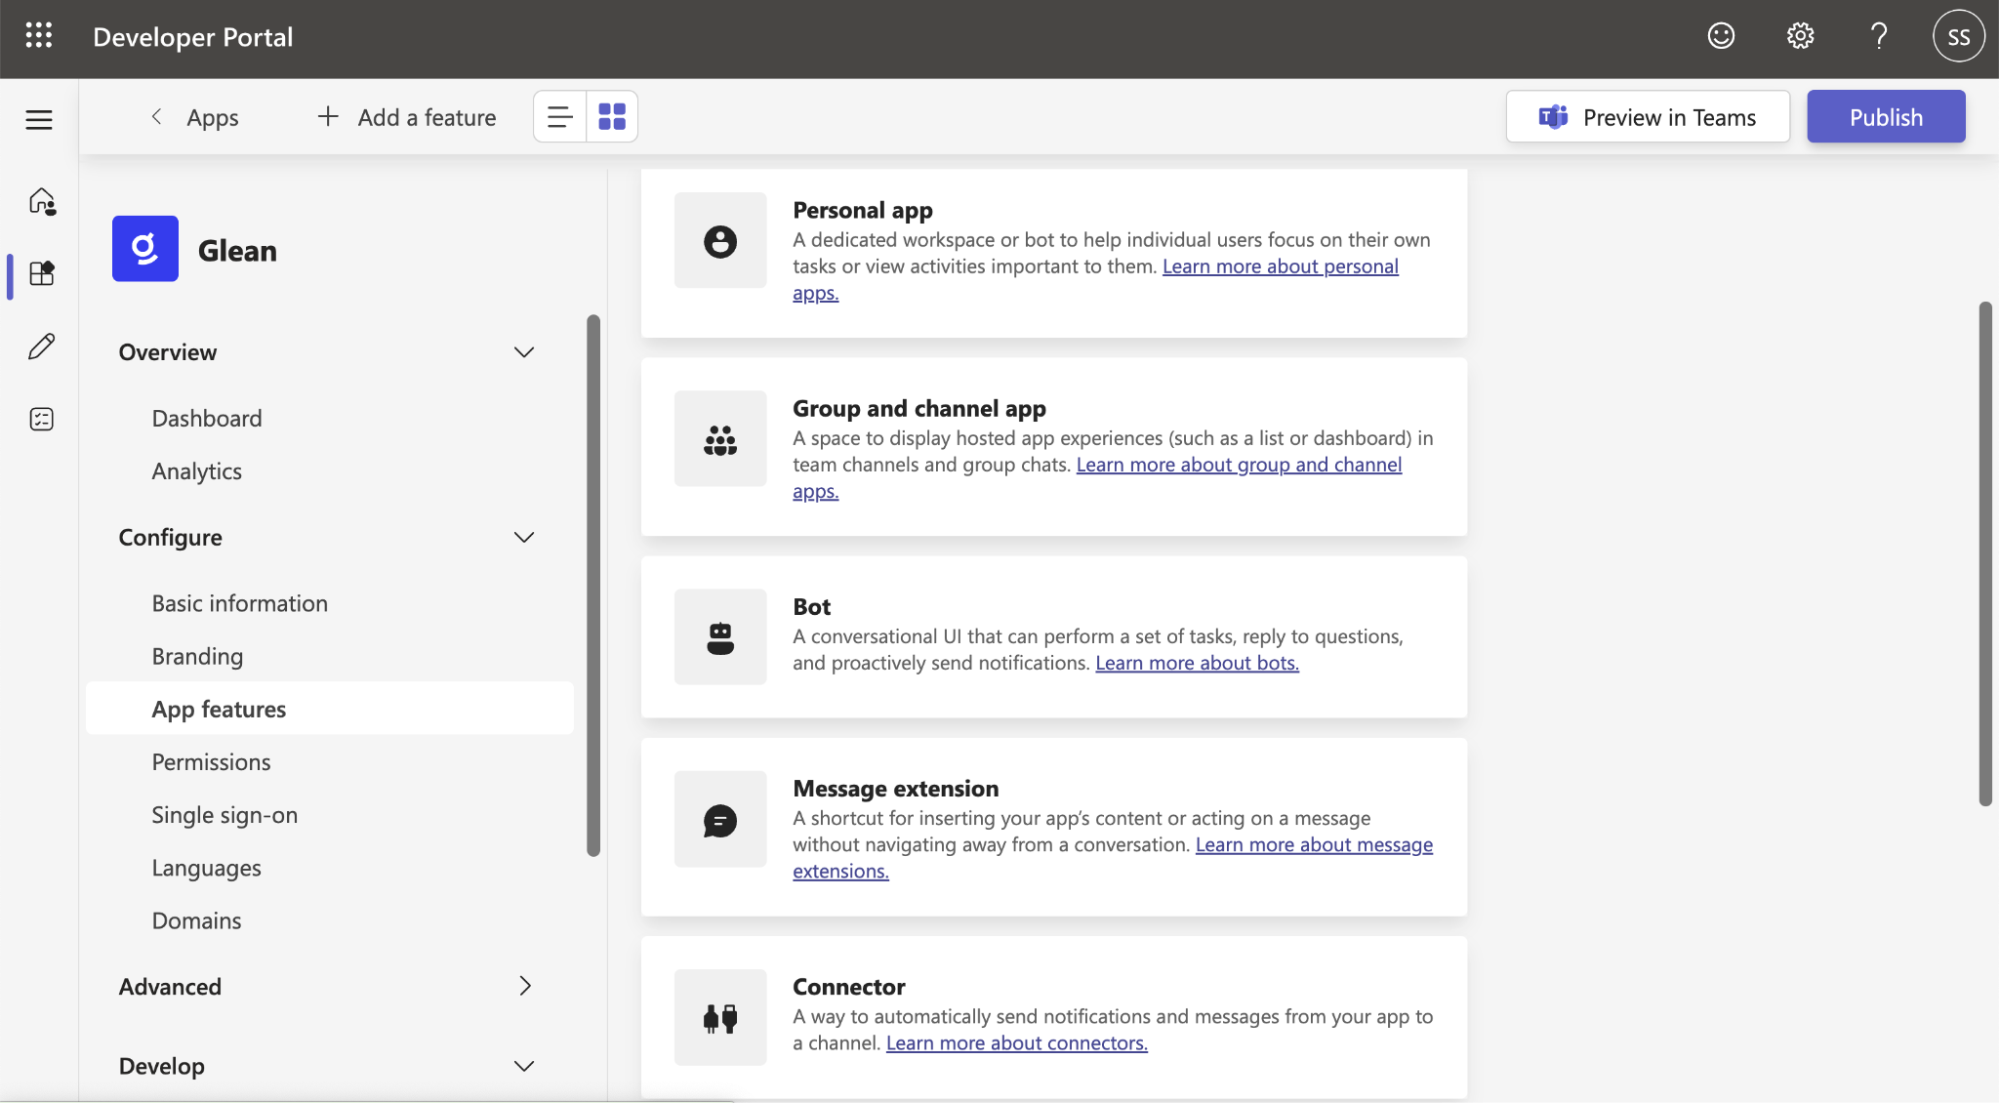
In the left navigation, select App features, then click Bot.
-
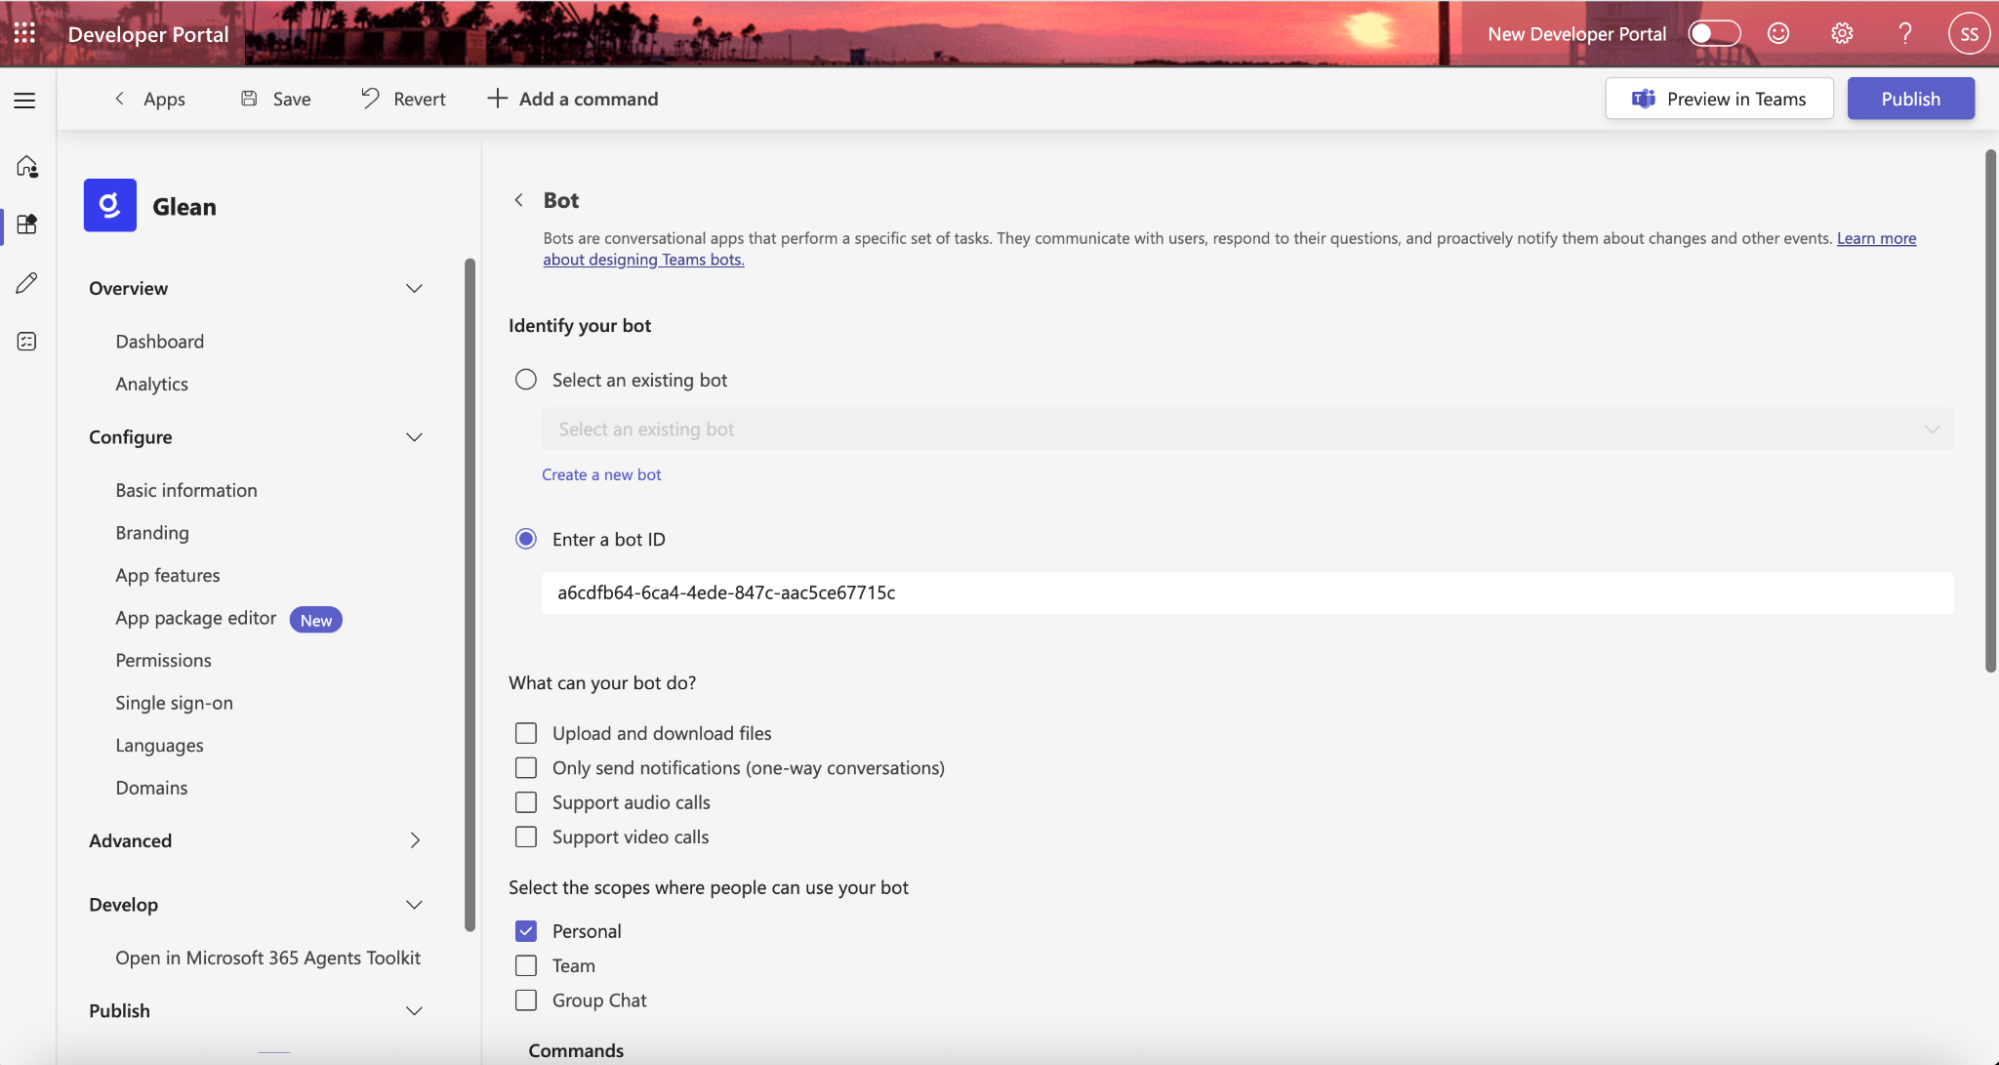
Select Enter a bot ID and paste the Application (client) ID you copied earlier. Under Select the scopes where people can use your bot, select Personal only (the current version supports personal DM only). Click Save.
-
Click Add a command to add starter prompts. Starter prompts appear when users first open the Glean app in Teams. The following prompts are recommended:
Command title Command Summarize documents Summarize <linked documents>and highlight key points on specific topicsHelp me write Write an [email, company announcement, etc] on [project explanation] Who should I ask Who is the subject matter expert on [topic] to ask about [describe question]? Learn more about a project Research a new project. Identify insights, resources, and subject matter experts Ask about a company policy Find and research company policies and answer specific questions. Learn about a team Research a team's focus area and current projects. Prepare for an executive review Identify questions that could be asked during a presentation to an executive. Explain acronym Expand and provide a detailed explanation of the given acronym. Brainstorm Brainstorm ideas for a presentation on [Project Name] Explain a technical term Provide a clear and simple explanation of a technical term. 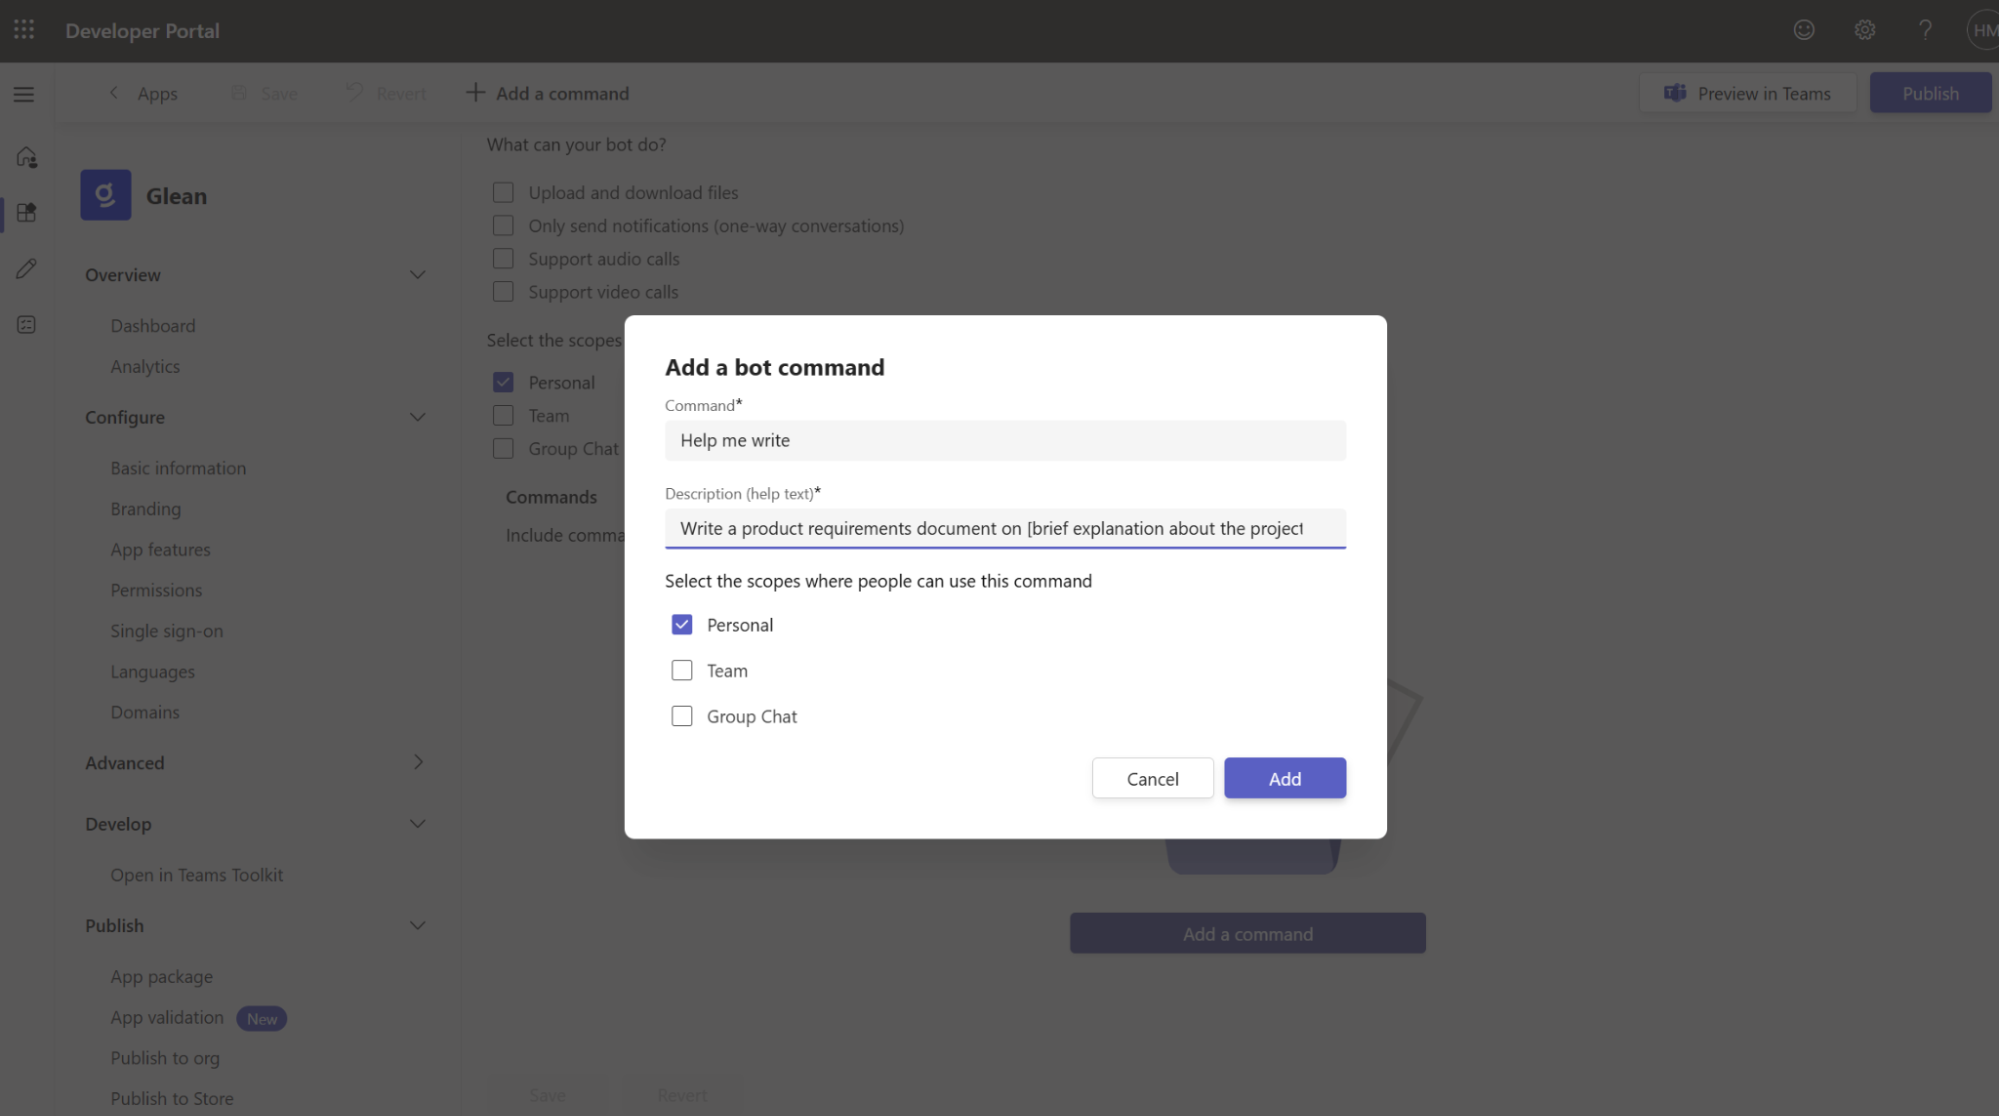
-
(Optional) If you plan to enable channel or group chat support in the future, select Permissions in the left navigation. Under Team permissions, select
ChannelMessage.Read.Group. Under Chat/Meeting permissions, selectChatMessage.Read.Chat.

-
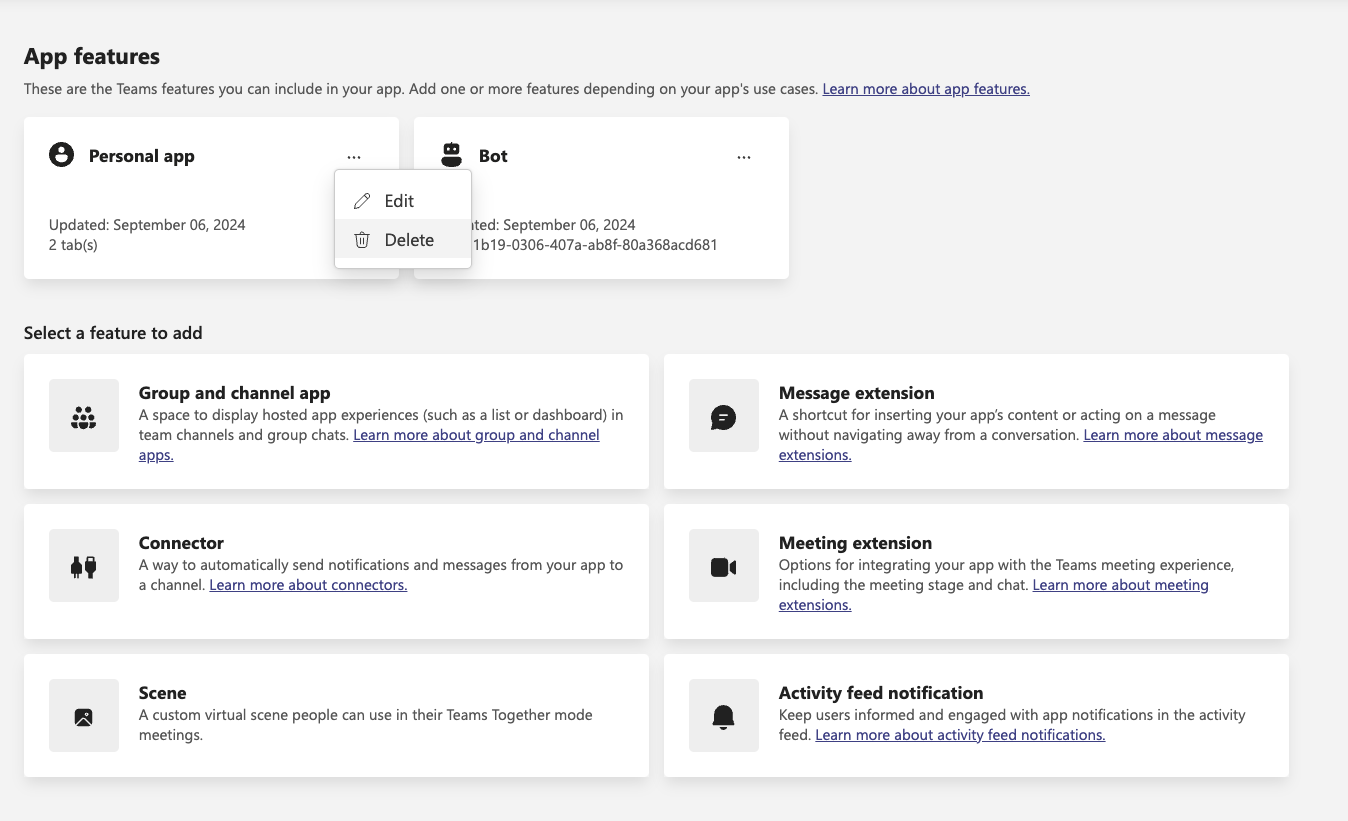
Refresh the page and return to App features. If a Personal app entry was added automatically, open its menu and click Delete.
Publish the app to your organization
-
In the left navigation, under Publish, select Publish to org. Click Publish your app, then select Publish to your org.
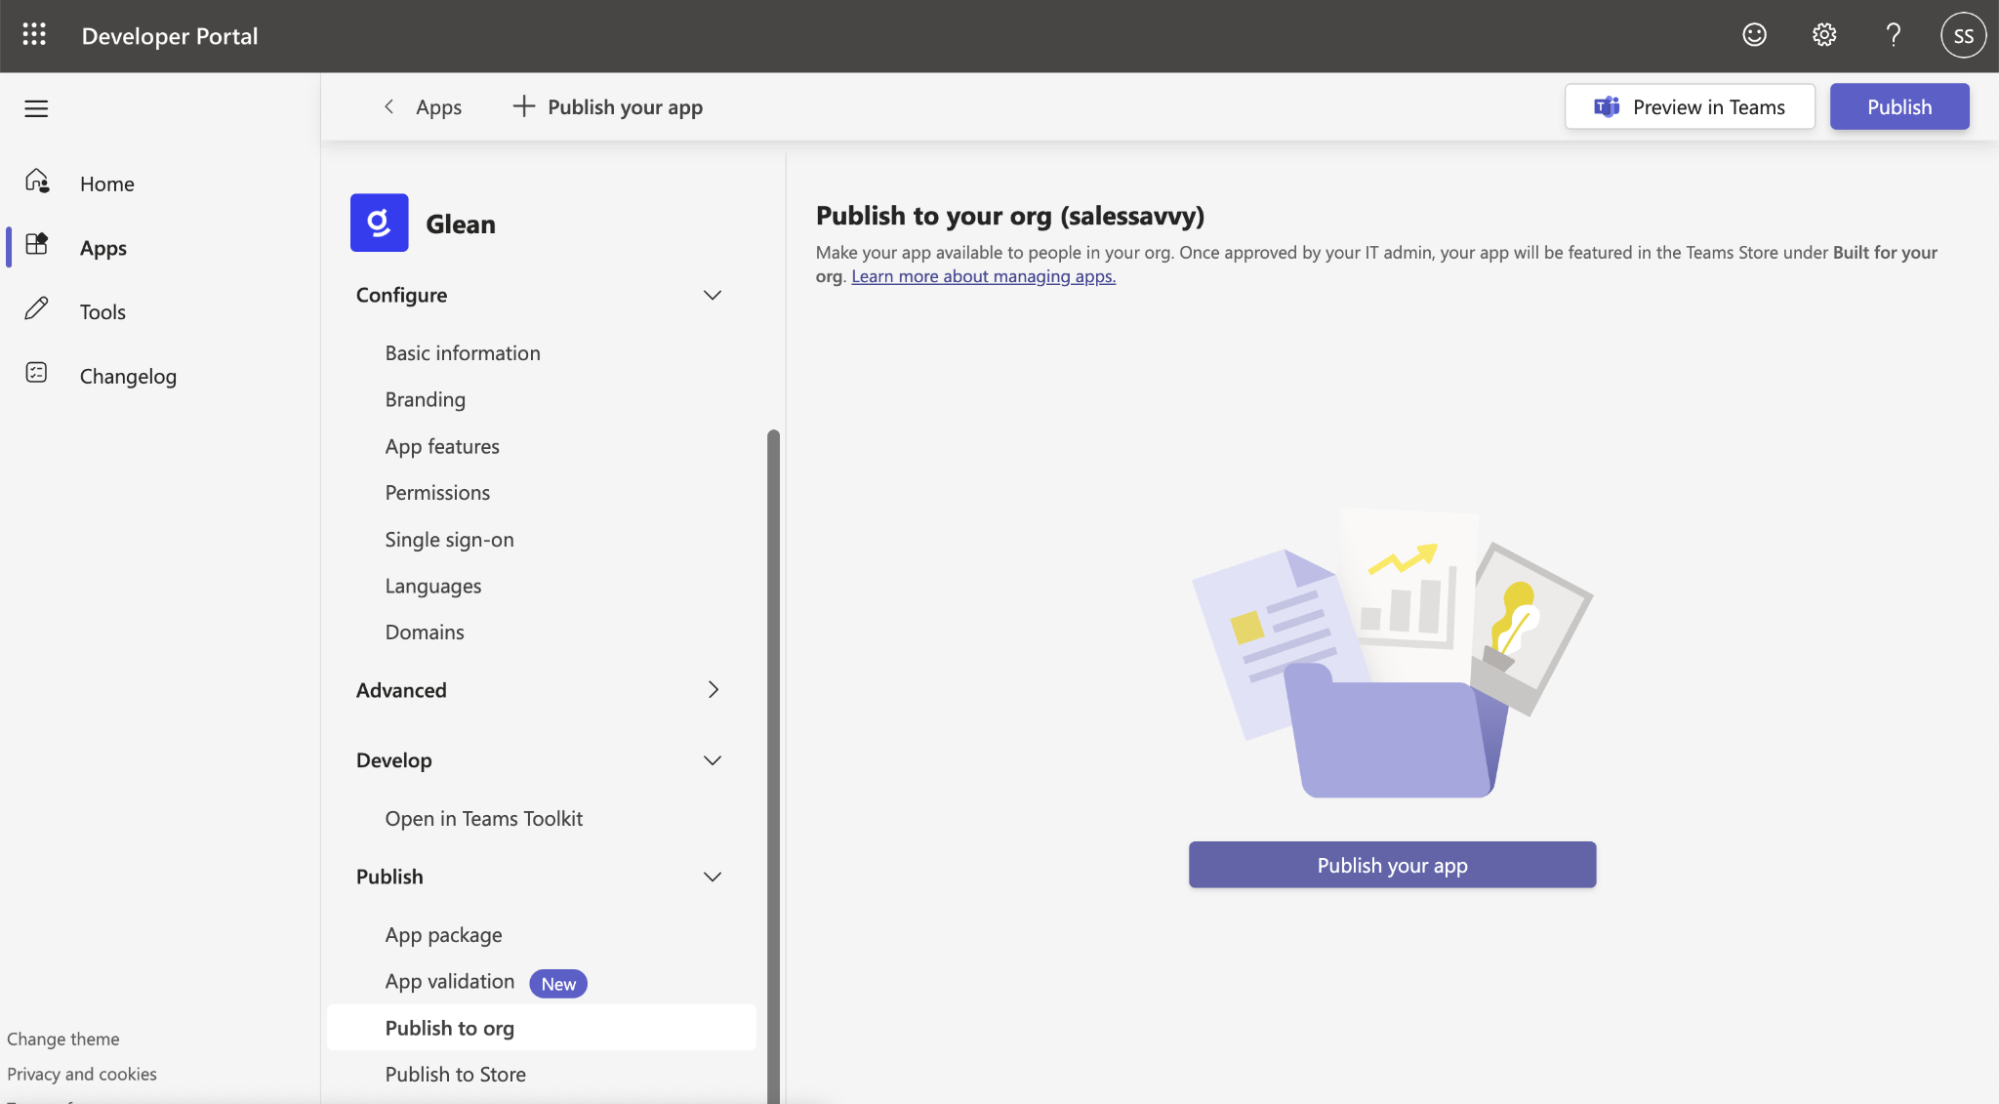 note
noteDeployment to specific groups or users is managed in the Teams Admin Center during Phase 2.
Phase 2: Deploy via Teams Admin Center
Publish the Glean app
-
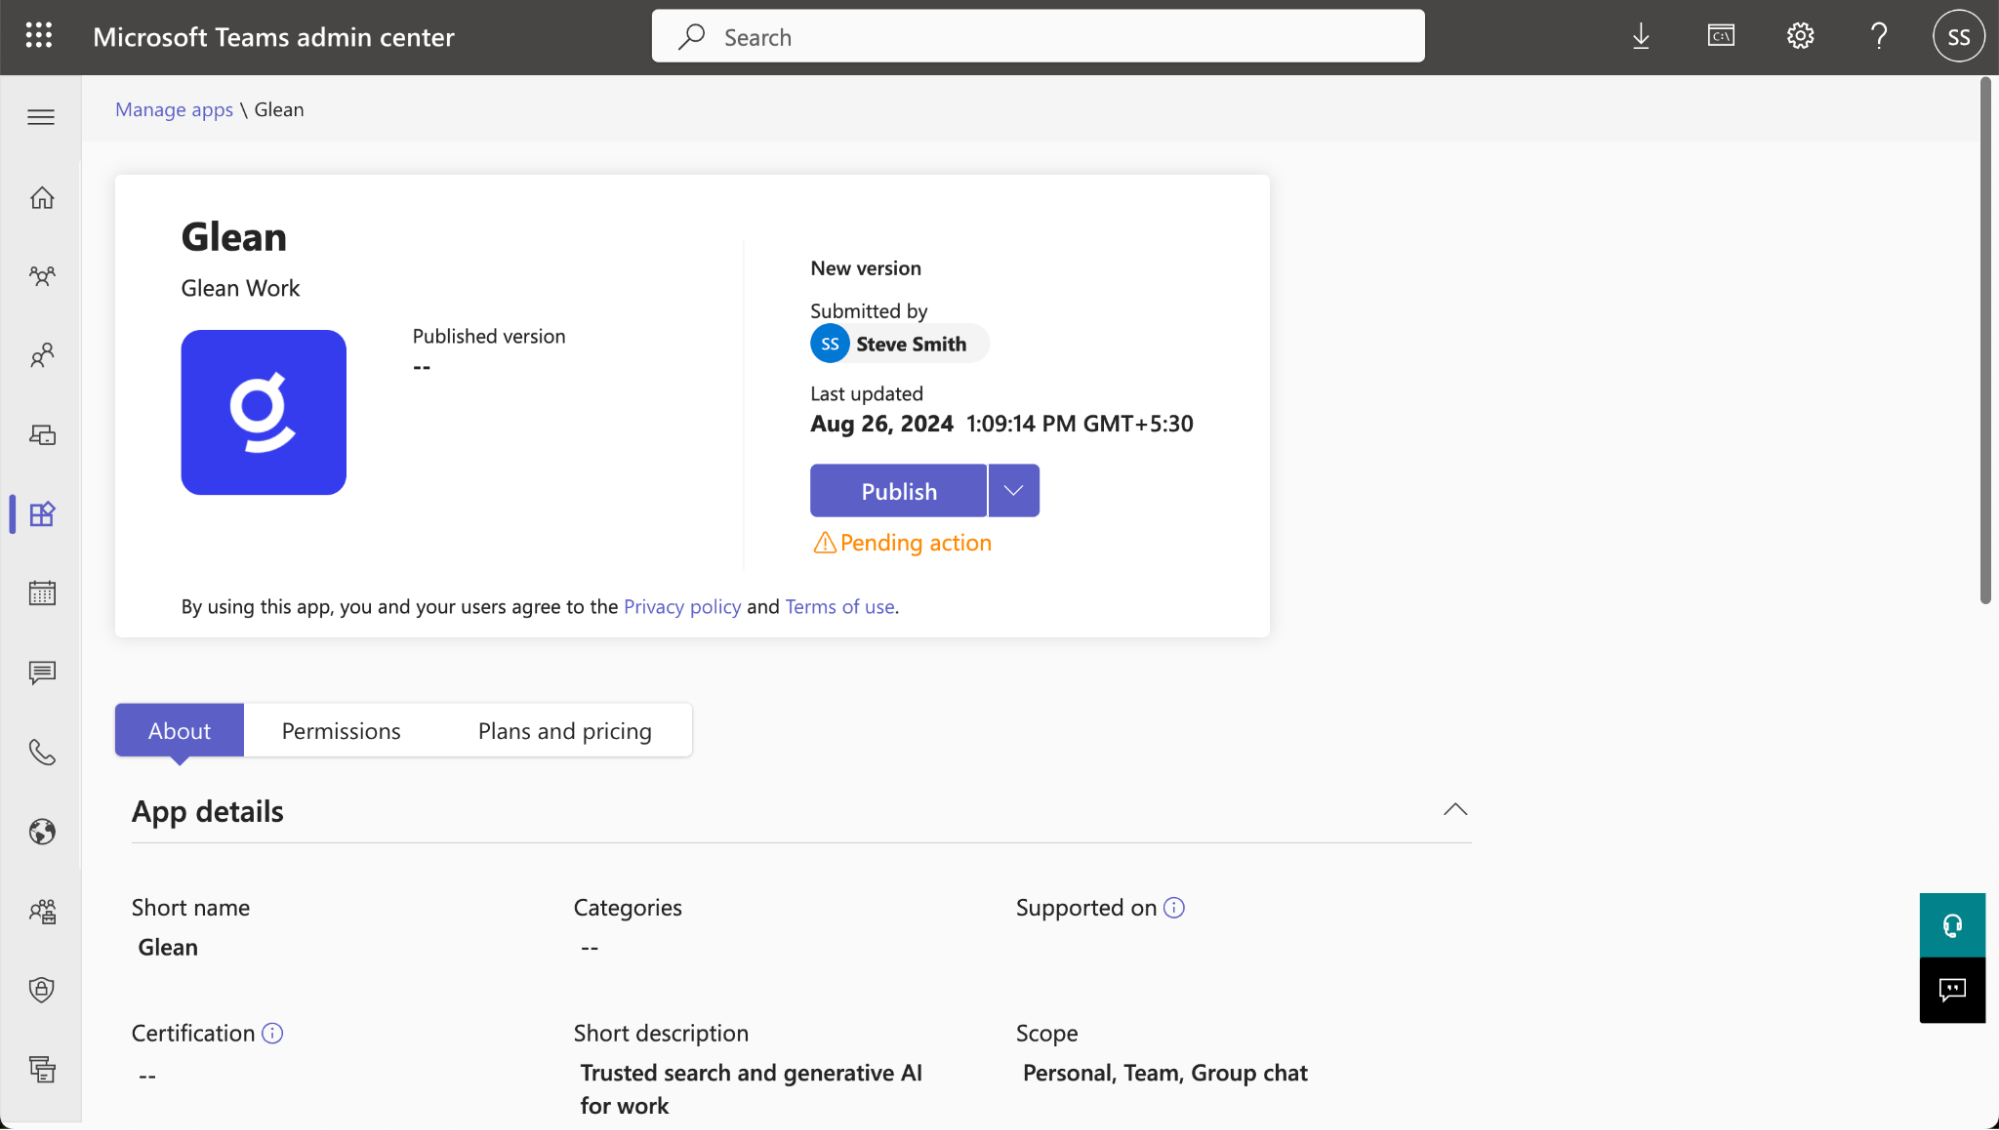
Go to the Teams Admin Center. In the left navigation, go to Teams apps → Manage apps. Search for
Glean. The app status is Blocked by default.
-
Click the Glean app to open its settings, then click Publish to allow it.
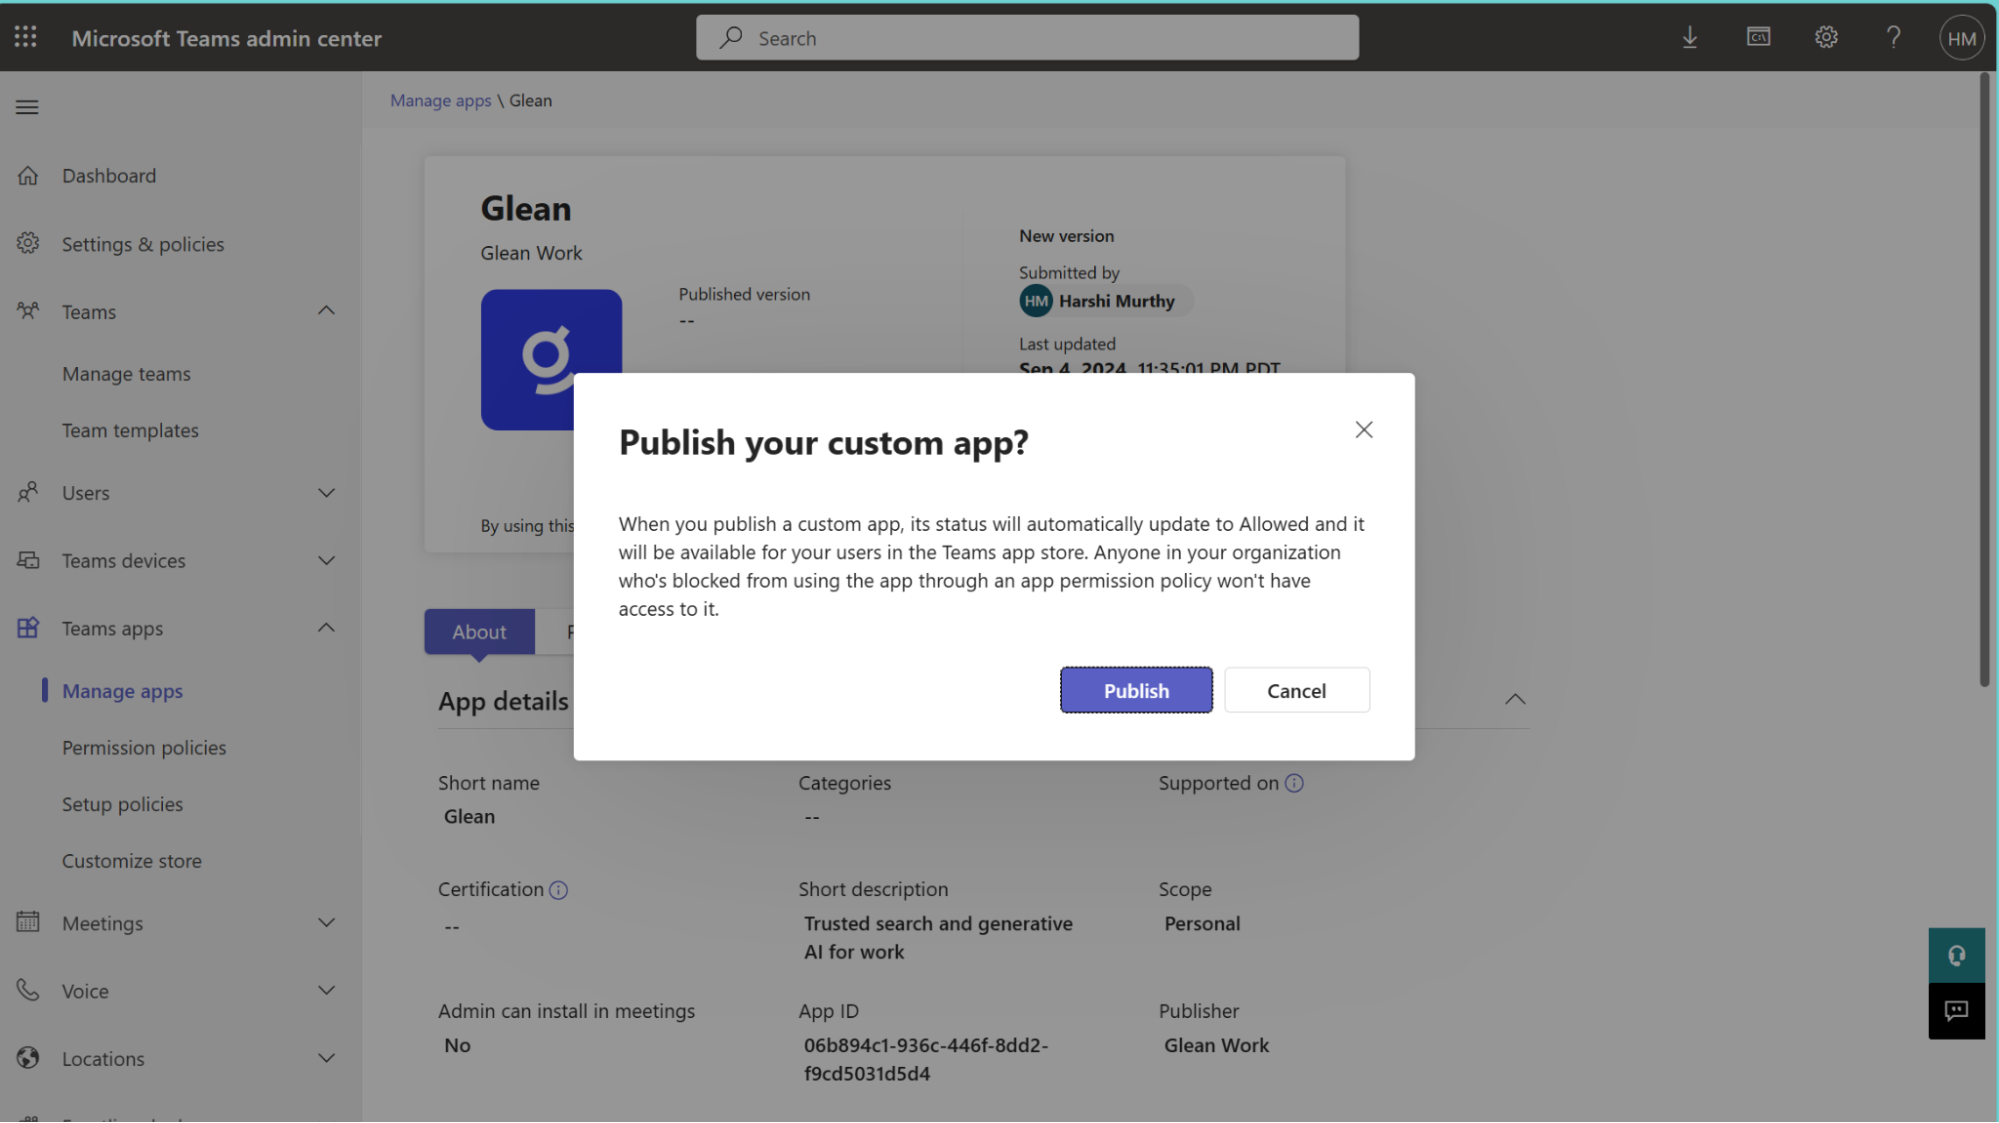
After publishing, it takes approximately 24 hours for the Glean app to appear in the Teams store.
-
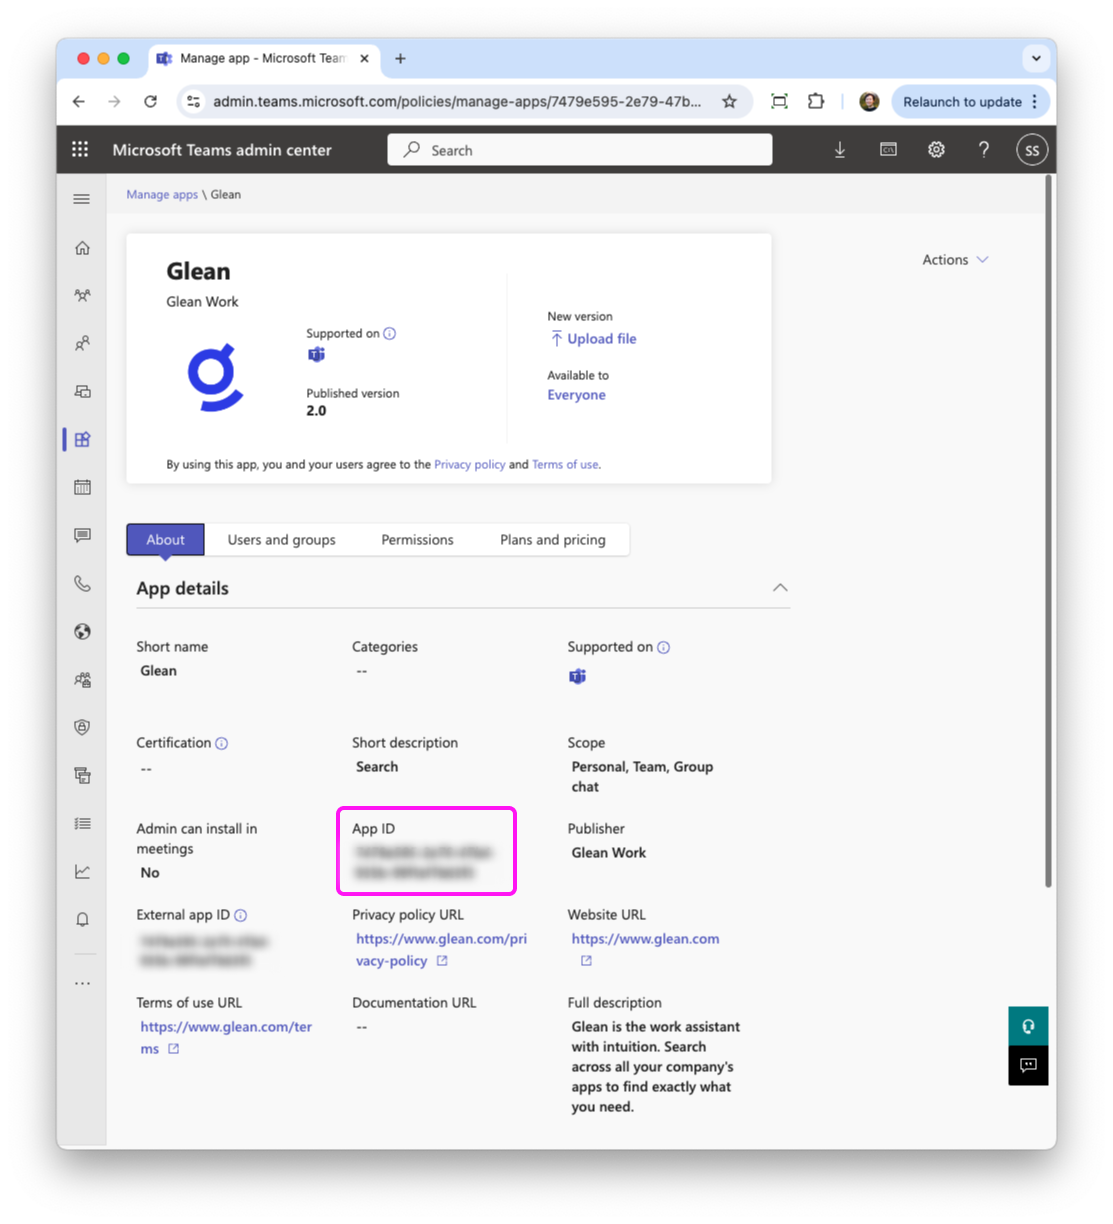
Copy the App ID shown on the Glean app page — you will need this value in Phase 3.
Manage access (optional)
-
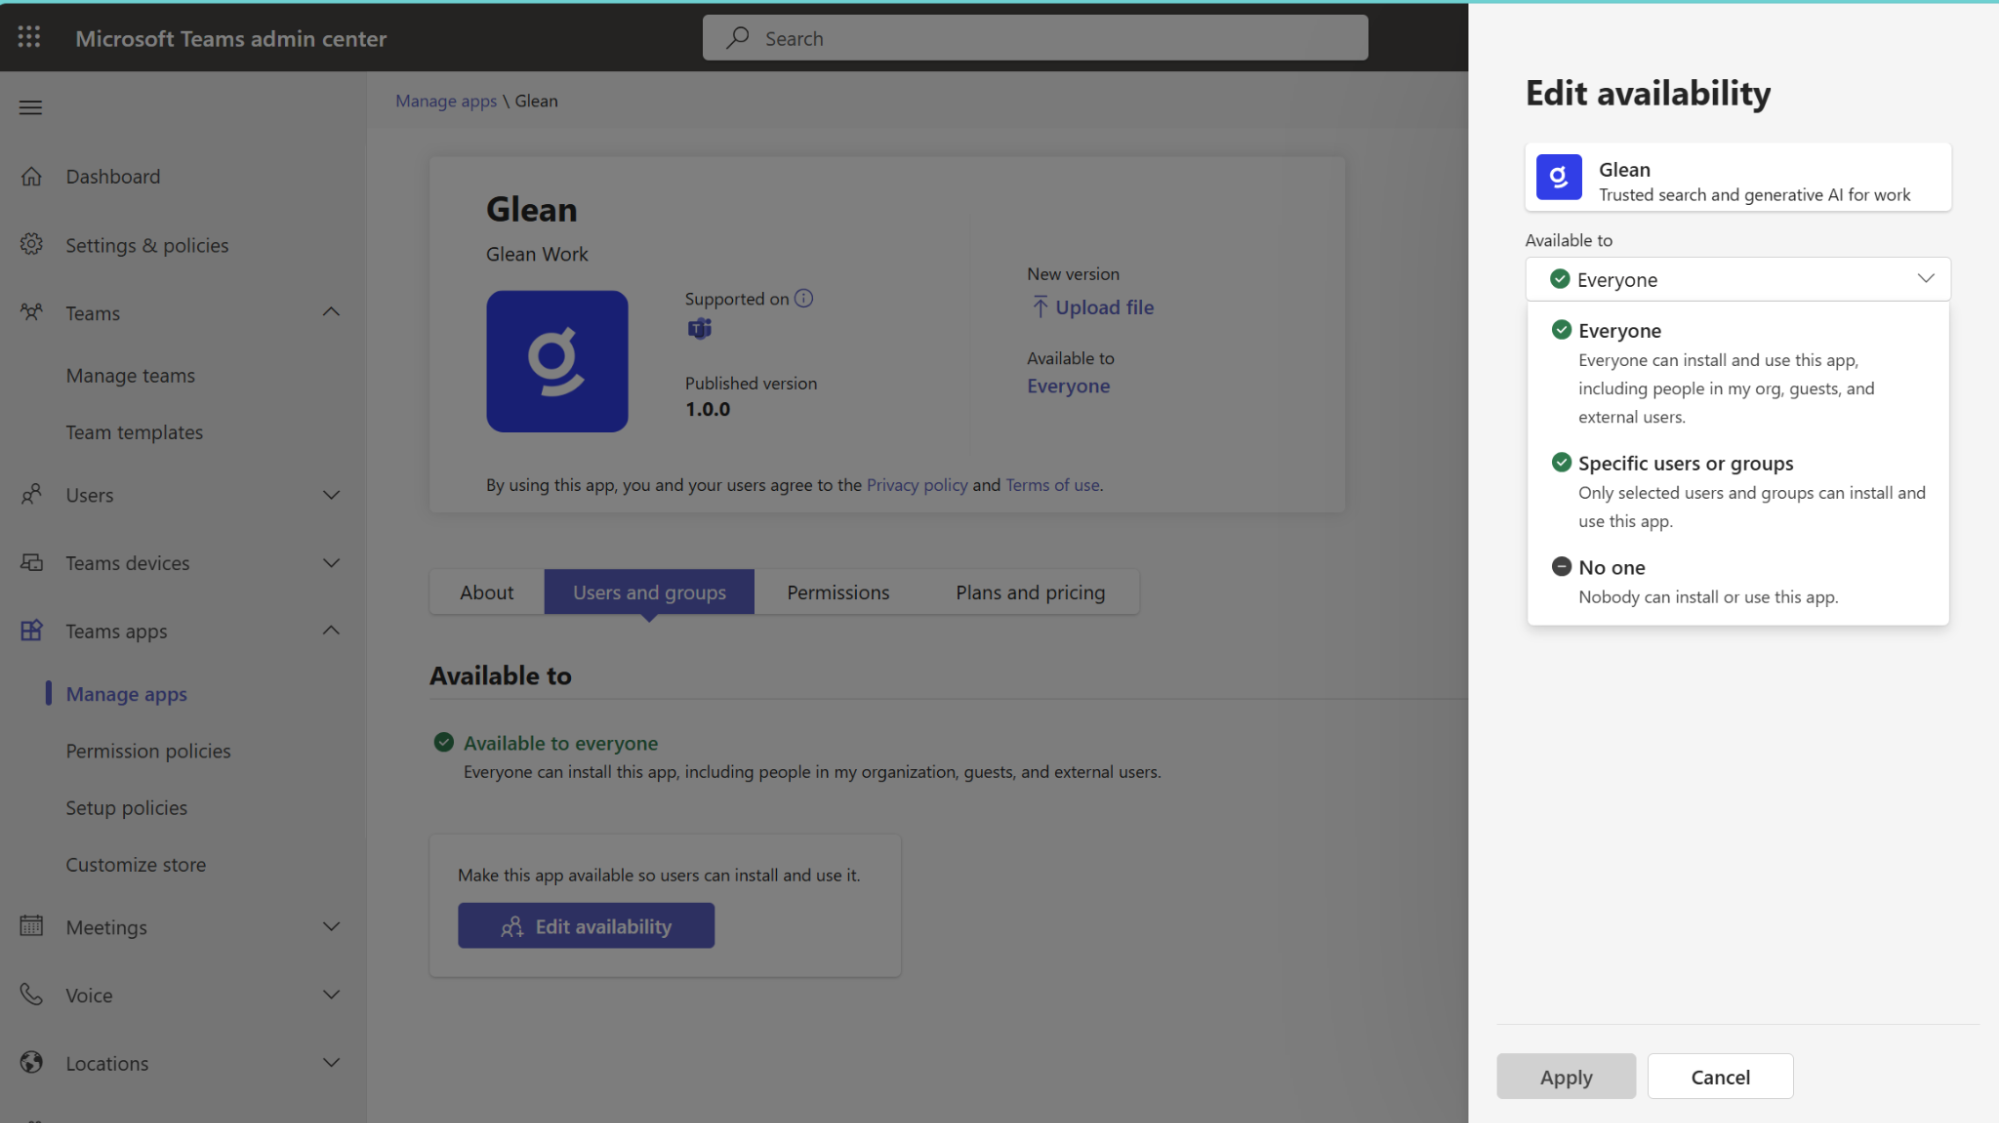
By default, the Glean app is available to everyone in your organization. To restrict access, go to the Users and groups tab within the Glean app settings and click Edit availability.
Install and pin Glean in the Teams sidebar (optional, recommended)
Pinning the Glean app to the Teams sidebar makes it immediately accessible to users from the main Teams interface.
-
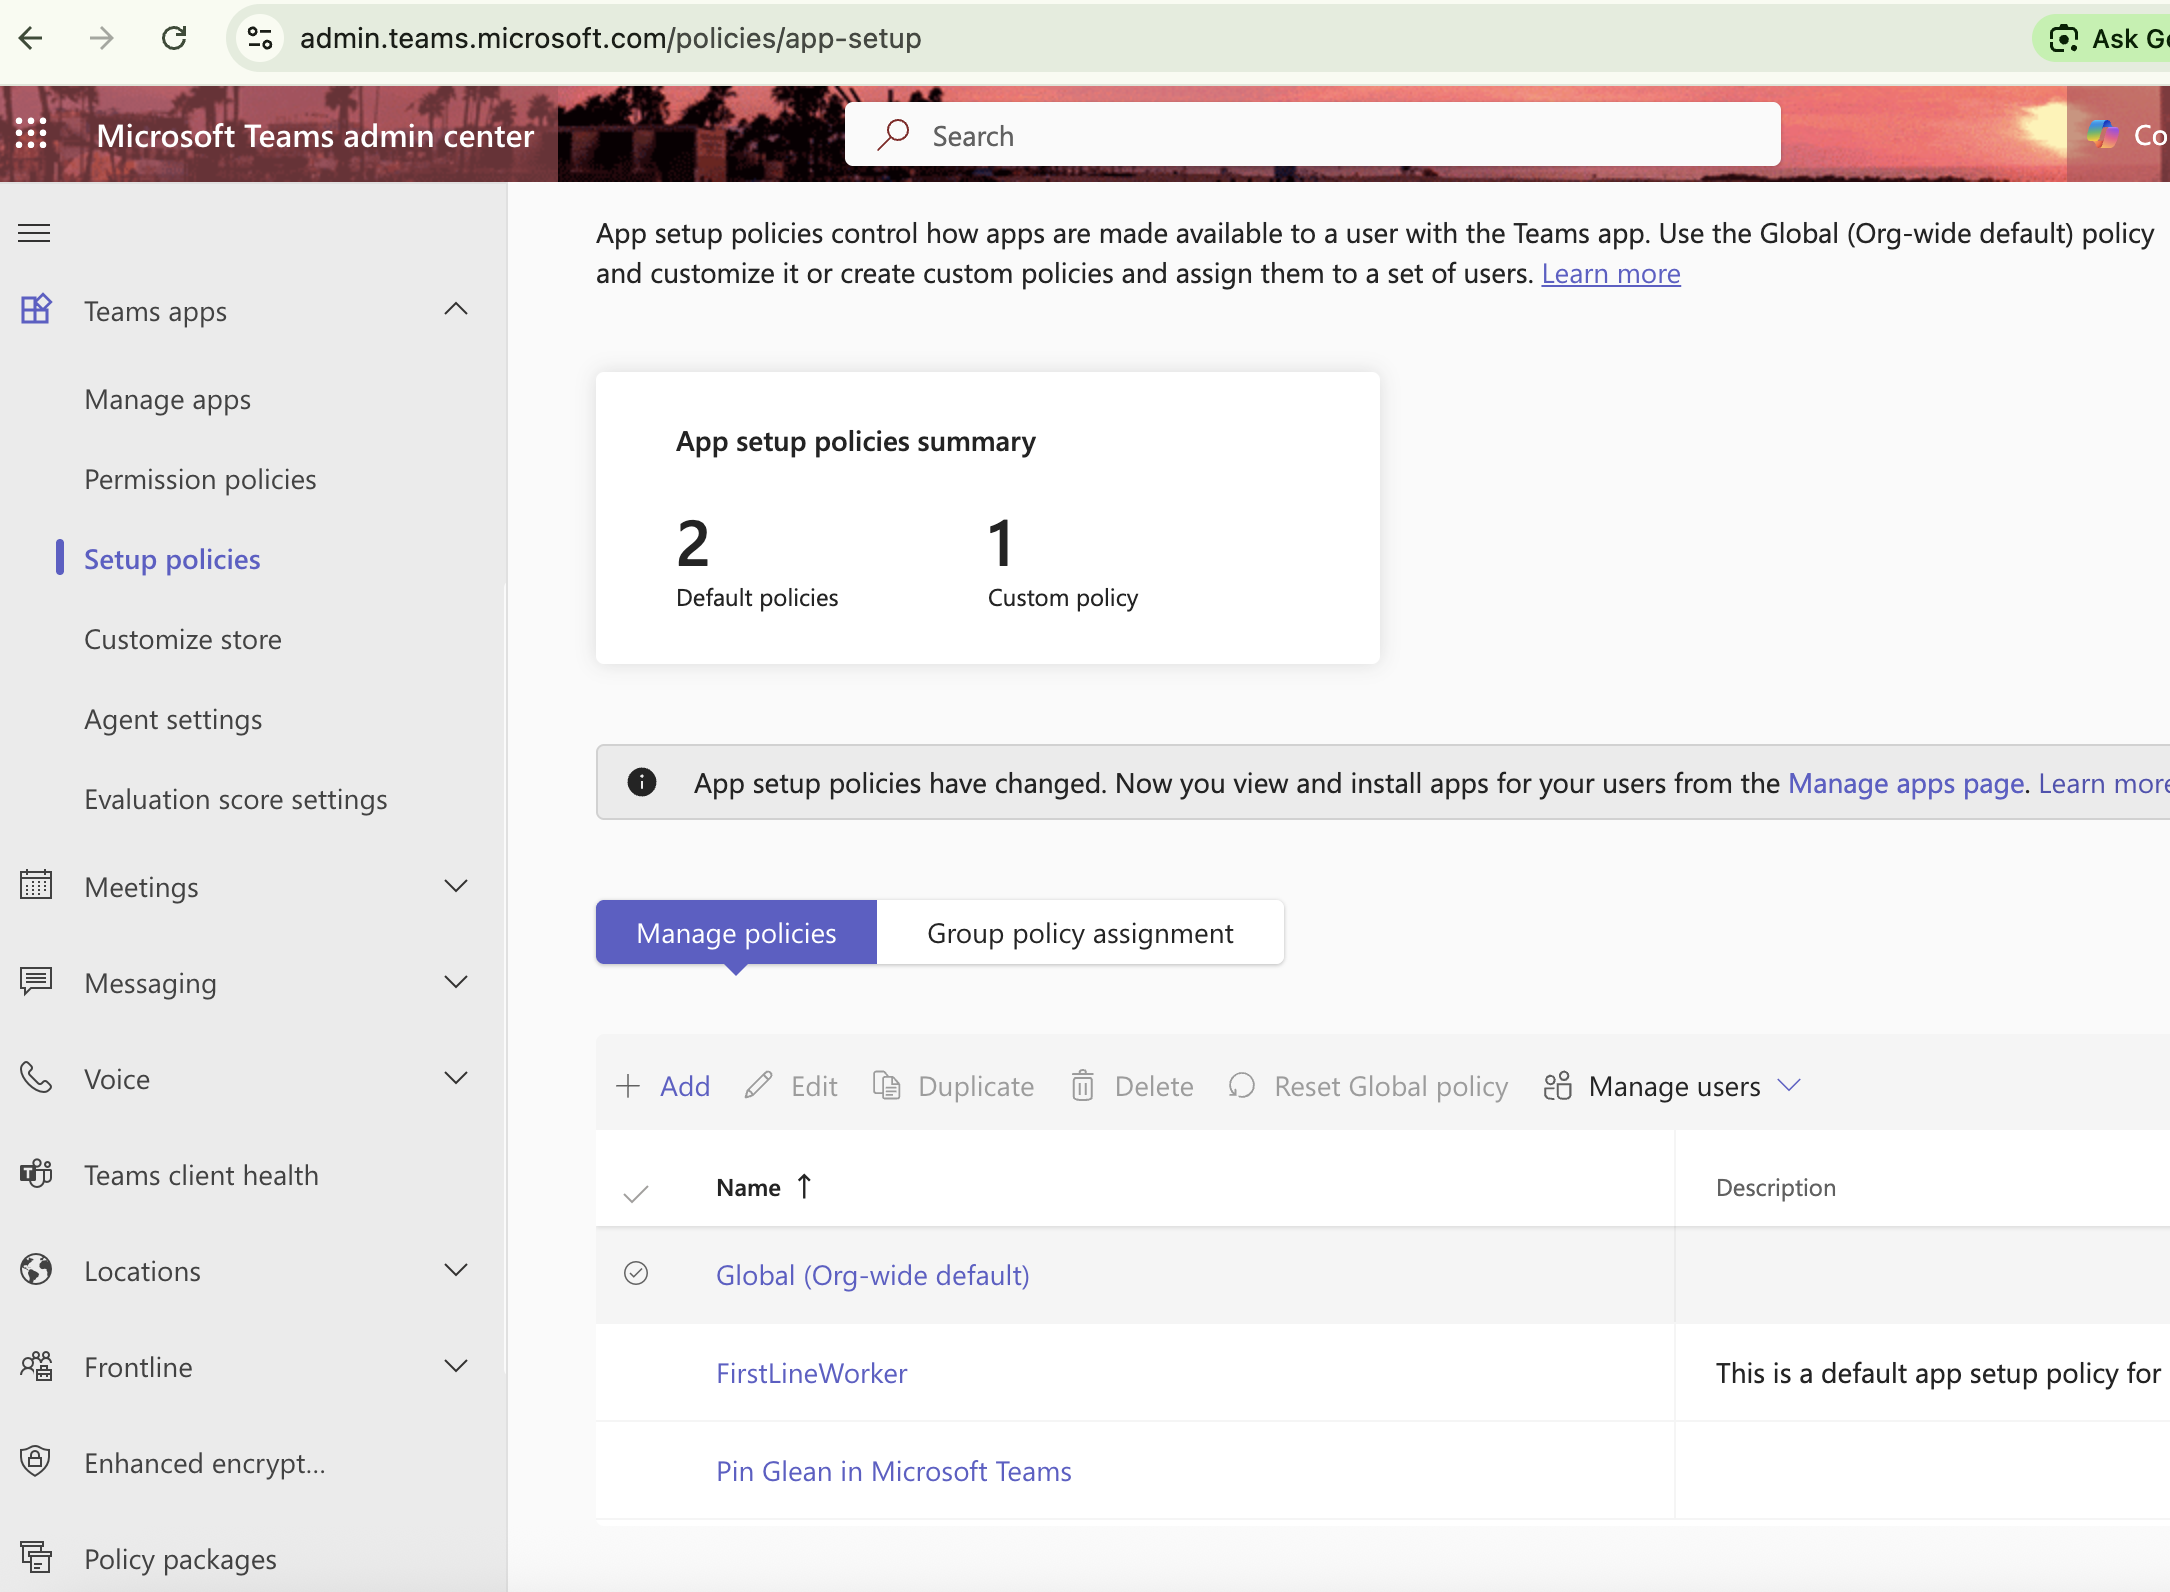
In the Teams Admin Center left navigation, select Teams apps → Setup policies. Select the policy that applies to your target users, such as the Global (Org-wide default) policy.
-
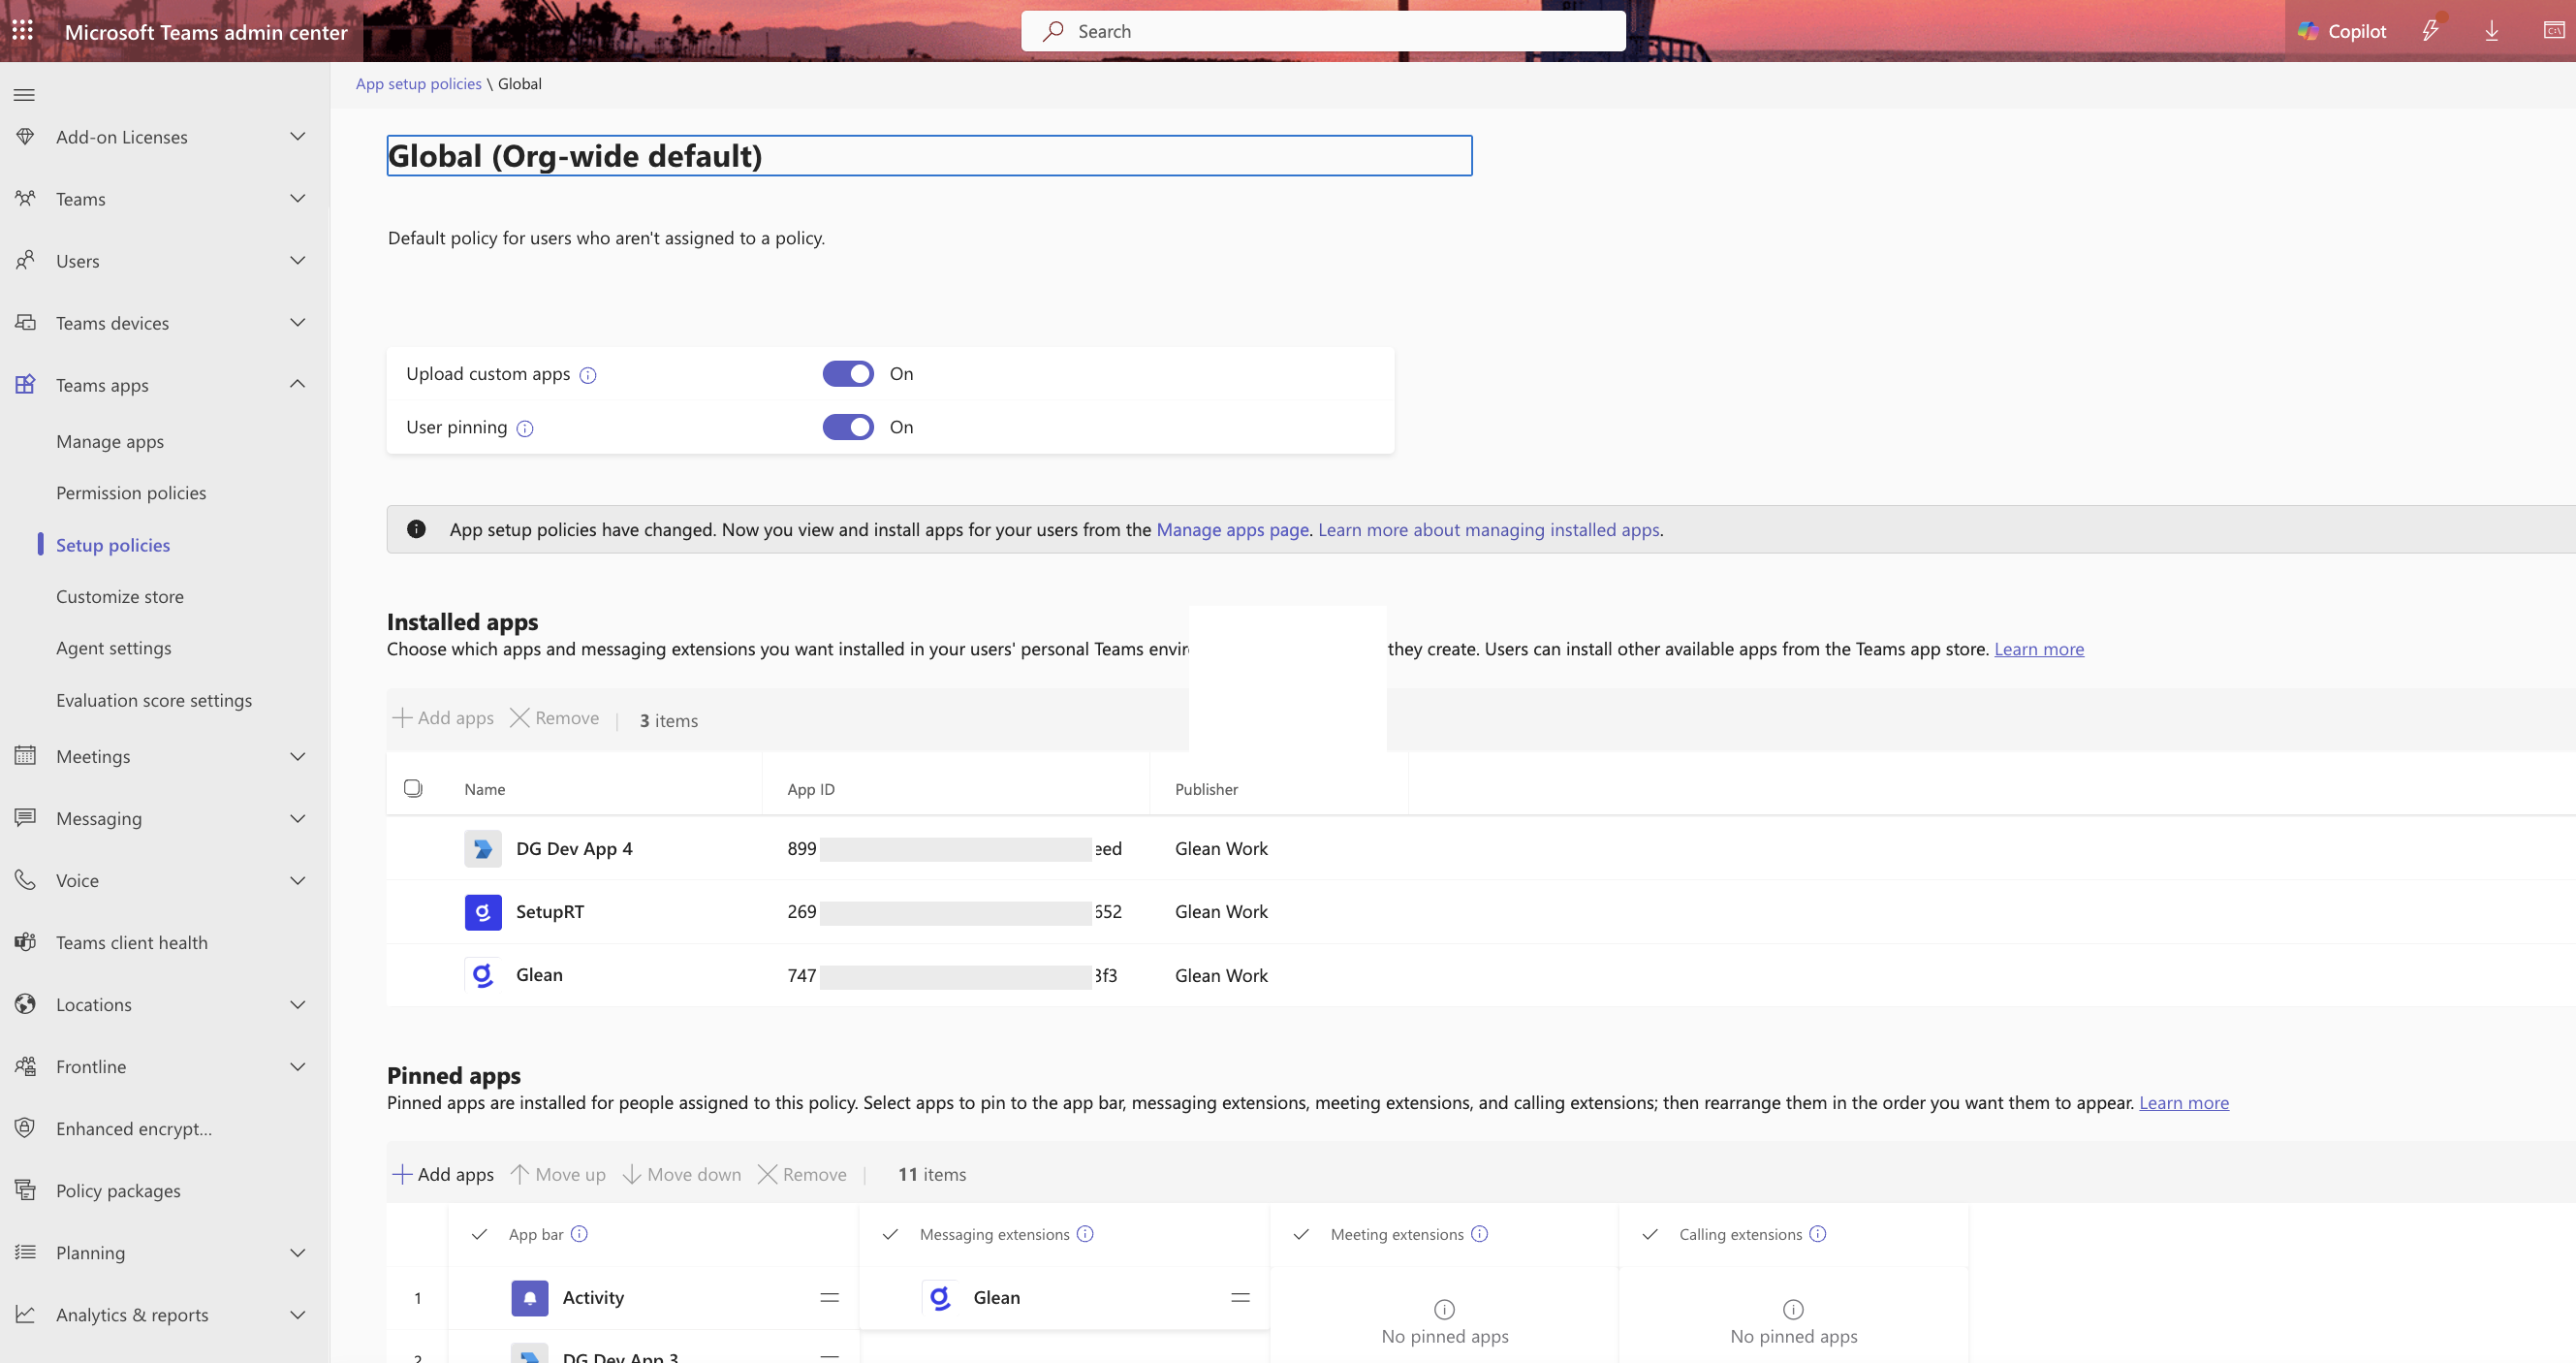
Enable User pinning. Under Installed apps, click Add apps and add Glean. Your policy may already have other apps installed.
-
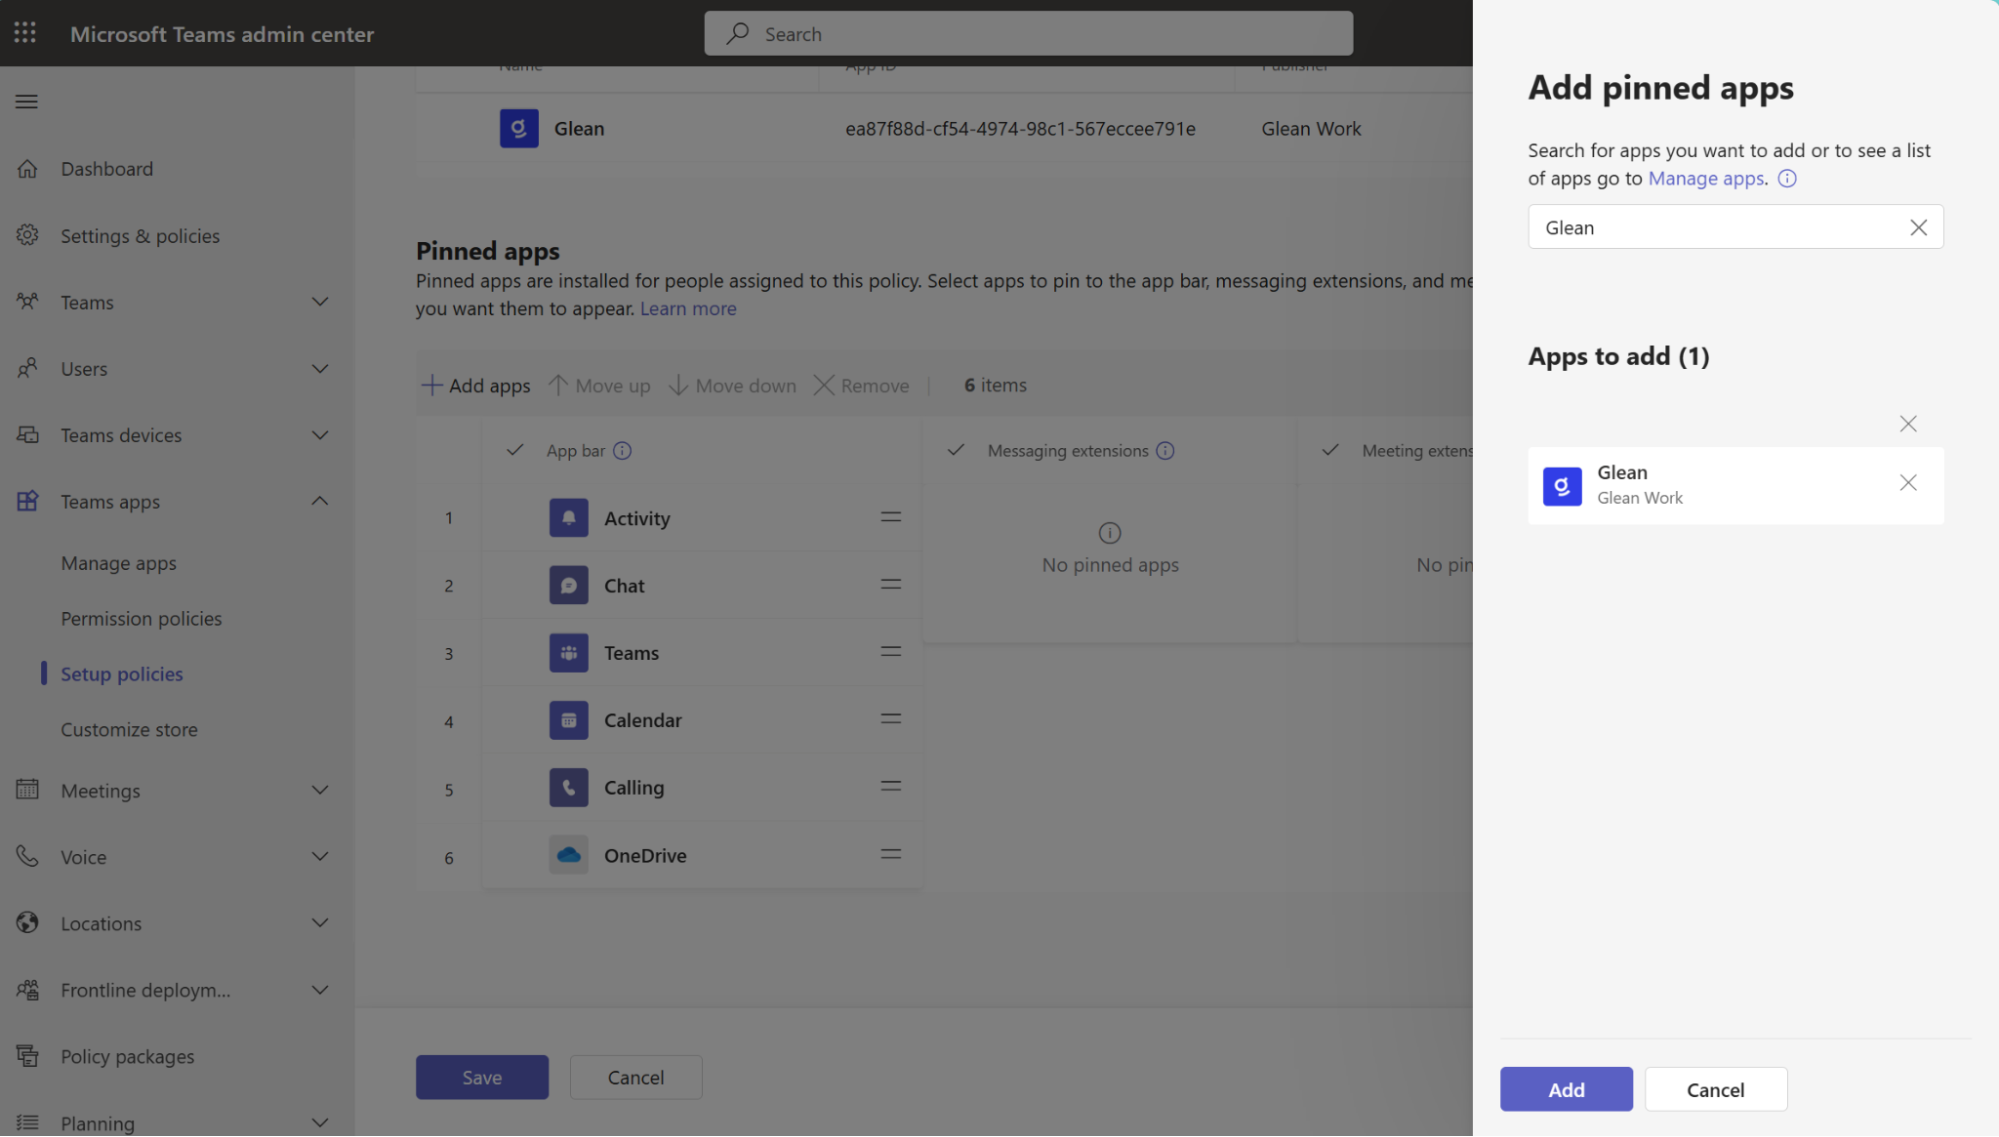
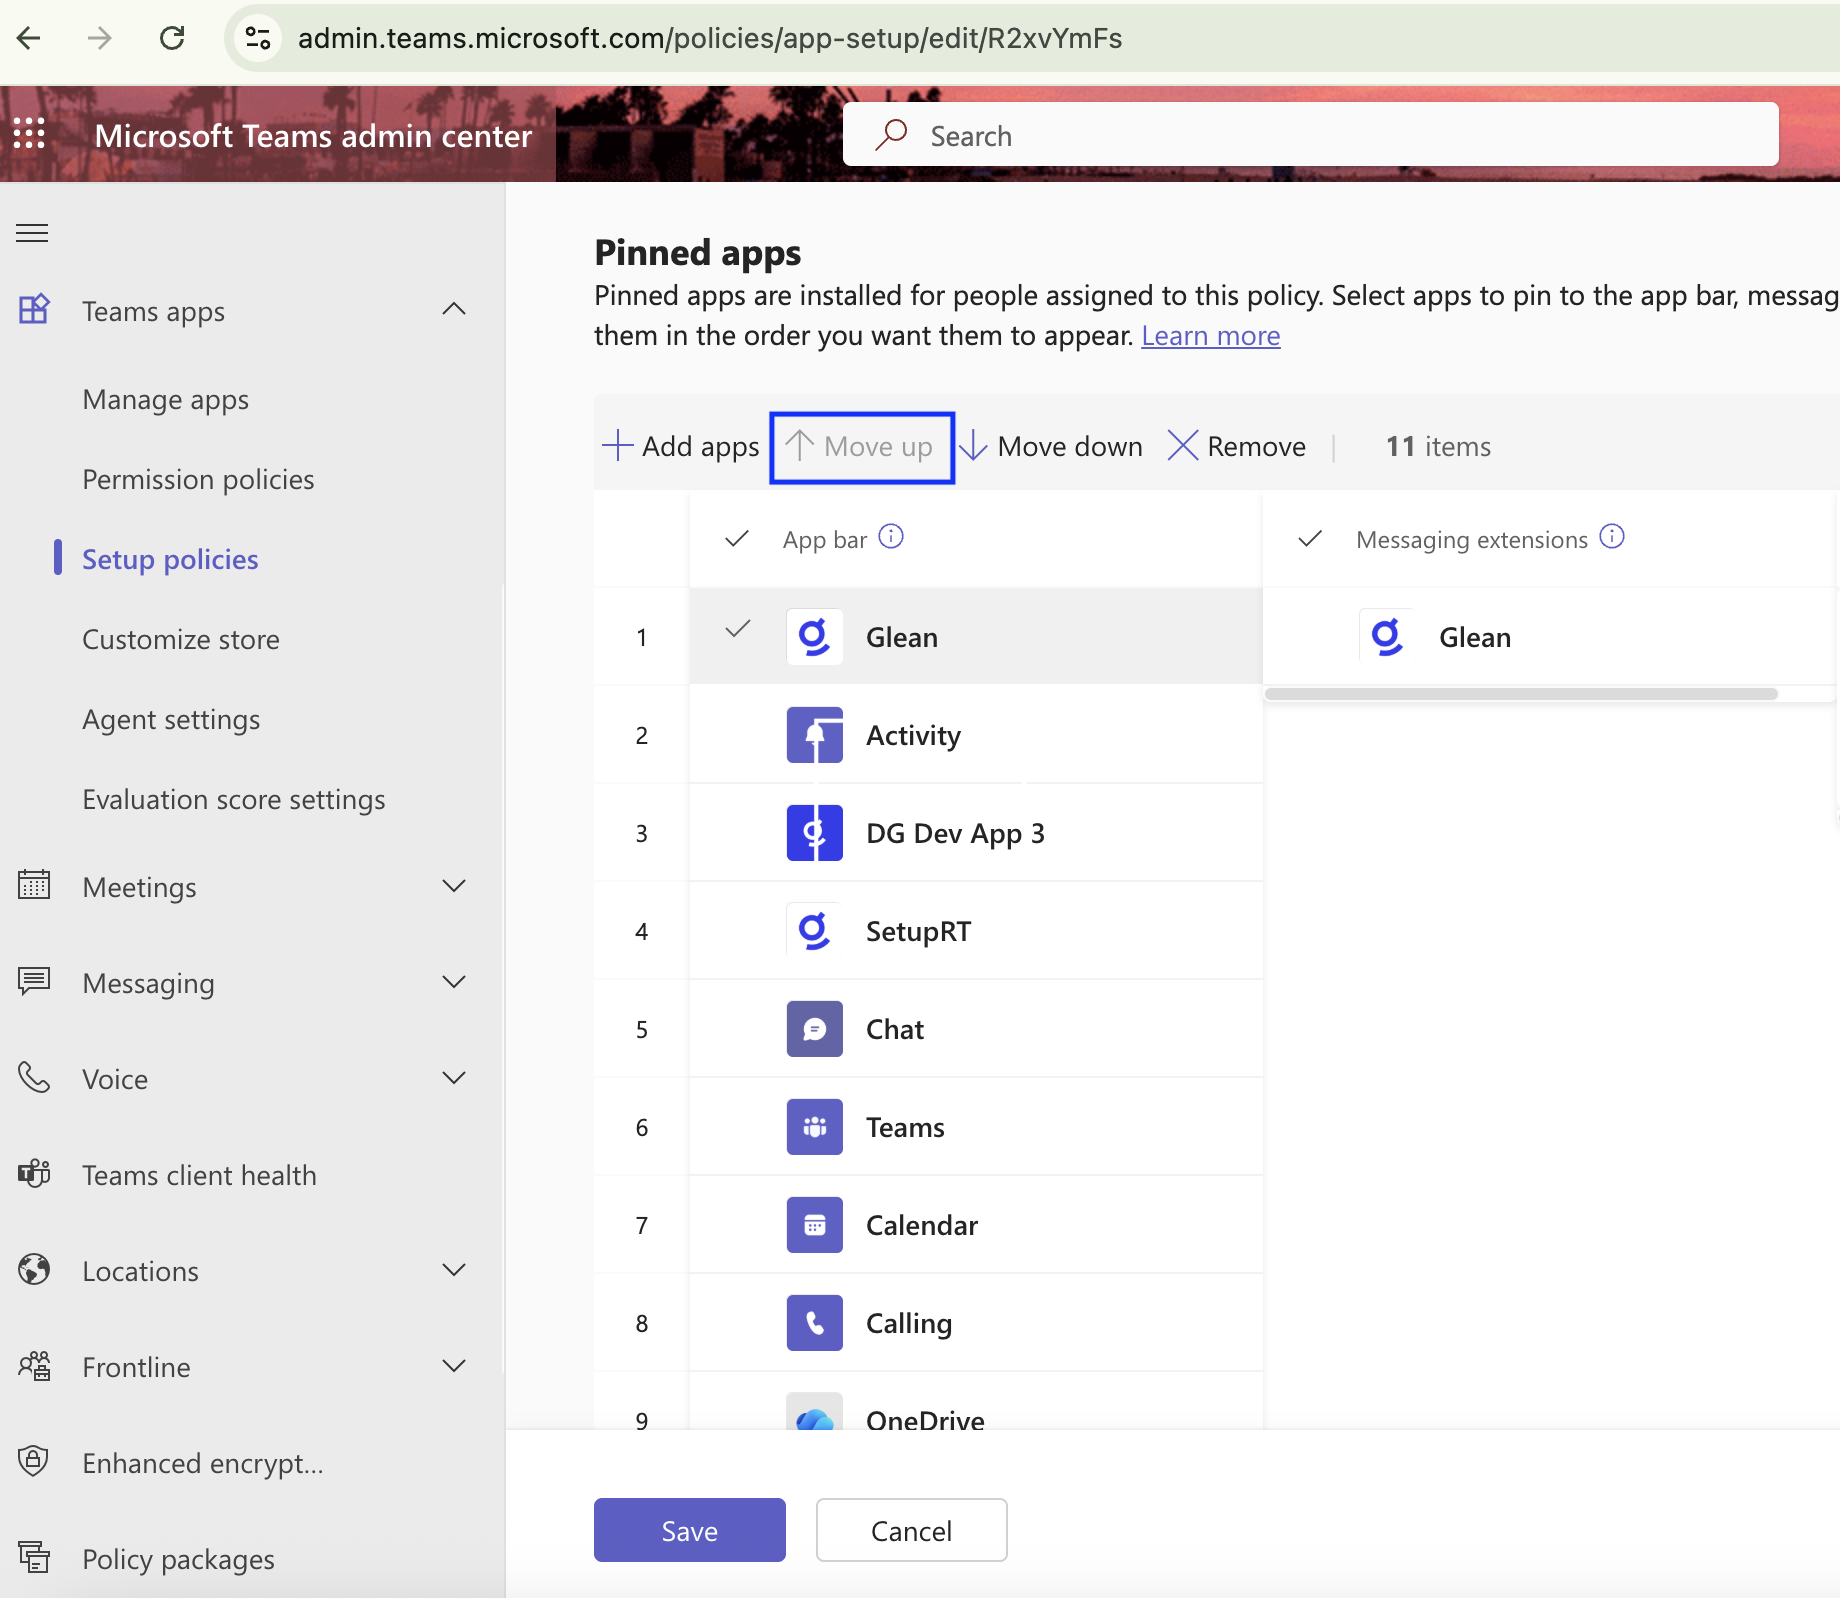
Under Pinned apps, click Add apps, search for Glean, click Select, and click Add. Glean is added to the existing list of pinned apps in the policy.
-
To make Glean more discoverable, use the Move up button to reorder Glean to the top of the pinned apps list.
-
Click Save.
If your organization uses multiple setup policies for different user groups, repeat steps 1–5 for each policy that applies to users who should have Glean pinned.
Phase 3: Enable Glean in Microsoft Teams in the Glean Admin console
Enter credentials in the Glean Admin console
-
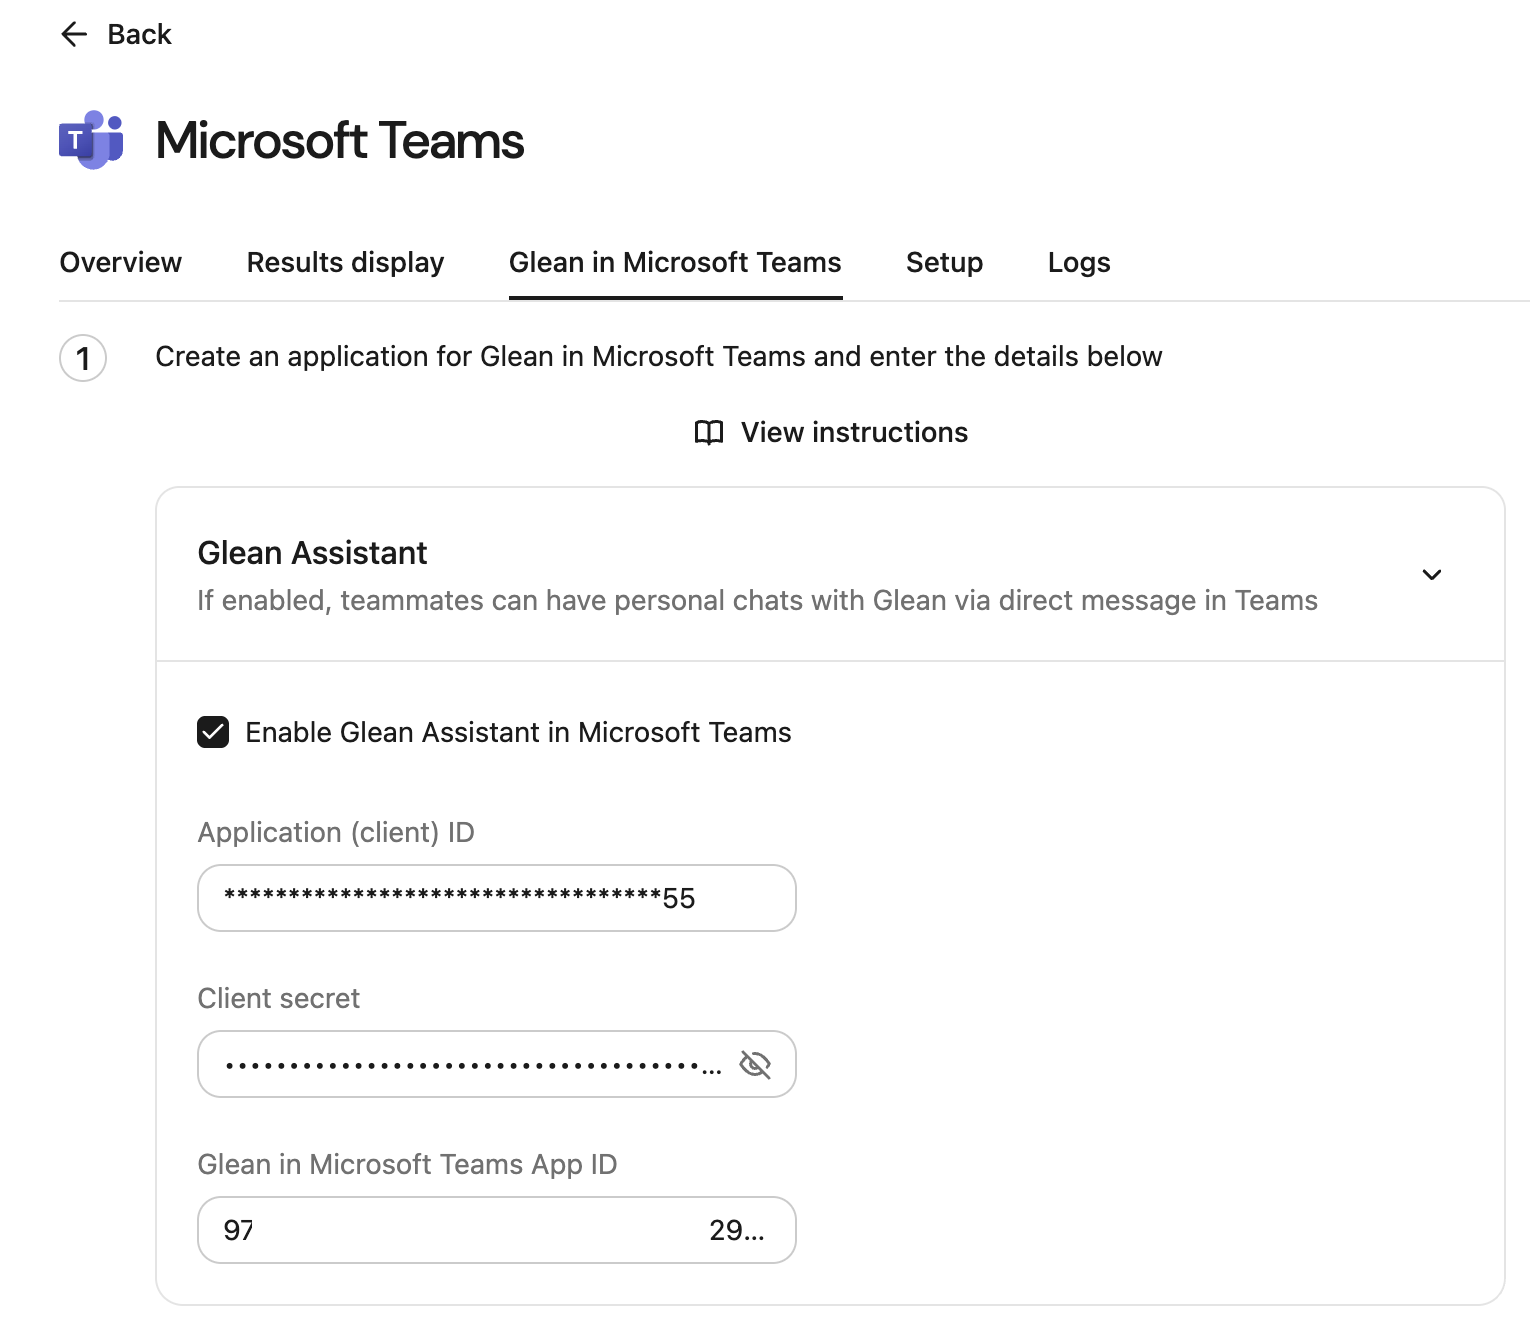
Open the Glean Admin console. In the left navigation, select Connectors, then select Microsoft Teams → Glean in Microsoft Teams.
-
Enter the values collected during setup:
Field Source Application (client) ID Copied from Azure App Registration overview (Phase 1) Client secret Generated from Azure Certificates & secrets (Phase 1) Glean in Microsoft Teams App ID Copied from Teams Admin Center (Phase 2)
-
Click Save. Glean in Microsoft Teams is now enabled for your organization.
-
Share the Glean in Microsoft Teams: User guide with your users so they can get started.
Set up dedicated Teams apps for agents
The steps on this page explain how to configure the Glean app for Microsoft Teams.
If your deployment has opted into the Agent Identity beta, use service credentials to set up a dedicated Teams app for a specific agent:
-
Complete the Microsoft app setup described on this page.
-
Go to Admin console → Tools → Service credentials in Glean and create a Microsoft Teams App credential.
-
Open your agent in Agent builder and navigate to Share → Publishing → Microsoft Teams.
-
Select the credential created in Step 2 and publish the app.
If your deployment hasn't opted into the beta, continue adding dedicated agent apps using Add Agent on the Microsoft Teams connector page.
For existing setups: if you previously configured dedicated agents using Add Agent on the Microsoft Teams connector page, your existing setups will continue to function. They aren't migrated automatically when the beta is enabled — migration is rolled out on a per-deployment basis. After migration completes for your deployment, existing configurations automatically appear under Tools → Service credentials and within the Microsoft Teams publishing flow. All new dedicated agent apps must use the service credential flow.
Troubleshooting
I don't see Add Agent on the Microsoft Teams connector page
If Agent Identity beta is enabled for your deployment, Add Agent is hidden for new dedicated agent app setup. This is expected.
Continue using the connector page for the main Glean in Microsoft Teams app. For dedicated agent apps, use Admin console → Tools → Service credentials and Agent builder → Share → Publishing → Microsoft Teams.
Bot installed but not responding (401 Authorization has been denied)
If the Glean bot is installed in Microsoft Teams and appears to be correctly configured, but replies from the bot fail with a 401 "Authorization has been denied" error (or similar) from Microsoft's Bot API, the issue is likely caused by an incorrect sign-in audience setting on the Azure app registration.
Symptoms
- The Glean bot is installed in Microsoft Teams and visible to users.
- The bot can receive user messages.
- Graph API calls (such as fetching chat IDs) work correctly.
- However, when the bot attempts to reply, the response fails with a 401 "Authorization has been denied for this request" error from the Bot Framework.
Cause
This error occurs when the Azure app registration used for the Glean Teams bot is configured as multi-tenant instead of single-tenant. The Bot Framework requires the app registration to use single-tenant authentication for proper authorization when sending replies.
Resolution
Follow the steps in Migrate the Teams bot to Azure Bot Service to switch the bot to single-tenant mode and resolve the authentication error. Allow up to 60 minutes for the change to propagate after completing the migration.