Connect to GitLab Server
The instructions below will work for on-prem instances that the Glean Crawler can access. Glean supports deployments on both GCP and AWS. Your on-prem GitLab Server instance must be network-accessible to the Glean crawler running in your cloud. Please reach out to Glean Support for any network configuration required.
Code Search is enabled by default after GitLab Server is connected to Glean. The previous code action toggle in the Admin console has been removed. See Code Search for more details.
Step 1. Choose your authentication path
Glean supports two authentication paths for the GitLab Server connector. The path you choose determines which additional setup steps are required.
| Admin PAT (recommended) | Non-admin PAT | |
|---|---|---|
| Token type | Personal access token from a GitLab admin account | Personal access token from a non-admin account with access to the projects you want Glean to crawl |
| User mapping CSV | Not required — admin-scoped tokens return user emails from the GitLab API | Required — non-admin tokens do not return user emails, so a CSV mapping user IDs to emails must be uploaded |
| Project permissions CSV | Not required — Glean reads project memberships directly from the API | Required — non-admin tokens may not see all project members (e.g., members added via groups the token user cannot access) |
| Webhooks | Can be created automatically if api scope is granted, or manually with read-only scopes | Can be auto-created for projects where the PAT user has Maintainer access (requires api scope); other projects require manual webhook setup |
If you are unsure which path to use, we recommend an admin PAT with read-only scopes (read_user, read_api, read_repository). This avoids the need for CSV uploads and ensures Glean always has complete, up-to-date permissions data.
Supported Objects: GitLab Server connector supports merge requests, issues, wikis, commit messages, and code (for use in Glean Assistant).
Step 2. Create a personal access token
-
Sign in to your GitLab account (admin or non-admin, depending on the path chosen in Step 1).
-
Navigate to the upper right hand corner (user icon) and click "Preferences"
-
Select "Access Tokens" on the left side menu.
-
Add a personal access token.
- Name: Glean Token
- Scopes:
- if you're allowing write privileges:
- api
- if you're only allowing read privileges:
- read_user
- read_api
- read_repository
- if you're allowing write privileges:
-
Leave Expires at empty
-
Copy the personal access token into the corresponding field in Glean
-
Check the box if the token has write privileges
Step 3. Provide information about your GitLab server instance
- Your GitLab instance domain name (e.g. https://gitlab.company.com)
- Your GitLab Server IP
If you provided api scope for the token, click Save and you're done! Otherwise, move on to the next step.
Step 4. Create Webhooks Manually (if token has only read access)
If your personal access token does not have the api scope, you must configure webhooks so GitLab Server can send change events to Glean.
Log in to GitLab with an admin account that can configure webhooks.
Prerequisites:
- For group webhooks, you must have the Owner role for the group.
- For project webhooks, you must have at least the Maintainer role for the project.
Group webhooks (recommended) apply to all projects within a group and its subgroups, while project webhooks apply only to individual projects.
For each group or project you want Glean to handle events for:
- Navigate to the group or project page within GitLab.
- From the left-side menu, go to Settings → Webhooks**.
- Select Add new webhook.
- Configure the webhook:
- URL: Use the URL shown in the GitLab data source setup page in Glean (Show setup instructions).
- Secret token: Use the token as shown in the setup instructions.
- Triggers:
- Comments
- Issue events
- Merge request events
- Wiki page events
- Save the webhook.
- In Glean, enter the same secret token in the Webhook secret token field for the GitLab Server data source.
System Hook
Lastly, create a system hook so Glean receives certain repository-level events:
- In GitLab, navigate to Admin Area → System Hooks.
- Create a system hook with:
- URL: Use the URL shown in the GitLab data source setup page in Glean (Show setup instructions).
- Secret token: Use the same token you used for the webhooks.
- Triggers:
- Repository update events
- Merge request events
- Save the system hook.
Repository content changes (code pushes) are handled by incremental git crawls, so you do not need to enable Push events on webhooks or system hooks.
Step 5. Upload User Mapping CSV (Non-Admin PAT Only)
This step applies only when the PAT provided to Glean belongs to a non-admin GitLab user. If you are using an admin-level PAT, skip this step — admin-scoped tokens return user emails directly from the GitLab API, so no mapping file is needed.
When the PAT used by Glean does not have admin privileges, the GitLab API does not return email addresses for all users. Without email addresses, Glean cannot map GitLab user IDs to company identities (SSO emails). To enable correct permissions enforcement, you must upload a CSV that maps each GitLab user ID to the corresponding company email.
-
Create a CSV with two columns: GitLab user ID, and email. The CSV doesn't need to have column headers, but the columns do need to be in the order (user ID, email).
- Note that the user ID is NOT the username — the user ID should be numbers only and corresponds to the
idin the example response of the /members API. - Example of a correct row:
12345,user1@glean.com
- Note that the user ID is NOT the username — the user ID should be numbers only and corresponds to the
-
Upload this CSV in the datasource setup page to correctly map the user IDs to the primary SSO email.
To list all GitLab user IDs, you can use the GitLab API. For your company emails, they can be queried from an identity system like Okta, GSuite, or any other source you may have internally.
Step 6. Upload Project Permissions CSV (Non-Admin PAT Only)
When the PAT used by Glean does not have admin privileges, GitLab's /members API may return incomplete project membership data. For example, if a group is granted access to a project but the PAT user does not have visibility into that group, members who only have access through that group will not appear in the API response. This means Glean cannot reliably determine the full set of users with access to each project.
To ensure accurate permissions enforcement in this scenario, Glean requires a project_permissions.csv file in addition to the user mapping CSV described in Step 5. This file maps projects to the users who should have access.
-
Create a CSV with two columns: full GitLab project path (namespace/project, e.g.
my-group/my-project) and GitLab user ID.- No column headers are required.
- Example row:
my-group/my-project,12345
-
Upload this CSV in the datasource setup page.
If project memberships change, the project_permissions.csv must be re-uploaded to keep permissions in sync.
Appendix
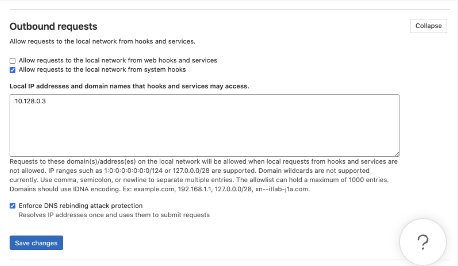
If you want to direct webhooks through local network, before creating webhooks, we'll need to allow local requests to the local network from web hooks and services:
- Navigate to Admin Area → Settings → Network
- Expand Outbound requests
- Paste the local proxy IP into the text box under "Local IP addresses and domain names that hooks and services may access." (Glean Support can help you with finding this IP)
- Click Save changes