GitLab Server setup
Setting up the GitLab Server connector involves these steps:
- Confirm requirements: network access, credentials, and permissions.
- Choose an authentication path: admin or non-admin personal access token.
- Create a personal access token: in GitLab, with write or read-only scopes.
- Create webhooks and a system hook: only if you chose read-only scopes.
- Build the CSV files: project permissions for a non-admin token, plus optional identity mapping.
- Create an OAuth application: configure user authorization.
- Configure in Glean: enter the credentials, save, and authorize the connector.
The current setup includes user OAuth application credentials alongside the connector's personal access token. OAuth maps each teammate's GitLab identity to their Glean account. It doesn't replace the token or expand the content the connector can crawl.
Requirements
Technical requirements
- Your self-managed GitLab instance must be network-reachable by the Glean crawler running in your cloud. Glean supports deployments on both GCP and AWS. Contact Glean Support for any network configuration required.
- Glean connects to your instance's GitLab REST API over HTTPS.
- Glean throttles its crawl to stay within GitLab's API rate limits, backing off in response to GitLab's rate-limit responses.
- Epic crawling requires GitLab 18.1 or later.
Credential requirements
Gather these values before you start:
- Personal access token: created in GitLab (see Create a personal access token).
- GitLab instance domain: for example,
https://gitlab.company.com. - GitLab Server IP: the IP address of your instance.
- Webhook secret token: copy this value from the GitLab Server setup instructions in Glean when creating webhooks manually.
- OAuth application credentials: the client ID and client secret from an instance-wide GitLab OAuth application. A GitLab administrator must create this application, even if the connector uses a non-admin personal access token.
- CSV files: a project permissions CSV for a non-admin token, plus an optional user-mapping CSV when using user OAuth. See Build the CSV files.
Permission requirements
- The account that creates the personal access token must have access to every project you want Glean to crawl.
- To create webhooks manually, you need the Maintainer role for a project or the Owner role for a group. Creating a system hook requires admin access to the GitLab instance.
1. Choose an authentication path
Glean supports two authentication paths. The path you choose determines which additional setup steps are required.
| Admin PAT (recommended) | Non-admin PAT | |
|---|---|---|
| Token type | Personal access token from a GitLab admin account | Personal access token from a non-admin account with access to the projects you want Glean to crawl |
| User-mapping CSV | Not required — admin-scoped tokens return user emails from the GitLab API | Optional with user OAuth. Use it as a fallback for teammates who haven't authorized GitLab. |
| Project permissions CSV | Not required — Glean reads project memberships directly from the API | Required — non-admin tokens may not see all project members. List only users with repository access. |
| Webhooks | Can be created automatically with the api scope, or manually with read-only scopes | Can be auto-created for projects where the token user has Maintainer access (requires api scope); other projects require manual webhook setup |
If you are unsure which path to use, we recommend an admin PAT. This avoids CSV uploads and ensures Glean always has complete, up-to-date permissions data.
2. Create a personal access token
Glean authenticates to GitLab with a personal access token (PAT). The scopes you grant determine whether Glean can create webhooks automatically.
- Sign in to GitLab with the account you chose in step 1 (admin or non-admin).
- Go to your avatar in the top right → Edit profile → Access tokens.
- Select Add new token and give it a name, for example
Glean Token. - Choose the scopes:
- To let Glean create webhooks automatically, grant the
apiscope. - To keep the token read-only, grant
read_user,read_api, andread_repository. With read-only scopes you must create webhooks and a system hook manually.
- To let Glean create webhooks automatically, grant the
- Set an Expiration date according to your organization's policy.
- Select Create personal access token and copy the token value. GitLab shows it only once.
3. Provide your instance details
You enter these in the Glean Admin console during Configure in Glean:
- Your GitLab instance domain, for example
https://gitlab.company.com. - Your GitLab Server IP.
Create webhooks and a system hook (read-only scopes only)
Skip this step if your token has the api scope — Glean creates the webhooks for you.
If your token has only read-only scopes, create webhooks for the groups or projects you want Glean to receive change events for, plus one instance-wide system hook. Group webhooks apply to all projects in a group and its subgroups; project webhooks apply to a single project.
Open the GitLab Server connector setup in the Glean Admin console, then open its setup instructions to copy the webhook URL and secret token.
Create webhooks
For each group or project:
- Go to the group or project → Settings → Webhooks → Add new webhook.
- Configure the webhook:
- URL: copy the webhook URL from Glean's setup instructions.
- Secret token: copy the webhook secret token from Glean's setup instructions.
- Trigger: enable:
- Push events
- Comments
- Issues events
- Confidential issues events
- Merge request events
- Wiki page events
- Repository update events
- Select Add webhook.
Create a system hook
A system hook lets Glean receive certain instance-level repository events.
- In GitLab, go to Admin Area → System Hooks.
- Create a system hook:
- URL: copy the webhook URL from Glean's setup instructions.
- Secret token: the same secret token you used for the webhooks.
- Trigger: enable:
- Push events
- Merge request events
- Repository update events
- Save the system hook.
4. Build the CSV files (non-admin token only)
The project permissions CSV remains required for a non-admin personal access token. User OAuth replaces the need for an identity-mapping CSV, not the project membership data. With an admin token, skip these uploads because GitLab returns user emails and project membership through the API.
User-mapping CSV
With user OAuth configured, this CSV is optional. It maps numeric GitLab user IDs to company (SSO) emails as a fallback for teammates who haven't authorized GitLab. Existing CSV mappings remain supported.
- Create a CSV with two columns in the order user ID, email. Column headers are not required.
- The user ID is the numeric
idfrom the GitLab API — not the username. Retrieve IDs with the members API. - Example row:
12345,user1@example.com
- The user ID is the numeric
- Keep the file — you upload it in the Glean Admin console during Configure in Glean.
Project permissions CSV
A non-admin token may return incomplete project membership — for example, members added through a group the token user cannot see. Upload a project_permissions.csv that maps projects to the users who should have repository access.
The file does not include GitLab roles. Include only users with repository access, not Guest members. Use an admin token if Guest members must find private project overviews without receiving repository access.
- Create a CSV with two columns in the order project path, user ID. Column headers are not required.
- The project path is the full namespace path, for example
my-group/my-project. - Example row:
my-group/my-project,12345
- The project path is the full namespace path, for example
- Keep the file — you upload it in the Glean Admin console during Configure in Glean.
If project memberships change, re-upload project_permissions.csv to keep permissions in sync.
5. Create a GitLab OAuth application
Ask a GitLab administrator to create an instance-wide application. The OAuth application credentials are separate from the personal access token used to crawl content.
- Open the GitLab Server connector setup in the Glean Admin console, then open its setup instructions to copy the Callback URL.
- In GitLab, go to Admin Area → Applications and click New application.
- Enter a Name, such as
Glean, and set Redirect URI to the callback URL from Glean. Don't use the webhook URL. - Select
openid,profile,email,read_user,read_api, andmcp. - Save the application. Copy GitLab's Application ID and Secret for the Client ID and Client Secret fields in Glean.
See Configure GitLab as an OAuth 2.0 authentication identity provider.
Configure in Glean
Enter the values you gathered into the GitLab Server connector setup page in the Glean Admin console, in this order.
1. Start connector setup
In the Glean Admin console, go to Connectors, add the GitLab connector, and select the GitLab Server setup. Set the connector display Name and icon.
2. Enter your instance details
Enter your GitLab instance domain (for example, https://gitlab.company.com) and your GitLab Server IP.
3. Enter the personal access token
Paste the personal access token into the token field, then set the two token checkboxes to match the token you created:
- API token has admin privileges: select this if the token belongs to a GitLab admin account. Clear it for a non-admin token — the CSV upload fields appear only when this checkbox is cleared.
- API token has write privileges: select this if the token has the
apiscope, so Glean creates webhooks automatically. Leave it cleared for read-only scopes, and make sure you have created webhooks and a system hook manually.
4. Confirm the webhook secret
Glean supplies the webhook secret token in its setup instructions. If you created webhooks and a system hook manually, confirm that their Secret token matches that value. You don't enter a webhook secret in the GitLab Server setup form.
5. Upload the CSV files (non-admin token only)
If you cleared API token has admin privileges, upload the project permissions CSV. You can also upload a user-mapping CSV as an identity fallback. Each upload field has a Download CSV template button. Skip these uploads with an admin token. See Project permissions CSV and User-mapping CSV.
Glean validates the required project permissions CSV and any uploaded user-mapping CSV when you save. User OAuth doesn't remove the project permissions CSV requirement for a non-admin token.
6. Enter the OAuth application credentials
Enter the application's Client ID and Client Secret. These are required in the current setup form.
7. Choose what to index
Epics are controlled by a single setup toggle:
- Crawl epics: index epics. Selected by default. Requires GitLab 18.1 or later — clear it if your instance is older or you don't want epics indexed.
Glean always indexes project overviews, merge requests (with comments and diffs), code, issues, and wikis. These object types have no per-object toggles. Glean makes code searchable through Code Search and turns Code Search on by default after setup.
8. Save and authorize
Complete both setup actions:
- Click Save. Glean validates the connector configuration. If validation fails, fix the reported problem and save again.
- Click Authorize and complete the GitLab OAuth flow. Return to Glean and confirm that authorization succeeded.
Saving the configuration alone doesn't complete OAuth setup. After setup and crawling, results depend on the user's GitLab access and identity mapping.
With a non-admin token, a missing project permissions CSV fails validation. CSV files must contain valid, nonempty rows with numeric user IDs. An uploaded user-mapping CSV must also contain valid email addresses. See CSV_1.
Authorize GitLab as a user
During connector setup, an admin can optionally upload a user-mapping CSV for an initial set of users. Those users don't need to authorize individually for search access. New users who aren't included in the CSV can authorize GitLab instead of asking an admin to update the user-mapping CSV.
After an admin configures the OAuth application, teammates can authorize their GitLab Server accounts:
- In Glean, go to Settings → Connectors and open GitLab.
- Under Search access, click Authorize for the GitLab Server instance you want to connect.
- Click Get search results from GitLab. If Glean asks you to choose an instance, click Add to Glean beside that instance.
- Sign in to your GitLab Server instance and complete authorization, then return to Glean.
Authorize each instance you need separately.
User OAuth doesn't grant additional project access or replace the project permissions CSV required with a non-admin token.
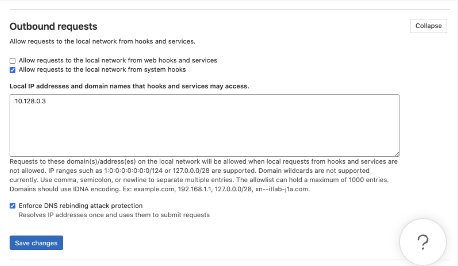
Appendix: allow webhooks over the local network
If you want webhooks to reach Glean through your local network, allow local requests from hooks and services before creating the webhooks:
- Go to Admin Area → Settings → Network.
- Expand Outbound requests.
- Under Local IP addresses and domain names that hooks and services may access, add the local proxy IP. Contact Glean Support if you need help finding this IP.
- Select Save changes.