Intercom setup
Credentials
The Intercom connector uses OAuth 2.0 for authentication. You must create a private OAuth app in the Intercom Developer Hub to obtain the required credentials.
Required credentials
- Client ID. The OAuth client identifier from your Intercom app's Basic information page.
- Client secret. The OAuth client secret from your Intercom app's Basic Information page.
Required OAuth scopes
Use the scope list shown in the Glean Admin console when configuring your Intercom OAuth app. The console displays the exact scopes required for your deployment.
Permission requirements
- The Intercom user creating the OAuth app must have permission to access the Developer Hub and manage app integrations.
- Each end user who connects their Intercom account to Glean must be an Intercom admin or teammate with appropriate access to the content they want to search.
Requirements
In Glean
- A Glean administrator who can add and configure connectors in the Admin console.
In Intercom
- An Intercom account with permission to create and manage apps in the Intercom Developer Hub.
- Ability to register an OAuth client and assign read permissions (scopes) for the objects Glean will index. Use the scope list shown in the Glean Admin console.
Setup instructions
Create a private OAuth app in Intercom
- Sign in to the Intercom Developer Hub. Select Developer Hub from the top navigation panel, and log in with admin credentials.
- Navigate to Settings → Integrations → Developer Hub.
- Click Your Apps in the top navigation, then click New app at the bottom left.
- In the New app field, enter a name for the application (for example,
Glean-app). This is a private app. - Add the app to an existing workspace from the Workspace dropdown, or create a new workspace in the Workspace field.
Choose the workspace this app must use by default. Only people with access to that workspace can complete OAuth authorization in Glean.
For multiple workspaces, create a separate app for each workspace. Don't reuse the same app across workspaces. Give each app a clear, descriptive name so it’s easy to tell them apart. For example, Glean support, and Glean sales.
- Once the app is created, it is displayed in the Your apps section.
Glean supports private apps. To learn about public apps visit Intercom public apps.
- Select your app, and in the left navigation panel, choose Authentication. Click Edit on the upper right to edit the app.
- Under Authentication → OAuth → Use OAuth → Add redirect URL:
- Copy and add the exact Glean OAuth Redirect URL shown in your Glean admin console.
- Under Authentication → Permissions → People and conversation data, enable the scopes in the following table:
| Scope | Purpose |
|---|---|
| Read and list users and companies | Fetch contacts and companies for indexing |
| Read conversations | Fetch conversations and conversation parts |
| Read tickets | Fetch tickets and ticket activity |
| Read content data | Fetch engagement events, and Help Center articles |
| Read tags | Fetch tags on conversations, tickets, and contacts |
- Under Authentication → Permissions → Workspace data, enable the scopes in the following table:
| Scope | Purpose |
|---|---|
| Read admins | Fetch admin/user information for identity mapping |
| Read and list articles | Fetch Help Center articles and collections |
Scopes are classified as:
- Extended Scopes (for example
Read admins,Read content data) and require Intercom approval. Extended scope requests are typically approved within 24 hours. - Standard scopes work immediately. See Intercom OAuth scopes for details.
- Click Save to save the configuration.
- Copy the Client ID and Client secret from the app's Basic information tab in the left navigation panel.
Configure the Glean admin console
Repeat this step for each workspace. Each workspace requires its own connector instance in Glean with the corresponding OAuth app credentials.
- In the Glean Admin console, go to Connectors → Add connector → Intercom.
- Give a Name and Icon to the Intercom instance. For example, Glean sales.
- Provide the OAuth credentials from Create a private OAuth app:
- Client ID: Enter your Intercom OAuth client ID
- Client secret: Enter your Intercom OAuth client secret
- Select your API Region (US, EU, or AU) based on your Intercom workspace location.
- (Optional) Enter your Help Center Domain if you use a custom domain for Intercom articles (for example
help.company.com). - Click Save to complete the setup.
- Authorize Glean to access your Intercom instance, and complete the OAuth setup. Click Authorize.
Authorize users in Intercom
- On the Intercom authorization page, select the correct workspace from the list—ensure it matches the workspace you created the OAuth app for.
- Grant access to the Glean app when prompted by Intercom.
- Glean begins indexing your Intercom content automatically.
Verify you are authorizing the correct workspace. In the Intercom OAuth prompt, confirm the workspace shown matches the one you created the OAuth app for. If you are logged into multiple Intercom workspaces, Intercom may default to a different one—switch to the correct workspace before granting access.
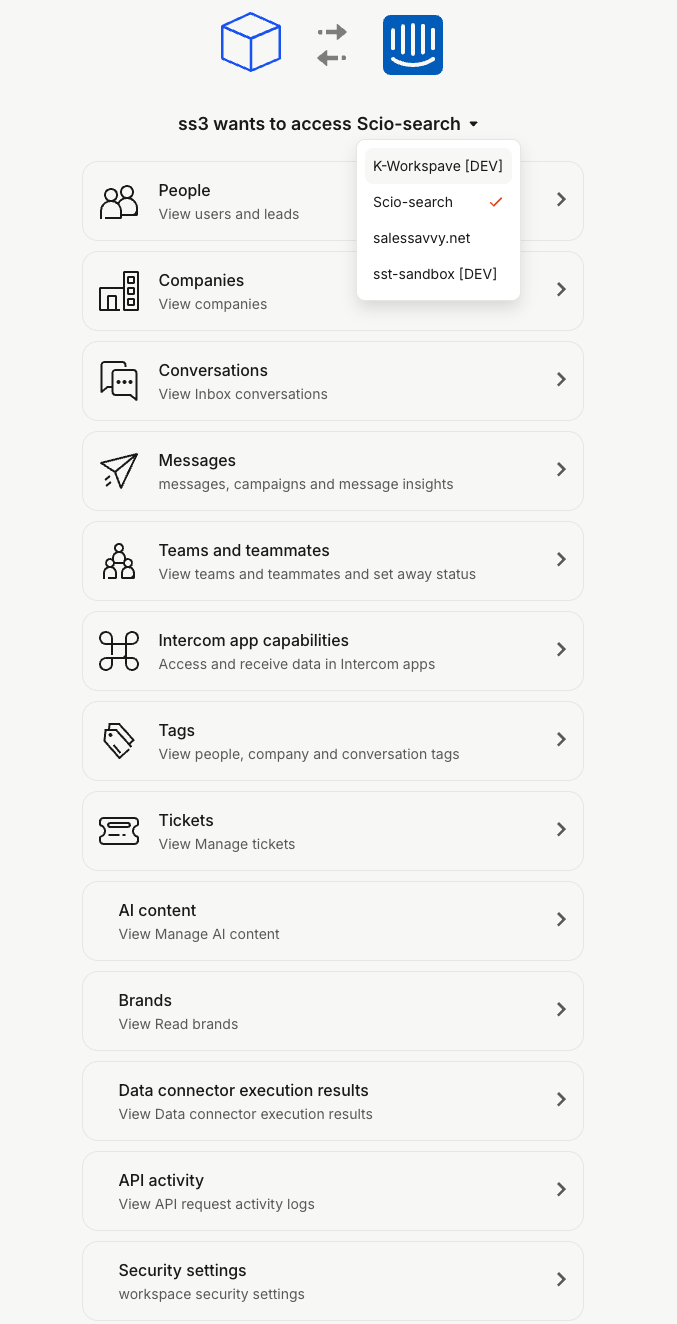
- Users with Intercom accounts must authorize Intercom in Glean to access their Intercom data in Glean. Direct users to Glean settings → Connected apps → Intercom to complete authorization.
Intercom OAuth tokens do not expire. If a token is revoked in Intercom, the user must reconnect through this flow.