Microsoft 365 setup
These instructions apply to existing Glean deployments that use the previous Microsoft 365 setup flow. The setup path depends on your deployment's unified setup eligibility, not on when Microsoft 365 was connected. Connectors configured this way keep working, and there is no migration to run. If you are on a new Glean deployment, see Choose your setup.
This section covers setup for the Microsoft 365 parent connector. Complete this before configuring SharePoint or OneDrive.
Request all suite permissions upfront
One Glean application in Microsoft Entra ID serves the whole Microsoft 365 suite. The parent connector needs only identity permissions. The SharePoint and OneDrive child connectors layer their content permissions onto the same app. Rather than discovering these scopes one connector at a time and raising a separate IT ticket for each, gather the complete set from the table below and submit it as a single request, finalized with one admin-consent step.
Every scope is an application permission. Use the Required by column to scope your request to the connectors you'll actually run, and the API column to grant each one in the right place. (Outlook and Teams are separate app registrations with their own permissions. See the Outlook and Teams pages.)
Toggle the child connectors you plan to configure so your security team can approve all scopes in a single request.
This setup flow currently applies to SharePoint and OneDrive only. Outlook and Teams are not part of this setup and continue to be configured separately.
The baseline permissions are always included. Select any extras below and the permission set updates instantly. Then copy it to hand to your IT or security team, so every scope is requested in one pass.
User.Read.AllEnumerates tenant users to map Microsoft 365 identities to Glean and enforce document-level permissions.GroupMember.Read.AllResolves group membership so group-based permissions are applied correctly.Member.Read.HiddenResolves hidden-visibility group membership, used when confidential groups share content.Reports.Read.AllReads Microsoft 365 usage reports across your tenant.
Required permissions for setup
The user setting up this connector must be a Global Administrator.
Register a new app
-
Sign in to the Azure portal.
-
Select Microsoft Entra ID → Manage → App registrations → New registration.
-
On the Register an application page, register an app with the following:
Field Value Name GleanSupported account types Accounts in this organizational directory only (Single tenant) Redirect URI Leave this field blank -
Select Register.
Configure permissions
- On the overview page, select Manage → API Permissions.
- Select Add a permission, then choose Microsoft Graph.
- Choose Application permissions and add the following:
User.Read.AllGroupMember.Read.AllReports.Read.AllMember.Read.Hidden
These four identity permissions cover the parent connector. SharePoint and OneDrive add content permissions to this same app — see Request all suite permissions upfront for the complete list, and add them all now if you already know you'll configure those child connectors.
Grant admin consent
- Ensure you are signed in to Azure as a Global, Application, or Cloud Application Administrator.
- Use the search box to navigate to Enterprise applications.
- Select the Glean app you created.
- Select Permissions under Security.
- Review the permissions shown, then select Grant admin consent.
Set up certificate authentication
Glean uses app-only credentials to authenticate to Microsoft Graph and SharePoint APIs for Microsoft 365 connectors.
For SharePoint and OneDrive, use certificate-based authentication. The steps below show how to generate a certificate and private key with OpenSSL. Before uploading the files, make sure the private key is PEM-encoded PKCS#8, unencrypted, and uses BEGIN PRIVATE KEY / END PRIVATE KEY headers.
Generate with OpenSSL
Install OpenSSL
macOS includes OpenSSL by default. On Windows, set up OpenSSL for PowerShell:
- Download the relevant OpenSSL installation manager for your version of Windows. OpenSSL offers a list of third-party binary distributions.
- During the installation process, select the option to copy the OpenSSL binaries into the
/bindirectory. - Open a new PowerShell instance and run the following command to make OpenSSL binaries available:
$env:Path += ";C:\\Program Files\\OpenSSL-Win64\\bin"
Generate certificate and private key
Run the following commands line by line. Microsoft SDK requires the certificate to be verified with a private key in PKCS#8 syntax.
openssl genrsa -out tempprivatekey.key 2048
openssl pkcs8 -topk8 -inform PEM -outform PEM -in tempprivatekey.key -out privatekey.key -nocrypt
openssl req -new -key privatekey.key -out request.csr
openssl x509 -req -days 365 -in request.csr -signkey privatekey.key -out certificate.crt
Verify that both certificate.crt and privatekey.key exist. Open each file and confirm the formats:
- The certificate file should start with
BEGIN CERTIFICATEand end withEND CERTIFICATE. - The private key should begin with
BEGIN PRIVATE KEYand end withEND PRIVATE KEY. It should not includeRSAin the headers, nor be encrypted.
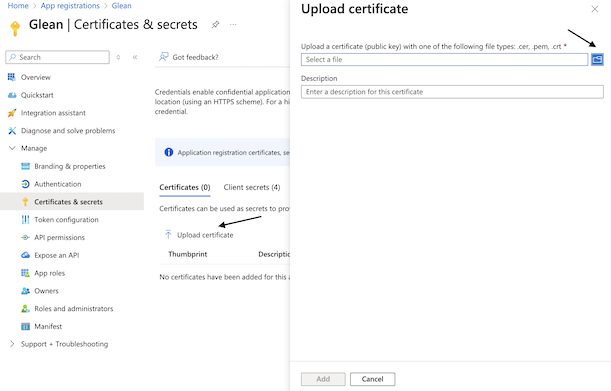
Upload certificate to Azure
- Navigate back to Microsoft Entra ID → Manage → App registrations and select the app you created.
- Select Manage → Certificates & secrets.
- Select the Certificates tab and then Upload certificate.
- Upload the
certificate.crtfile you generated.
Fill out keys in Glean
- In Azure, select Overview.
- Copy the following values from the Essentials panel and enter them in Glean:
- Application (client) ID
- Directory (tenant) ID
- Upload
certificate.crtin Glean under Client Certificate. - Upload
privatekey.keyin Glean under Private Key. - Select your tenant size in Glean.
- Select Save to create the Microsoft 365 suite.
If your tenant size is greater than 1,000, add one or more additional applications (Glean recommends 1–10) to improve full crawl speed. Use the same permission settings as the initial app.
For each additional app, repeat the steps from Register a new app through Upload certificate to Azure, then paste the additional Application (client) ID into Glean. You only need to upload the certificate once in Glean.
Next steps
After saving the Microsoft 365 suite, continue setting up the child connectors. They inherit the parent credentials and only require child-specific configuration.
See also
- Choose your Microsoft 365 setup shows which setup is yours and how the suite fits together.
- Microsoft 365 overview explains how the suite works and which child connectors it covers.