Agent Builder
The Agent Builder is a tool that lets you design, create, and organize agents to automate your processes in Glean. Think of the Agent Builder as your "workshop" for building automations where you decide what your agent will do, step by step.
Using the Agent Builder, you can break down complex work into clear, manageable instructions. Each agent you create follows a series of steps that you set up, like collecting information, making decisions, or running Sub-agents.
The tools available in Agent Builder depend on your organization's admin settings. A tool appears when an admin has enabled it for Agents and included you in its access scope. You don't need the Admin or Tool Creator role to add an existing tool if you already have permission to create or edit the agent. See Manage agent access and Managing tool access.
Some Glean tools also require a corresponding feature to be enabled. For example, the Presentation Generation tool is available only when Slide deck generation is turned on, and the Image Generation tool requires Contextual Images to be turned on in the Admin console. Presentation Generation is available only in Autonomous (Auto Mode) agents, not Workflow-mode agents.
Getting Started
When you begin building a new agent, you'll be presented with a modal offering two creation approaches:
Build with Natural Language
Choose this option to describe your agent's purpose in plain language. Simply tell the Agent Builder what you want your agent to accomplish, and it will automatically generate the appropriate steps for you. This approach is ideal when you prefer not to configure each step manually.
Your organization must have an agentic model configured to use the natural language panel.
Start from Scratch
Select this option to build your agent step-by-step using the traditional interface. This gives you complete control over each step's configuration and is perfect when you need precise control over your agent's behavior.
Regardless of which approach you choose initially, you can always switch between natural language and manual editing throughout the building process.
Navigating Agent Menu Options
Agent Settings
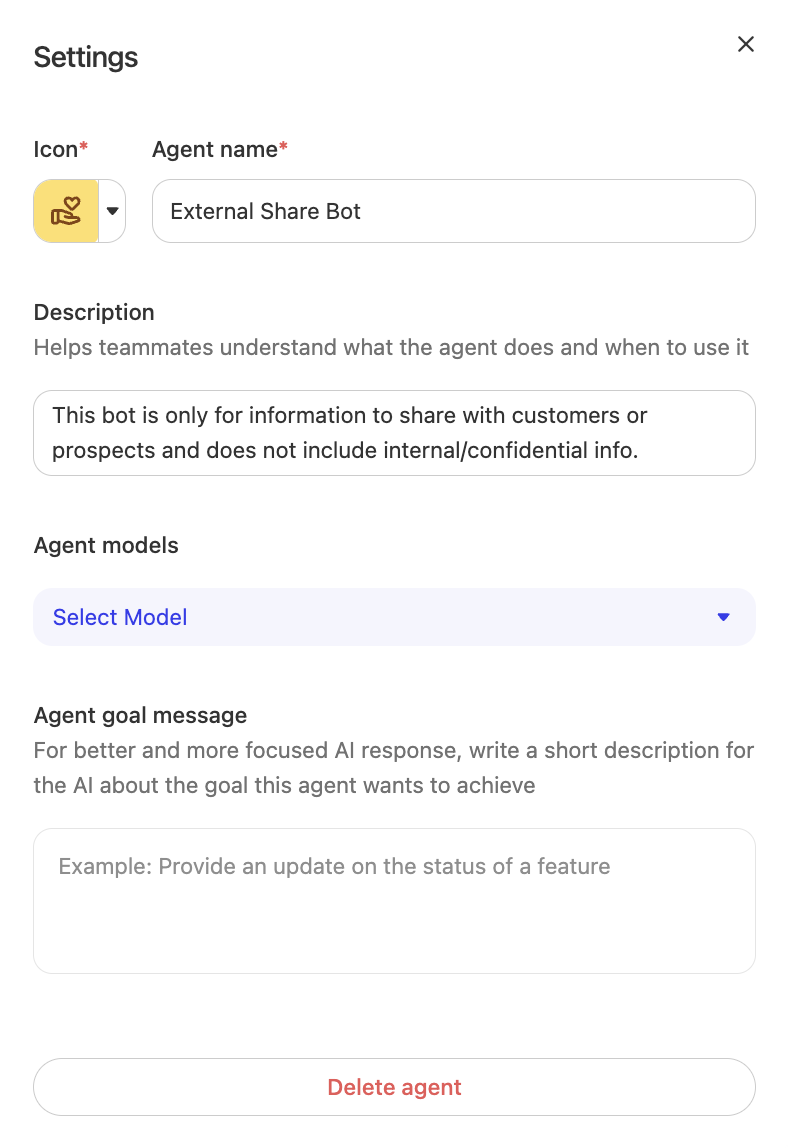
You can find Agent settings by clicking the gear icon at the top right in the Agent Builder screen. All agents require an icon and a name. You can help your users understand what your agent does by adding a description. This is what your users will see when they browse through the agent library.
Enhance description
The Enhance button (sparkle icon) appears next to the agent description field, both under the agent title and in Agent Settings. Clicking Enhance generates or refines the description using the agent's current configuration as context. This makes it easy to create clear, accurate descriptions without writing them from scratch.
- Click Enhance to auto-generate a description based on your agent's steps and configuration
- Review and edit the generated description for accuracy and clarity
- Use Undo if you prefer the previous version
When you share an agent that doesn't have a description, Glean also automatically suggests an icon and description. For more information, see Sharing and Permissions.
Agent Models
The Glean Model Hub enables you to experiment with and select the most suitable model for each agent and its respective steps. This selection of models allows organizations to flexibly experiment with, choose, and combine leading AI models for each step of their workflows, ensuring data safety, rapid access to new models, and robust performance tracking.
It also empowers businesses to optimize AI performance and cost without vendor lock-in or management overhead. For more information on accessing the model hub, please refer to the Set up LLMs article.
Agent goal message
The agent goal message is intended to clarify the specific objective that the agent aims to achieve during interactions. It serves as a short description that helps the AI to provide more focused and relevant responses based on the task at hand.
When writing an agent goal message you should consider:
- Clarity and Specificity: Clearly state what the agent is supposed to achieve. Avoid vague or broad goals, as this can make it harder for the LLM to provide relevant responses.
- Conciseness: The goal message should be short but comprehensive, summarizing the purpose of the conversation or task.
- User Perspective: The message should make sense to both the AI and the user, providing enough detail to guide the interaction without being confusing.
- Distinguishability: If there are multiple agents or similar conversations, craft the goal message to help differentiate between them.
Here are some examples of agent goals across a few job functions:
- Engineering: "Assist developers in debugging code and provide solutions for common programming errors."
- Sales: "Guide prospects through product features, answer pricing questions, and assist with purchase decisions."
- Support: "Help users troubleshoot technical issues and deliver step-by-step resolutions for reported problems."
Enhance prompt
The Enhance prompt feature automatically improves any step's natural‑language instructions in a single click. When editing a step that accepts a prompt, you can click the Enhance prompt button to have Glean review your text, apply embedded prompting best practices, and generate a refined version tailored to the step's objective.
Key features:
- Available on all steps that accept prompts - Works across any step type that allows free‑form instructions
- One-click improvement - Instantly applies field‑tested prompting best practices to your step instructions
- Undo support - If you don't like the enhanced version, you can instantly revert to your original prompt
- Consistent quality - Helps maintain high‑quality prompts across all steps in your agent
This feature is particularly useful for users who want to leverage proven prompting techniques without having to manually research and apply best practices themselves.
Natural Language Panel
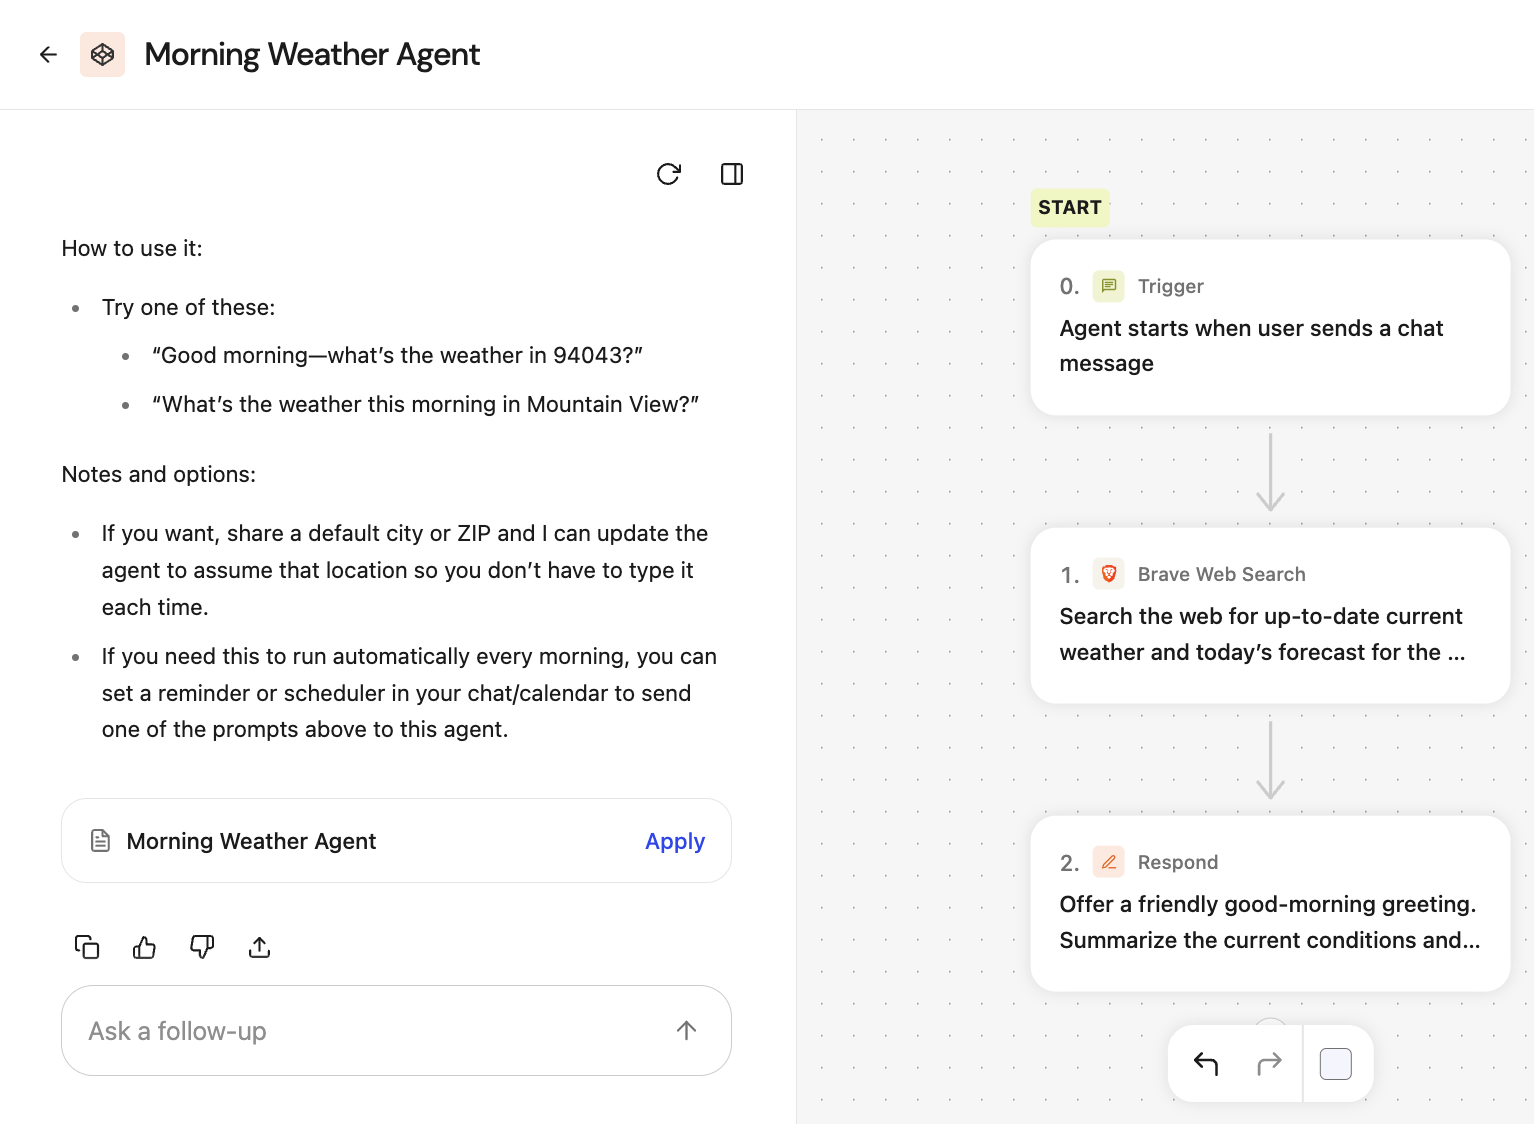
The Agent Builder includes a natural language panel that you can access at any time by clicking Open panel in the upper left corner. This panel allows you to:
- Generate new steps: Describe what you want your agent to do, and the system will create the appropriate steps automatically
- Modify existing steps: Provide instructions to update, reorder, or refine your current agent steps
- Iterate quickly: Make changes through conversation rather than manual configuration
Flexible Editing Workflow
The Agent Builder supports a hybrid approach that combines natural language and manual editing:
- Start with natural language: Use the initial modal or open panel to describe your agent's purpose
- Switch to manual editing: Take precise control over any step's configuration, models, or triggers
- Return to natural language: Use the Open panel whenever conversational editing is faster than field configuration
- Real-time updates: Your agent's steps update immediately as you iterate through either method
This unified experience lets you start with natural language and finish with precise configuration—or vice versa—without switching tools.
Preview
The preview agent option lets creators test or interact with their agent in a safe, private environment before making it available to a wider audience. This allows for troubleshooting, refining agent responses, and validating functionality without impacting real users or live workflows. This also streamlines the development cycle by enabling iterative updates and immediate feedback during testing.
After you kick off your agent using the preview, you will have two additional options:
- Reset Preview: Return to the first screen to enter new values for the initial trigger.
- Try Again: Re‑run your last input to observe how responses may vary.
Save
The primary button in the top-right of the builder is labeled Save.
- Click Save to apply your changes to the agent. All edits are held as a draft until you save.
- Drafts are auto-saved even if they contain errors, so you can persist changes without perfecting your agent.
- Want to undo changes? Click Restore to Published State to discard your draft.
More tools menu
The More tools menu (⋮) in the top-right of the builder header groups agent status and management options:
- Disable agent/Enable agent: pause or resume an agent without deleting it. Only available to admins with the right controls enabled.
- Delete agent: permanently remove the agent. Only available to users with owner-level delete access.
- Settings: open agent settings.
- View insights: open the insights dashboard for this agent.
- Duplicate: create a copy of the agent.
- Import/Export: import or export an agent configuration. Availability, access, and file format depend on the agent mode.
Export and import agents
Import and export availability depends on the agent mode:
| Agent mode | Availability | Export format | Access |
|---|---|---|---|
| Workflow mode | Generally available | JSON | Available to admins and Agent Moderators by default. Access can also be enabled for other users. |
| Auto mode | Limited availability and not generally available | ZIP file containing spec.yaml and instructions.md | Available only to admins in deployments where the feature is enabled. |
Workflow mode agents
You can export a Workflow mode agent to a JSON file and import it into another Glean deployment. This is useful for moving Workflow mode agents between environments or sharing their configurations across teams.
The export generates a JSON file containing the Workflow mode agent configuration, including steps, tools, sub-agents, and settings. Tool references are converted to portable names so the file works across deployments.
Import reads the exported JSON file and creates a new Workflow mode agent. Sub-agents included in the export are recreated automatically. If a tool referenced in the file doesn't exist in the target environment, that step is cleared and you need to reconfigure it after import.
Auto mode agents
Import and export for Auto mode agents are not generally available. The options appear only in deployments where Glean has enabled the limited-availability features, and only admins can use them.
When enabled, exporting an Auto mode agent creates a ZIP file containing spec.yaml and instructions.md. Import reads a ZIP file exported from an Auto mode agent. If the import or export option does not appear for an Auto mode agent, the feature is not enabled for your deployment.
Retrieval and execution limits
Agents have tool-call budgets for each run and payload size caps for each response. When you build agents that need to retrieve large datasets, for example every open ticket in a Jira project, use a native connector tool like JQL or SOQL rather than company search. Batch queries by date range or field to stay within those limits.
See Limits and exhaustive retrieval best practices for guidance on choosing between company search and native tools, configuring result counts, and paginating large result sets.
Agent Drafts
All changes made to an agent are automatically saved as a draft. These edits do not impact the live agent until you save.
Agent Versions
Each time you save, the current changes become the new live agent, and a snapshot of the previous live version is stored in version history.
- Version history lets you browse and revisit earlier agent versions.
- Click Restore on any past version to create a new draft from it.
- Only the most recent 30 versions are retained.