Connect Salesforce with Glean
Prerequisites
Salesforce org and API access
- A Salesforce org (Production or Sandbox) with API access (for example, Enterprise Edition or another edition with the API add‑on enabled).
- Admin access in Salesforce to create and configure an integration user and any required Connected App or OAuth policies (if your org enforces API access control).
Integration user (service account)
Glean strongly recommends a dedicated integration user that is not tied to a specific employee account so that connector access is stable over time. The following Profiles are supported:
-
System Administrator profile: Integration user has the System Administrator profile (or a similar full‑admin profile) with read access to the objects you intend to index and access to required metadata APIs.
-
Custom non‑admininstrator profile: Integration user has a custom profile and/or permission set with a defined minimum set of Administrative Permissions and Object Permissions. This approach requires more configuration and careful testing but can reduce blast radius if the account is compromised.
Required Salesforce permissions (high‑level)
The exact list of permissions depends on which objects and features you index, but typical requirements include:
- Administrative permissions such as:
- API Enabled
- View Setup and Configuration
- View Roles and Role Hierarchy
- View All Users
- View All Profiles
- View Data Categories in Setup (for Knowledge)
- View All Data (often required to read share records comprehensively)
- Query All Files (for Salesforce Files indexing)
- Chatter Internal User (for Chatter indexing)
- Standard object permissions (Read and usually View All) for core objects you plan to index (e.g., Account, Case, Contact, Lead, Opportunity, Task, Knowledge article types).
Where Salesforce API Access Control is enabled, you may also need to:
-
Allow the Glean connected app under
- Use Any API Client, or
- Approve Uninstalled Connected Apps (depending on your org’s policy).
Add the administrative permissions
To add the permissions, do the following:
-
Login to Salesforce. Navigate to Setup on the top right. On the left hand side, under Administration (Administer for Salesforce Classic), go to Users (Manage Users for Salesforce Classic) and then Profiles.
-
Select an existing Profile that will be used for the integration and hit Edit, or create a New Profile.
-
Under Custom App Settings, if you plan on indexing the following objects, ensure that the following settings are checked.
Content Permission setting Discussion Forums Community (Standard__Community): Visible Discussion Forums and Chatter Salesforce Chatter (Standard__Chatter): Visible -
Under Administrative Permissions, ensure that the following permissions are checked (any unset permission may lead to integration issues):
Permission setting Objective API Enabled Allows access to Salesforce API to ingest data View Roles and Role Hierarchy Captures document permissions for any object (users, permission sets, etc.) with an associated Role View Setup and Configuration Captures organization-level document permissioning View Data Categories in Setup Captures organization and access control in Salesforce Knowledge and Discussion Forums (Chatter) View All Profiles Captures document permissions for any object (users, permission sets, etc.) with associated Profiles View All Users Captures users to understand document permissions for each individual View Reports in Public Folders Captures public access reports View Dashboards in Public Folders Captures public access dashboards Chatter Internal User Captures discussion forums, chatter, and other feed-related items View All Data Allows the ability to directly query for all tasks and feed-related items
Salesforce has added restrictions in authorizing uninstalled connected apps. To allow the integration to work, we would additionally need:
- Use Any API Client permission: If API Access Control is enabled.
- Approve Uninstalled Connected Apps: If API Access Control is not enabled.
- Under General User Permissions, ensure that:
- Access Activities is checked. This is required to crawl tasks within Salesforce instance.
- Allow View Knowledge is checked. This is used to crawl all supported knowledge bases within the Salesforce instance.
- Under Standard Object Permissions, ensure that we have both Read and View All permissions to the following objects:
- Accounts
- Campaigns
- Cases
- Contacts
- Leads
- Opportunities
- Save the Profile. Finally, back on the left hand side, select Users, and create a new user with the associated Profile from the previous steps. Ensure that Knowledge User and Service Cloud User are both checked before hitting Save.
- You are now ready to authorize access on the main page with the newly created user.
Network and security prerequisites
Glean connects to Salesforce via HTTPS over the public internet; in environments with outbound network restrictions, ensure that your network allows outbound traffic from your Glean egress IPs to Salesforce endpoints (e.g., https://*.salesforce.com).
Glean permissions
To configure the Salesforce connector, you must be a Glean org admin (or hold an equivalent role authorized to manage connectors and tools in the Glean Admin console).
Set up the Salesforce connector
This section describes the recommended setup path. It assumes you have already identified or created your integration user in Salesforce.
Step 1: Create or select the Salesforce integration user
- In Salesforce, go to Setup → Users → Users and create a new user (or select an existing dedicated integration user).
- Assign the System Administrator profile, or a Custom non‑admininstrator profile that meets the Required Salesforce permissions listed above.
- Verify that:
- The user can log in successfully.
- The user can access representative records for each object you plan to index (e.g., Accounts, Cases, Knowledge articles) via the Salesforce UI or SOQL queries.
Step 2: Configure connected app and OAuth policies (if required)
If your org uses API Access Control or requires approval of uninstalled connected apps, review these Salesforce policies before authorizing the connector in Glean.
Verify the following settings:
- If API Access Control is enabled, make sure the integration user has the Use Any API Client permission.
- If API Access Control is not enabled, make sure Approve Uninstalled Connected Apps is enabled.
- Confirm that any IP restrictions or MFA rules are compatible with connector usage.
After an admin completes the initial authorization, you can verify the Glean connected app in Setup → Connected Apps OAuth Usage. If you re-authenticate with the integration user afterward, you can revoke the admin token.
If your integration user has API-only access (limited Salesforce UI access), they cannot approve the Glean connected app directly. In this case:
- Use a Salesforce admin account with full UI access to authorize the connector in Glean Admin.
- The admin completes the OAuth flow and approves Glean as an uninstalled connected app. This grants org-wide approval for the app.
- Re-authenticate using the integration user in Glean Admin. After org-wide approval, the integration user can complete OAuth without needing UI access.
- (Optional but recommended) Revoke the admin user's tokens: go to Setup → Connected Apps OAuth Usage, find the admin user's Glean connection, and revoke the refresh token to maintain least privilege.
For the related permission requirements, see the Required Salesforce permissions section earlier on this page.
Step 3: Add Salesforce as a connector in Glean Admin
- In Glean, go to Admin Console → Platform → Connectors and select Add connector.
- Choose Salesforce from the list of native connectors.
- Configure the connection:
- Name – a descriptive name, e.g.,
Salesforce – Production. - Icon – optional icon to represent Salesforce results.
- Custom login domain – if you use a My Domain or sandbox (e.g.,
myorg--sandbox.my.salesforce.com), enable and provide the domain if prompted.
- Name – a descriptive name, e.g.,
- Select data retrieval methods: Allow Glean to access data by checking both methods (recommended):
- Data crawling and indexing: Gathers and organizes data for fast access.
- Data fetching: Retrieves live data on a per-query basis.
- Click Authorize and sign in as the integration user in the Salesforce login window. Approve requested scopes when prompted.
- After successful authorization, save the connector. You can start a crawl immediately or return later to configure objects before starting the initial sync.
Step 4: Choose your initial object scope
After authorization, go to the Objects (or Setup → Objects) tab for the Salesforce connector in Glean Admin.
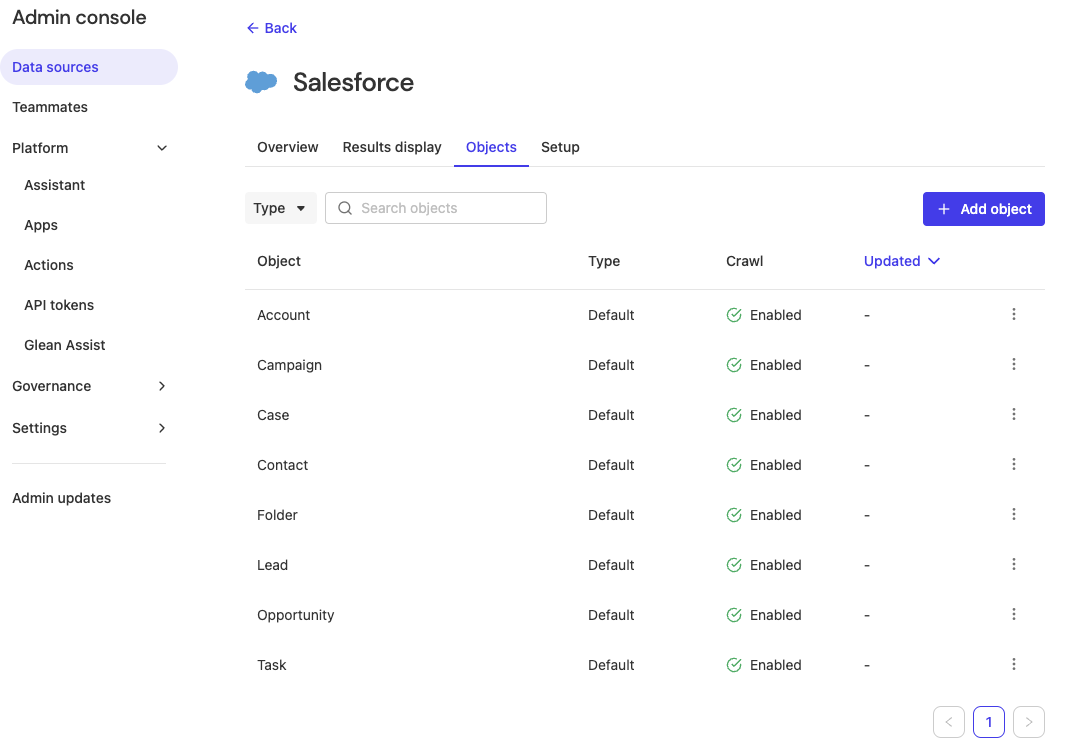
Figure 1: Salesforce connector “Objects” configuration in Glean Admin, showing standard objects, crawl type, and enabled status.
Recommended starting point for most orgs:
- Accounts
- Contacts
- Opportunities
- Cases
- Knowledge
You can add additional standard and custom objects later after you’ve validated indexing behavior and API usage.
Step 5: Start the initial crawl
- From the Salesforce connector page, click Crawl now (or equivalent tool) to begin the initial full crawl.
- Monitor crawl status and progress:
- The connector should move from Activating to Active after a successful initial crawl.
- Object‑level progress and document counts are visible in the Admin UI for the connector.
- For large orgs, the initial crawl may take hours or longer, depending on the number of objects, records, and fields, and on your Salesforce API limits.
Step 6: Validate results
After the first crawl completes:
- Functional checks
- Search in Glean for a known Account name, Case number, or Opportunity to confirm those records appear as Salesforce results.
- Verify that key fields (title, owner, status) look correct in result snippets.
- Permission checks
- Using two test users with different Salesforce access, verify that:
- The user who can see a record in Salesforce also sees it in Glean.
- A user who cannot see a private opportunity or case in Salesforce does not see it in Glean.
- Using two test users with different Salesforce access, verify that:
- Files and Knowledge
- If you have enabled file indexing, confirm that representative files appear and that their content is searchable (subject to file‑type and size limits).
- For Knowledge, verify that published (and optionally draft) articles appear as expected.
Configure object coverage and fields
Adding and configuring standard and custom objects
In the Objects tab of the Salesforce connector, you can:
- Enable or disable standard objects such as Account, Opportunity, Case, Knowledge, etc.
- Add additional standard or custom objects by entering their object API names and configuring field mappings for each.
For each object you configure, you provide:
- Title field – field used as the document title (e.g.,
Name). - Owner - for example,
OwnerId.
Determine whether your data is an object or a field
When you want Glean to index additional Salesforce data — for example, internal notes or fields synced from another system — the first step is to determine whether that data is a standalone Salesforce object or a field on an existing object. The configuration path in Glean depends on which one it is:
- Standalone object — appears as its own entry in Salesforce Object Manager (for example, a custom object like
Internal_Note__c). You add it from the Objects tab in Admin console using its Salesforce object API name. - Field on an existing object — appears as a property under an existing object's Fields & Relationships (for example, a custom field
Jira_Link__con the Case object). It won't show up as a separate object to add. Instead, configure it as a field on the relevant existing object.
Verify in Salesforce
- Check Object Manager — in Salesforce, navigate to Setup → Object Manager. Search for the data you're looking for. If it appears as a top-level entry, it's a standalone object.
- Check Fields & Relationships — if it doesn't appear as a top-level entry in Object Manager, navigate to the parent object (for example, Case or Account) → Fields & Relationships. If it appears there, it's a field on that object.
- Verify metadata flags — for standalone objects, confirm that the object is marked as queryable and retrievable. In Object Manager, select the object → Details and check these flags. If the object isn't queryable, Glean won't show it in the object picker.
Add a custom object in Glean
- Navigate to Admin console → Data sources → Salesforce → Objects.
- Click Add object.
- Enter the Salesforce object API name (for example,
Internal_Note__c). - Configure the Title field, Owner, and any custom properties.
If the object doesn't appear in the picker when you click Add object, the most common causes are:
- The integration user's service account doesn't have sufficient permissions (see below).
- The object isn't marked as queryable or retrievable in Salesforce metadata.
Required permissions for custom objects
The Salesforce integration user (service account) needs the following permissions for each custom object you want to index:
- Read access to the custom object
- View All on each custom object that should be indexed
- Field-level read access for the fields you want Glean to map or index
For a complete list of required administrative and object permissions, see the Required Salesforce permissions section earlier on this page.
Custom properties, facets, and filters
You can declare additional fields as:
- Indexable – their contents are full‑text searchable in Glean.
- Facets/filters – exposed as filterable properties in Glean Search.
The object setup UI only presents certain field types as candidates for filters (facets), including:
emailpicklistmultipickliststringbooleancombobox
Other field types may still be indexed for search but will not appear in the filter dropdown when configuring filters in Glean Admin and cannot be used as structured filter operators.
Inclusion and exclusion rules
Glean supports inclusion (green‑listing) and exclusion (red‑listing) at multiple levels:
- Object‑level inclusion – choose which objects to index (e.g., index Accounts and Cases but not certain HR‑related custom objects).
- Record‑level filters – for some objects, you can apply conditions (e.g., only open Cases or certain record types), using fields that are eligible as filters.
- Field‑level exclusion – highly sensitive fields can be excluded/red‑listed so they are never indexed, even if records are indexed; this is an important mitigation given the lack of FLS enforcement at query time.
For complex red‑listing patterns, Glean Support can help configure field‑level exclusions that are not directly editable in the UI.
Query filters
You can add query filters to limit which Salesforce records are indexed for a given object. Filters use SOQL WHERE-clause conditions — only records that match all specified filters are indexed by Glean.
How to configure query filters
- In the Admin Console, navigate to Connectors > Salesforce > Objects.
- Add a new object or edit an existing one.
- Expand the Advanced options section.
- Click Add filter.
- For each filter, select:
- Field name: The Salesforce field to filter on (populated from the object's schema).
- Operator: The comparison operator (see Supported operators).
- Value: The value to compare against.
- Click Save to apply the filters.
Supported operators
| Operator | Description | Example |
|---|---|---|
= | Exact match | Status = "Active" |
!= | Excludes exact match | Status != "Archived" |
< | Values below threshold | Amount < 1000 |
> | Values above threshold | Amount > 500 |
<= | Values at or below threshold | Priority <= 3 |
>= | Values at or above threshold | Score >= 80 |
LIKE | Wildcard text matching using % | Name LIKE "Acme%" |
NOT LIKE | Excludes wildcard matches | Name NOT LIKE "%Test%" |
IN | Matches any of multiple values (comma-separated) | Status IN Active,Pending |
NOT IN | Excludes multiple values (comma-separated) | Region NOT IN EMEA,APAC |
INCLUDES | For multi-select picklists, matches records containing specified values | Tags INCLUDES Finance,Tech |
EXCLUDES | For multi-select picklists, excludes records containing specified values | Tags EXCLUDES Internal,Draft |
Filter behavior
- When multiple filters are added, they are combined using AND logic — all conditions must be met for a record to be indexed.
- Filters are applied during crawling. Records that do not match the filter conditions will not appear in Glean search results.
- Filters work with both standard and custom Salesforce objects.
Example — multiple filters on the Account object:
| Field name | Operator | Value |
|---|---|---|
Industry | = | Technology |
AnnualRevenue | >= | 1000000 |
BillingCountry | IN | US,Canada |
Because filters use AND logic, only Accounts where all three conditions are true will be indexed:
- Industry is "Technology", and
- AnnualRevenue is at least 1,000,000, and
- BillingCountry is either "US" or "Canada"
An Account in the Technology industry with $500,000 in revenue would not be indexed because it fails the AnnualRevenue condition.
Limitations
- Filters apply only to the configured object. They are not applied to related objects such as parent records, child relationships, or associated objects. If you need to scope related data, configure filters separately on each object.
- Salesforce Tools that make live SOQL calls on behalf of the user do not respect these filters. These filters only apply to records that are indexed.