Microsoft Dynamics 365
The Microsoft Dynamics 365 connector indexes CRM data from Dynamics 365: accounts, contacts, leads, opportunities, and activities. This makes it searchable in Glean alongside your other sources. After setup and an initial crawl, this CRM context is available in Glean Search, Glean Assistant, Glean Agents, and Glean MCP.
The connector depends on a healthy SharePoint or OneDrive connector on the same Microsoft Entra ID tenant for identity and permission mapping.
- A Microsoft 365 identity connector is required. Configure SharePoint or OneDrive on the same Azure tenant as Dynamics 365 first. It is the source of truth for the users and groups used to enforce Dynamics 365 permissions.
- Admin privileges are required for setup. You need a Microsoft 365 Global Administrator to add the application user, and an Azure administrator (Global, Application, or Cloud Application Administrator) to register the app and grant admin consent.
What gets indexed
By default, the connector indexes these Dynamics 365 tables:
| Table | Support | Notes |
|---|---|---|
| Accounts | Indexed | Default table. |
| Contacts | Indexed | Default table. |
| Leads | Indexed | Default table. |
| Opportunities | Indexed | Default table. |
| Activities | Indexed | Includes emails, meetings, and attachments. |
| Other tables | Indexed when enabled | Any Microsoft-provided or customer-defined table. Contact Glean Support to greenlist additional tables; columns can be redlisted to exclude them. |
The connector discovers table schemas and column metadata automatically and performs full and incremental crawls to keep data current. Greenlisting tables and redlisting columns are configured by Glean Support and aren't available in the setup UI.
Before you start
Have these in place before you configure the connector, to avoid mid-setup delays:
- A Microsoft 365 identity connector. SharePoint or OneDrive must be configured and healthy in Glean, linked to the same Azure tenant as Dynamics 365.
- A licensed, accessible Dynamics 365 environment within your organization.
- Azure portal access to register and manage applications, held by a Global, Application, or Cloud Application Administrator.
- A Microsoft 365 Global Administrator to add the application user in the Power Platform admin center.
- (Optional) Hierarchy security already enabled in your Dynamics 365 environment, if you want Glean to mirror hierarchy-based access.
Permissions to request from IT
Dynamics 365 authenticates as an Azure app registration that you add as an application user in your Dynamics 365 environment, assigned a security role that grants read access. Request the items below in one pass so you don't discover a missing grant after setup. Hand this section to whoever administers your Azure and Dynamics 365 tenants.
Glean operates read-only. The application user is assigned a security role scoped to read access for the tables Glean indexes, not System Administrator. Glean never creates, modifies, or deletes data in your Dynamics 365 environment, and search results mirror each user's existing Dynamics 365 record access.
- Microsoft Entra ID
- Dynamics 365 environment
| Grant | Why Glean needs it | What breaks without it |
|---|---|---|
| App registration with a client secret | Authenticates Glean to the Dynamics 365 (Dataverse) APIs. | Glean can't authenticate, and no content is crawled. |
Dynamics CRM user_impersonation (Delegated) | The API permission the app requests against the Dynamics CRM API. | The app can't call the Dynamics 365 Web API; crawls fail. |
| Admin consent on the app | Finalizes the user_impersonation permission for the tenant. | The user_impersonation permission stays unconsented for the tenant. |
| Grant | Why Glean needs it | What breaks without it |
|---|---|---|
| Application user for the app | Represents Glean inside your Dynamics 365 environment. | Glean has no identity in Dynamics 365 and can't read records. |
| A security role granting read access to the indexed tables | Read-level access at the organization, business unit, or parent:child business unit level, as your data model requires. Assign the least-privilege read role, not System Administrator. | Tables the role can't read return no results in Glean. |
Assign a security role scoped to read the data you want indexed. A custom organization-level read-only role with access to the indexed tables is the recommended least-privilege choice. Avoid assigning System Administrator; it grants far more than Glean needs.
Request summary
Copy this into your IT request so every grant is approved in one pass:
Microsoft Entra ID
- App registration with a client secret
- Dynamics CRM > user_impersonation (Delegated) API permission
- Admin consent on the app

Dynamics 365 environment
- Application user for the app
- Security role granting read access to the indexed tables (least-privilege, not System Administrator)
Set up the connector
The user setting up this connector must be a Microsoft 365 Global Administrator.
1. Confirm the Microsoft 365 identity connector
Make sure a SharePoint or OneDrive connector on the same Azure tenant as Dynamics 365 is already configured and healthy in Glean. It provides the identity and permission mapping Dynamics 365 relies on.
2. Register a new Azure app
Sign in to the Azure portal. Go to Microsoft Entra ID → Manage → App registrations → New registration. Register an app with the following:
| Field | Value |
|---|---|
| Name | Glean |
| Supported account types | Accounts in this organizational directory only (Single tenant) |
| Redirect URI | Leave blank |
Click Register.

3. Configure API permissions
On the app's left navigation, go to Manage → API permissions → Add a permission → Dynamics CRM. Select Delegated permissions and add:
user_impersonation
4. Grant admin consent
Signed in as a Global, Application, or Cloud Application Administrator, search for Enterprise applications and select the Glean app you created. Under Security, click Permissions, review the permissions, and click Grant admin consent. The Dynamics CRM user_impersonation permission should now show as consented on the API permissions page.

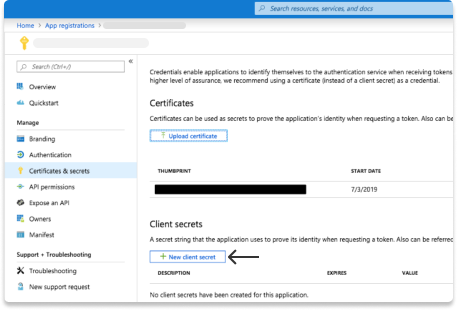
5. Generate a client secret
Go to Microsoft Entra ID → Manage → App registrations, open the app, then Manage → Certificates & secrets → New client secret. Enter a description, choose 24 months for expiry, and click Add. Under Client secrets, copy the Value (not the Secret ID), which is shown only once. This is the client secret you'll paste into Glean.
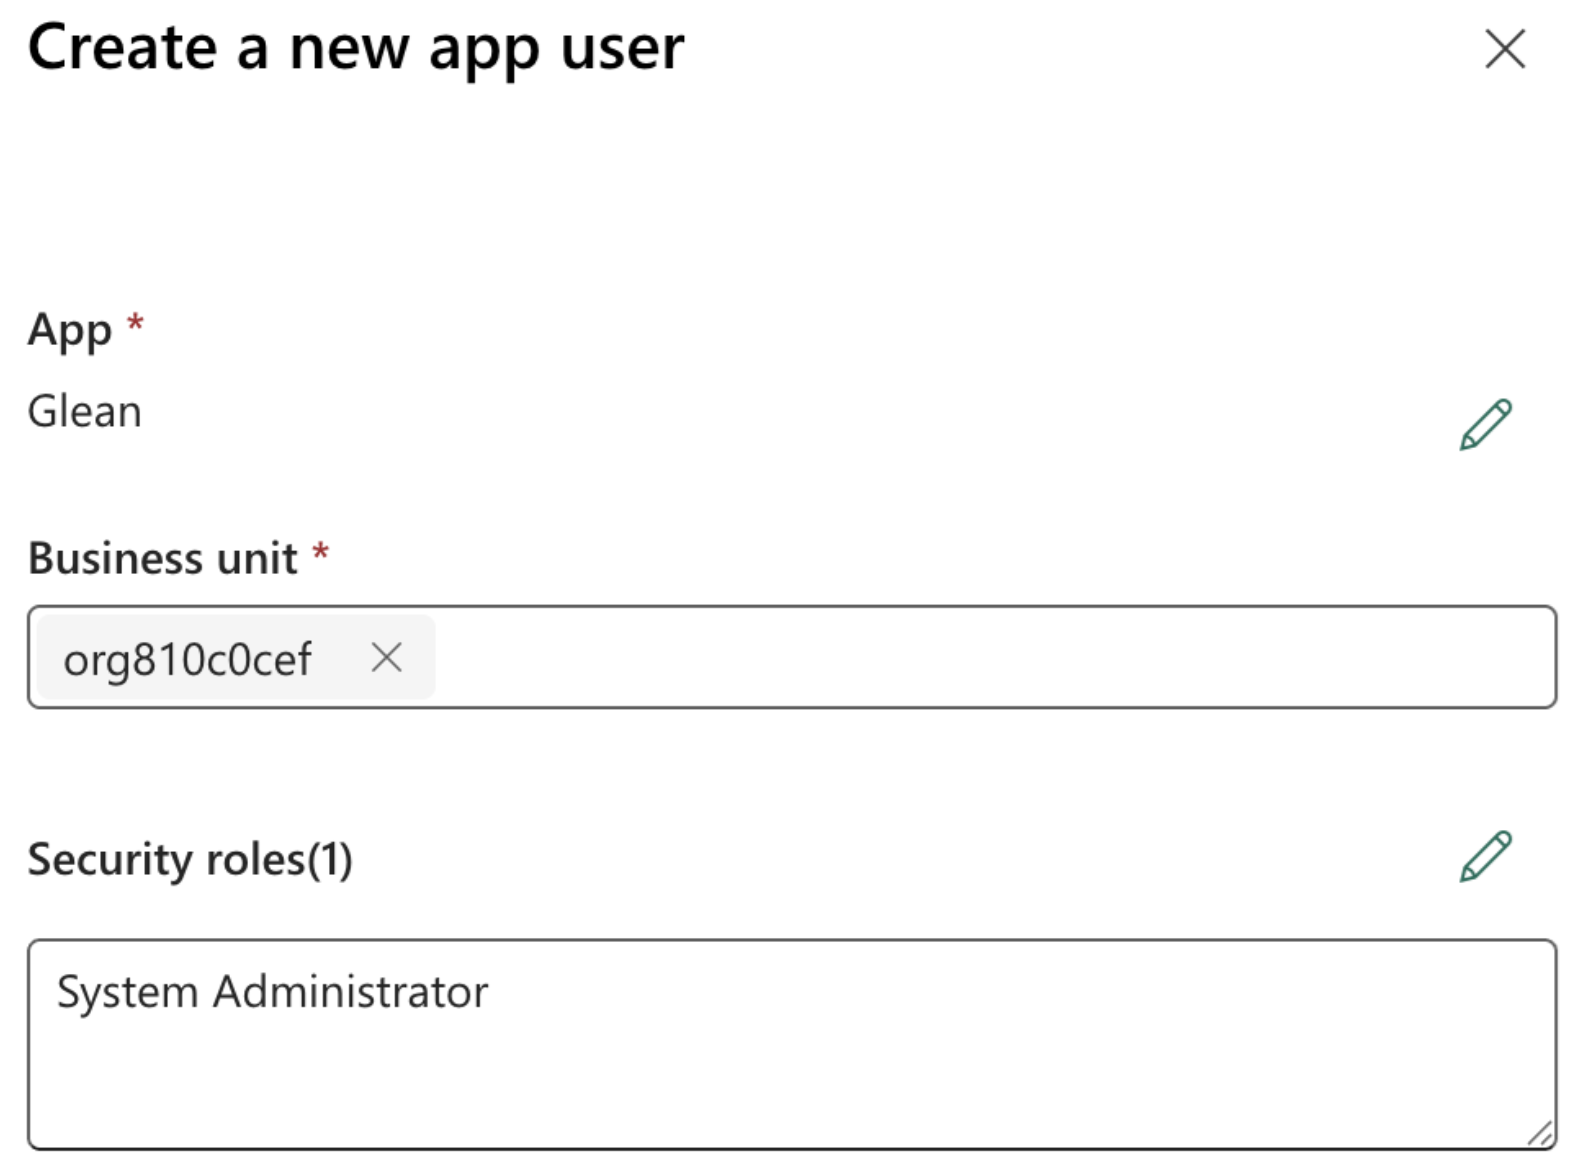
6. Find your Dynamics 365 organization ID
The organization ID is part of your Dynamics 365 domain. In https://org810c0cef.crm.dynamics.com/, the organization ID is org810c0cef.
If your Dynamics 365 URL uses a regional host such as crm4.dynamics.com or a sovereign cloud host such as crm.microsoftdynamics.us, the organization ID alone is not enough. Glean must use your full Dynamics 365 host to connect correctly. Contact Glean Support to have your full environment host configured.
7. Add the application user in Dynamics 365
Sign in to the Power Platform admin center and select the Dynamics 365 environment you want to connect. Go to Settings → User + permissions → Application users.
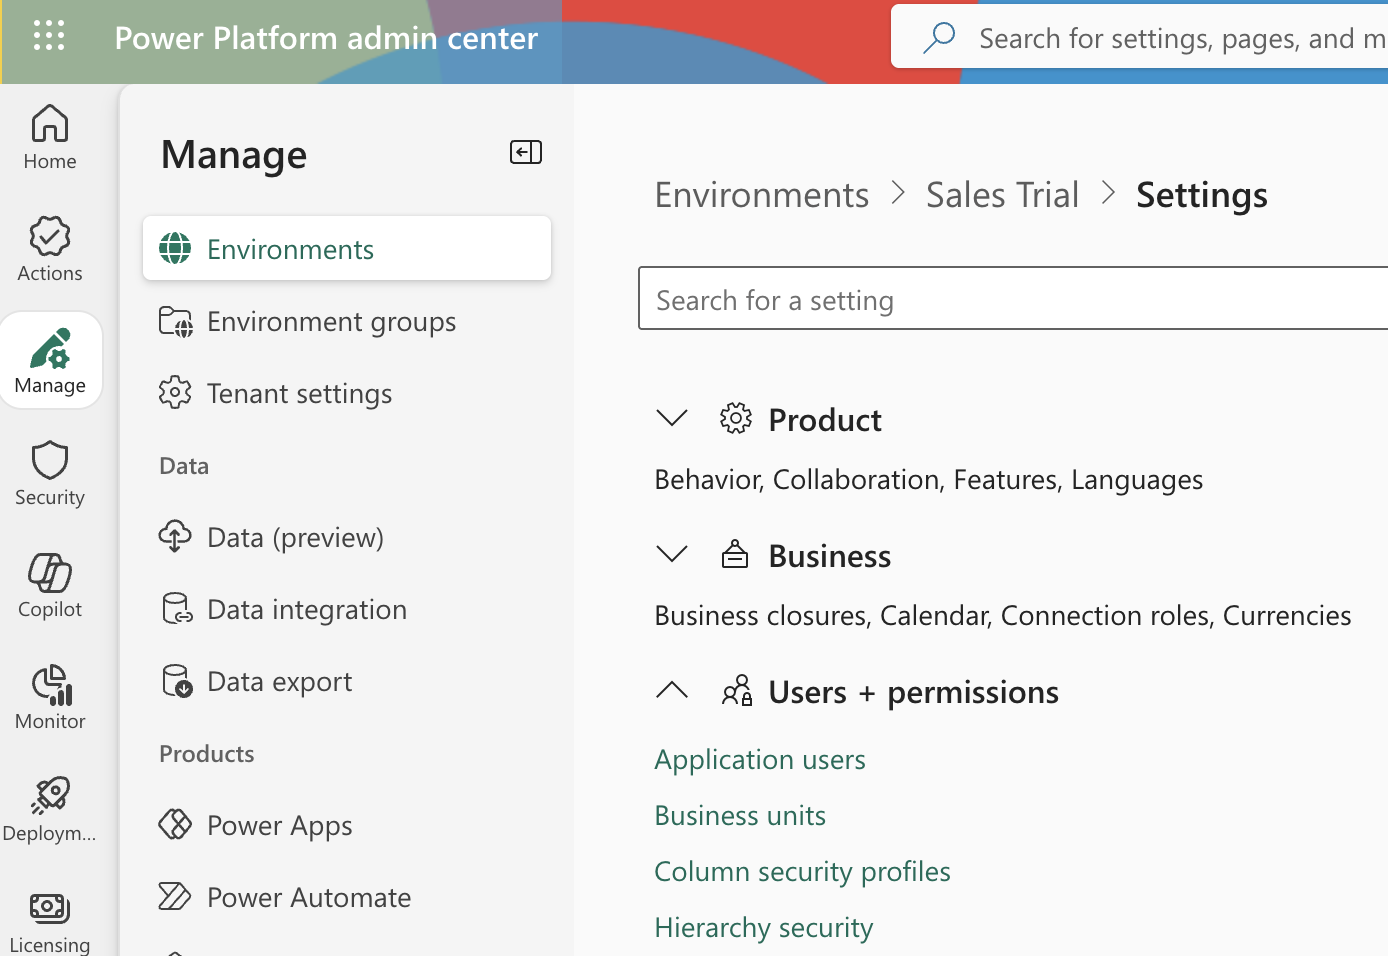
Click + New app user, enter the app name and Dynamics 365 organization ID, assign a security role that provides read access to the data you want indexed (a least-privilege org-level read-only role, not System Administrator), then click Create.
8. Configure the connector in Glean
In the Glean Admin console, open the connector's Setup page and provide:
- Application (client) ID and Directory (tenant) ID: from the app registration Overview tab
- Client secret: the value from the earlier step
- Dynamics 365 organization ID: from your environment URL
Click Save. If the credentials validate, setup is complete.
Verify the connection
After saving the connector:
- Check crawl status. In the Glean Admin console, confirm the Dynamics 365 connector's initial crawl completed without errors.
- Search with the app filter. Search in Glean using the Dynamics 365 app filter and confirm records appear for a user who has access in Dynamics 365.
- No results? A successful crawl with empty results usually means the SharePoint or OneDrive identity connector is missing or unhealthy, or the application user's security role can't read the indexed tables. See Troubleshooting.
Crawling strategy
| Content | Full crawl | Incremental crawl | People data | Activity | Webhook | Notes |
|---|---|---|---|---|---|---|
| Dynamics 365 CRM | Yes | Yes | No | No | No | Indexes the default tables by default; additional tables when configured by Glean Support. One Dynamics 365 organization per connector instance. |
When hierarchy security is enabled, Glean also reads Dynamics 365 hierarchy settings, hierarchy exclusions, and position hierarchy data to mirror access correctly. Glean also reads per-record sharing grants from the Dataverse principalobjectaccess table during full crawls to enforce sharing-based access.
Troubleshooting
- Crawl succeeds but no results appear. Dynamics 365 relies on a healthy SharePoint or OneDrive connector on the same Microsoft Entra ID tenant to resolve users and groups. If that identity connector is missing or unhealthy, records are crawled but can't be permission-mapped, so results are empty.
- A table returns no results. The application user's security role must grant read access to that table at the appropriate level (organization, business unit, or parent:child business unit). Tables the role can't read return nothing.
- Authentication fails. Confirm admin consent was granted for the Dynamics CRM
user_impersonationpermission, and that the client secret hasn't expired.
Limitations
- One organization per connector instance. A single Dynamics 365 organization (tenant) can be connected to each Glean connector instance.
- Hierarchy changes aren't real-time. Hierarchy-related permission changes take effect after the next hierarchy crawl and subsequent content reprocessing.
- Sharing permission changes require a full crawl. Sharing-based access updates are picked up during the next full crawl, not during incremental crawls.
Permissions and security
Glean enforces Dynamics 365 record access at query time, so users only see records they can access in the source.
-
Role-based access is the base model. Glean respects the read access level configured in Dynamics 365 (at the Organization, Business Unit, or Parent:Child Business Unit level) and owner-based read access for records owned by a user or team. Read privileges for indexed tables map to record access in Glean. See Microsoft's Security roles and privileges for Dataverse.
-
Sharing-based access. Glean honors per-record sharing grants from the Dataverse
principalobjectaccesstable. If a record is explicitly shared with a user or team in Dynamics 365, that user or team member can see it in Glean results. Sharing grants are additive: they extend access beyond what role-based security alone provides, but never restrict it. Sharing-based access applies to all indexed tables and is picked up during full crawls. -
Hierarchy-based access (optional). When hierarchy security is enabled in both Dynamics 365 and the Glean connector, Glean also mirrors hierarchy access:
- Manager hierarchy. Users inherit access to records owned by or shared with their direct and indirect reports.
- Position hierarchy. Users inherit access based on their relative level in the configured position structure.
Glean respects the maximum hierarchy depth configured in Dynamics 365, and skips hierarchy expansion for any table excluded from hierarchy security. Additional indexed tables follow the same permission model as the default tables. See Microsoft's Hierarchy security documentation.
Authentication uses OAuth 2.0 against Microsoft Entra ID. Glean does not modify or create data in your Dynamics 365 environment, and indexed CRM data may include personally identifiable information (PII) as present in source records, protected in Glean by the same role-based access controls. All data is encrypted in transit and at rest following Glean's standard security and compliance practices.