Admin VPN setup in the Glean Admin Console
The VPN setup tab in the Glean Admin Console lets workspace administrators set up a site‑to-site VPN tunnel between Glean and an on-premises or private network. This feature automates the networking process and shortens the time required to connect internal systems to Glean.
This self-serve VPN setup flow is currently available only for GCP deployments.
Use this page alongside your existing networking documentation, such as connecting Glean to on-premises connectors for GCP or AWS, to configure an IPsec VPN.
Only workspace admins with the appropriate role can view or change VPN settings. Standard users cannot see the VPN Setup page.
When to use VPN setup
Use VPN setup when:
- Your connectors live on‑premises or in a private network that is not reachable from the public internet (for example, on‑prem Jira, Confluence, GitLab, or internal web apps).
- You want to connect customer‑hosted services that power Glean Tools or LLM endpoints over a private network path.
- You already use IPsec site‑to‑site VPNs and want a self‑serve way to configure the Glean side.
If your environment is entirely on GCP and you already use Shared VPC or VPC peering, those patterns may remain preferable for some deployments. The VPN setup tab focuses only on IPsec VPN.
How the VPN connection works
Glean and your network establish an IPsec site‑to‑site VPN tunnel:
- You reserve a /29 transit CIDR range that does not overlap with your own VPC ranges or Glean’s internal ranges.
- Glean uses this range to create a transit VPC and a VPN gateway. Glean exposes a Glean peer IP that your VPN gateway uses as the remote endpoint.
- You configure your VPN gateway with:
- Its own public IP address (your peer IP).
- An IKE protocol version (typically version 2).
- A pre‑shared key (PSK).
- Routes for the internal networks that should be reachable via the tunnel.
- Glean stores the PSK securely and completes the IPsec configuration from its side.
Once the tunnel is up, Glean can reach internal services you configure for crawlers or Tools, subject to your firewall and routing rules.
Prerequisites
Before using the VPN setup tab, make sure:
- You have selected a /29 transit CIDR range (for example,
1.x.x.1/29) that:- Does not overlap with your existing on‑prem or cloud VPC ranges.
- Does not overlap with Glean’s reserved ranges (such as
35.239.35.180/32).
- Your networking team can provide:
- Your VPN gateway’s public IP address.
- The IKE version to use (v2 recommended).
- A strong pre‑shared key (PSK).
- Your firewalls and routing can allow IPsec traffic between your gateway and the Glean transit range.
- You know which internal networks and services you plan to expose to Glean once the VPN is active.
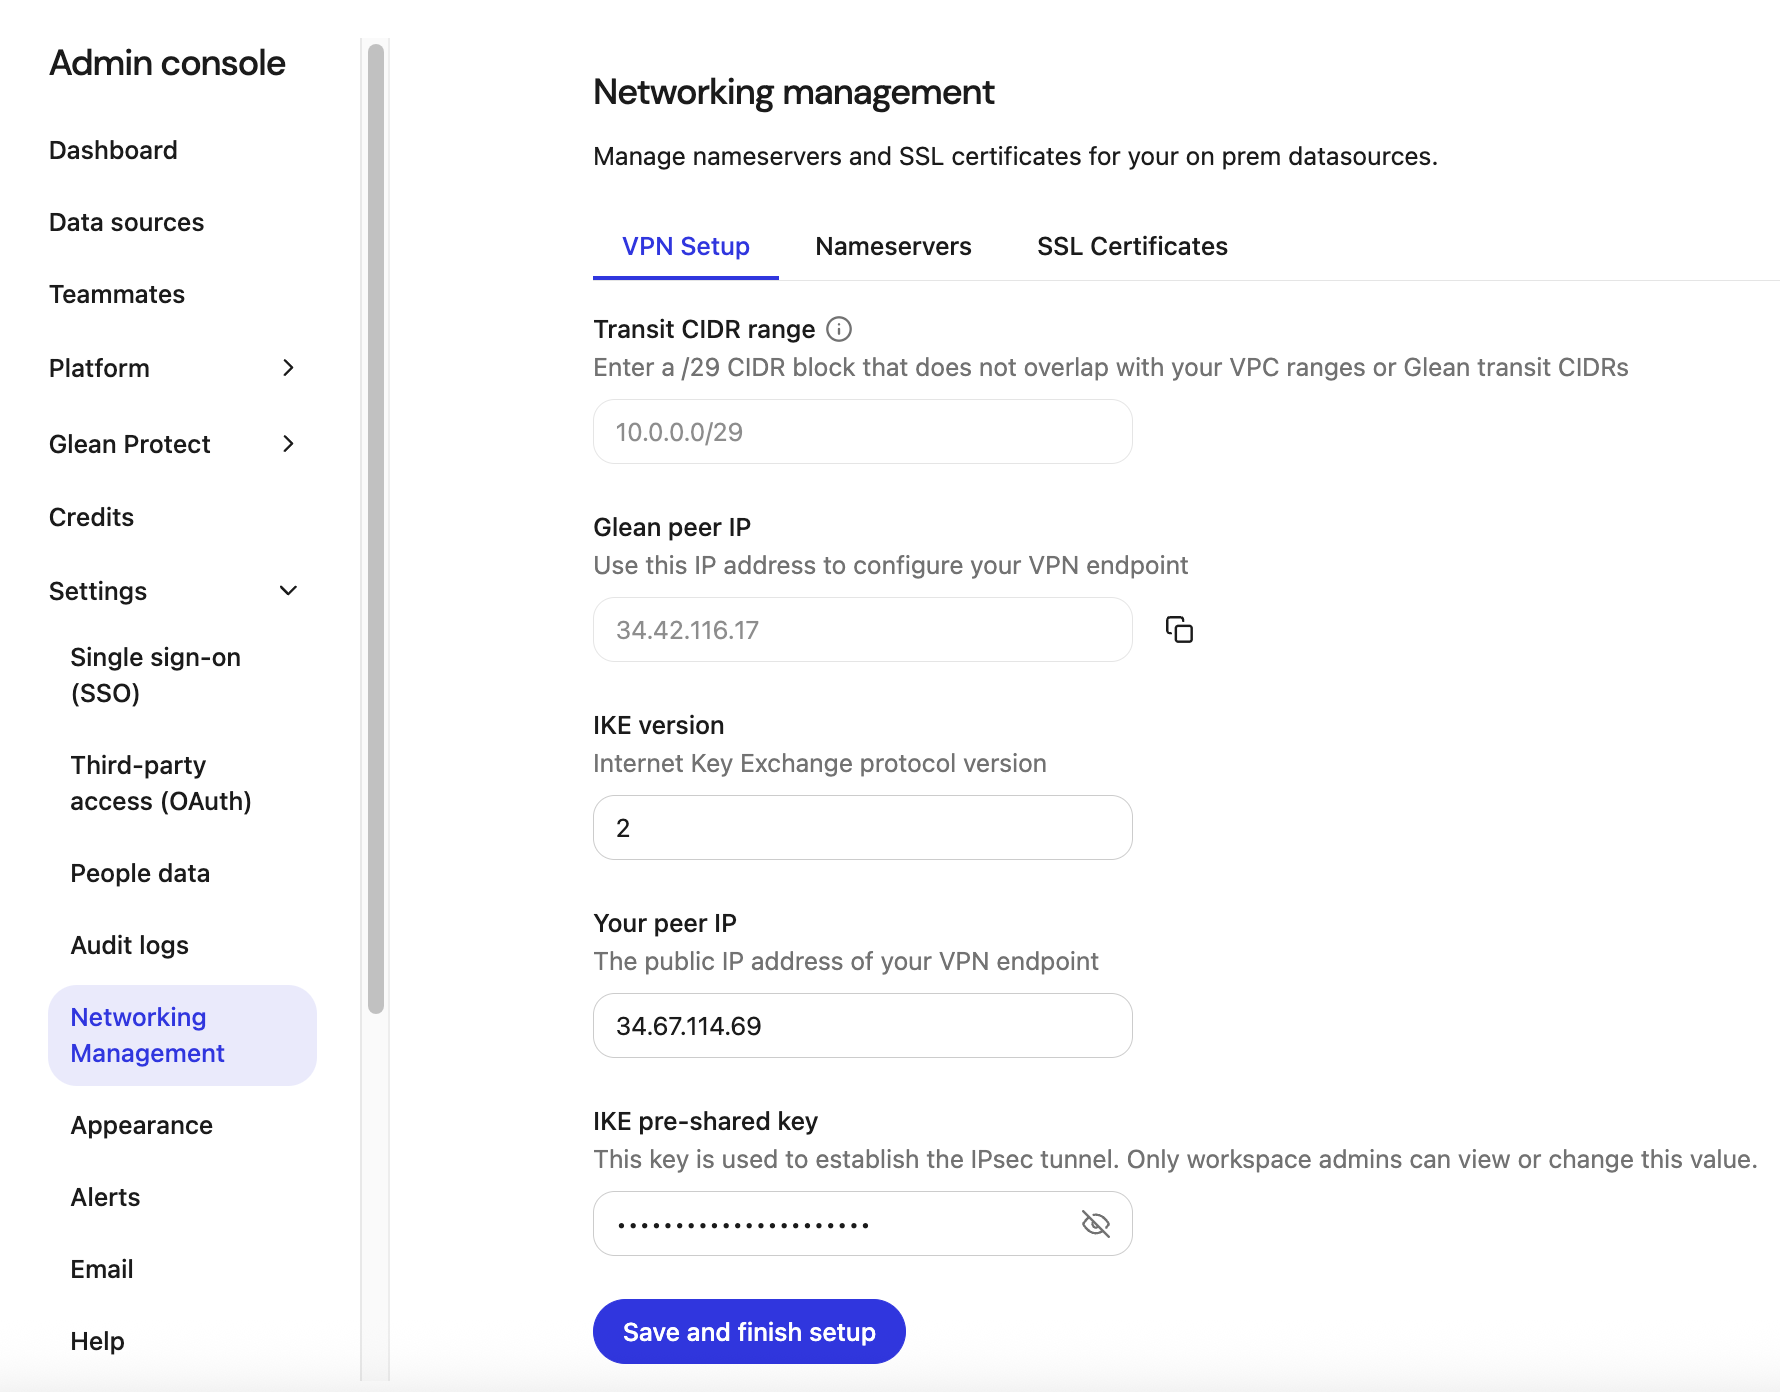
Field reference
The VPN setup tab contains the following fields:
-
Transit CIDR range: A /29 CIDR block reserved for Glean’s transit VPC. You set this value only once; it becomes read‑only after initial provisioning.
-
Glean peer IP: The VPN endpoint IP address hosted by Glean. Use this value when you configure your own VPN gateway.
-
IKE version: The Internet Key Exchange version used for the tunnel (commonly
2). -
Your peer IP: The public IP address of your VPN gateway.
-
IKE pre‑shared key: The shared secret used to authenticate and establish the IPsec tunnel. Only admins can edit this field.
-
Save and finish setup: Applies your configuration and finalizes tunnel creation. After a successful run, you generally do not need to click this again unless you work with Glean to change configuration.
How to set up VPN in the Admin Console
Step 1. Open the VPN setup tab
- In the Admin Console, go to Settings → Networking Management → VPN Setup.
This tab is currently available only for GCP deployments.
If this is the first time you are configuring VPN, only Transit CIDR range will be editable. After the initial setup, that field becomes read‑only.
Step 2. (First‑time only) Set the transit CIDR range
- In Transit CIDR range, enter a /29 block that does not overlap with your VPC ranges or Glean transit CIDRs (for example,
1.x.x.1/29). - Save to start VPN setup.
Glean provisions its side of the VPN in the background. When this completes:
- Transit CIDR range is disabled (read‑only).
- Glean peer IP is populated with Glean’s VPN endpoint address.
You only perform this step once for the deployment.
Step 3. Share the Glean peer IP with your networking team
- In Glean peer IP, copy the IP address.
- Ask your networking team to configure a site‑to‑site IPsec VPN on your VPN gateway using:
- The Glean peer IP as the remote endpoint.
- The non‑overlapping /29 transit range you selected.
- A strong PSK (they generate and share the value with you).
Your networking team should also configure appropriate routes so Glean can reach the internal networks you intend to crawl or call.
Step 4. Enter the details in Glean
After your VPN gateway is configured, provide the details of the following fields on the VPN Setup tab:
- IKE version: Enter the Internet Key Exchange protocol version for the tunnel, typically
2. - Your peer IP: Enter the public IP address of your VPN endpoint (your VPN gateway).
- IKE pre‑shared key: Paste the PSK used to establish the IPsec tunnel. Only workspace admins can view or change this value in the UI.
Step 5. Save and finish setup
- Click Save and finish setup.
- Glean:
- Stores the PSK in a secure secrets store.
- Applies the configuration and brings the tunnel up end‑to‑end.
- On success:
- You see a confirmation message.
- The button becomes disabled or disappears, indicating that setup is complete.
- If setup fails:
- Review the error message.
- Check for issues such as:
- Invalid or overlapping transit CIDR.
- Incorrect peer IP.
- Mismatched IKE version.
- Incorrect PSK.
- Fix the values and click Save and finish setup again.
What you can and cannot change
- You cannot edit the transit CIDR range from the Admin Console after initial setup. Changing it later requires Glean support and may involve re‑provisioning the VPN.
- You can update IKE version, Your peer IP, and IKE pre‑shared key only during setup. After a successful configuration, changing them typically requires coordination with Glean support to avoid downtime.
- Deleting or re‑creating the tunnel is not self‑serve today; contact Glean if you need to fully reconfigure VPN.
After VPN is established
Once the VPN tunnel is up:
- You can configure on‑prem or private connectors to use hostnames or IPs that are reachable only through the VPN.
- You can set up Tools or other integrations that call services reachable over the private network.
- You should validate:
- Connectivity from Glean to your key endpoints.
- That only the intended networks are reachable over the tunnel.
- That existing firewall and access control policies still meet your security requirements.
For detailed network patterns and alternatives (Shared VPC, VPC peering, Private Service Connect, or AWS TGW), see Connecting Glean to on‑premises connectors for GCP and AWS.