Agent library
The Agents page (referred as Agent library) lists all agents available based on the permission of your organization. From the Agents page, you can find, favorite, and launch agents to automate your workflows. It is designed for any team member looking to leverage agents to streamline their workflows.
To access the Agents page:
- Open Glean.
- Click Agents in the left navigation. You are redirected to the Agents page.
If you do not see Agents in the navigation, contact your admin to enable the Agent Library or assign you the appropriate role.
Using the Agents page
Find and use agents in the Agent Library
The Agent Library is a single-page catalog where you can browse, filter, and search for agents you can run. It replaces the older two-tab layout All agents / Active agents with one page optimized for discovery.
When you open the Library, you will see:
- A search bar across the top to look for agents by name or purpose.
- Filters that help you narrow down agents by who created them, verification status, and category.
- A list of agents with key details such as name, badge, author, and usage.
You can use the Library in three main ways:
-
Search for an agent
Enter keywords that describe what you want to do, for example, “create a customer QBR deck” or “summarize Zendesk tickets”. Glean searches across the agent’s name, description, and internal steps so you can find the right agent even if you don’t know its exact title. -
Filter by who created the agent
Common filters include:
- By you: Shows agents you have created or run. This is the fastest way to return to agents you personally use most often.
- Verified / by Company: Shows agents that your admins or moderators have reviewed, branded as by Company, and marked as trusted for broader use. These are often the “official” agents your organization wants people to rely on.
-
Browse by category
Your admins can define categories that group related agents, such as:
- Sales
- Marketing
- Support
- HR
- All
From the Library, you can open a category dropdown or navigation and browse all agents in that group. Categories are curated by admins to highlight the most relevant, high-quality agents for each audience.
Activate and manage triggered agents
When you open a scheduled or content-triggered agent in the library, the trigger details and activation controls appear at the top of the page. Glean also redirects you here automatically right after you publish a new agent.
Activate an agent
- Review the configuration (Prerequisite)
Confirm the trigger details and setup before turning the agent on. - Turn on the agent (Activation)
Use the activation controls to turn on the agent. - Verify in the dashboard (Confirmation)
After turned on, the agent moves to the Active agents table.
Manage active agents
From the Active agents table, you can monitor and control your running agents:
- Monitor performance: Review trigger configurations and check the last run status.
- Control execution: Pause or resume the agent as needed.
- Clean up: Remove the agent permanently when it is no longer required.
For setup details, see Content triggers and Schedule triggers.
Understand agent badges and metadata
Each row in the Library shows information that helps you decide whether to trust and use an agent:
- Agent name: A short description of what the agent does.
- Verified / company badge: Indicates that the agent was created or curated by admins or moderators and is considered an official, trusted agent. The badge appears in the Library list and on the agent’s detail view.
- Author: Shows either the individual who created the agent or your company name (for branded agents).
- Usage signals :May include views, run counts, or other indicators your deployment exposes to show how commonly an agent is used.
As a general rule:
- Prefer verified / company-branded agents when you need an officially supported workflow.
- Use personal or unverified agents for experimentation or team specific workflows.
Disable Glean-managed agents
Glean-managed agents show Glean as the author on their agent card. The set of available Glean-managed agents can vary by workspace, so not every organization sees the same agents.
To disable a Glean-managed agent:
- Open Agents in the left navigation.
- Browse or search for the Glean-managed agent that you want to manage. Its card shows Glean as the author.
- On a desktop, hover over the agent card to show its circular action buttons. On a touch-only or smaller screen, open the three-dot menu.
- Select Disable agent.
- Confirm the action.
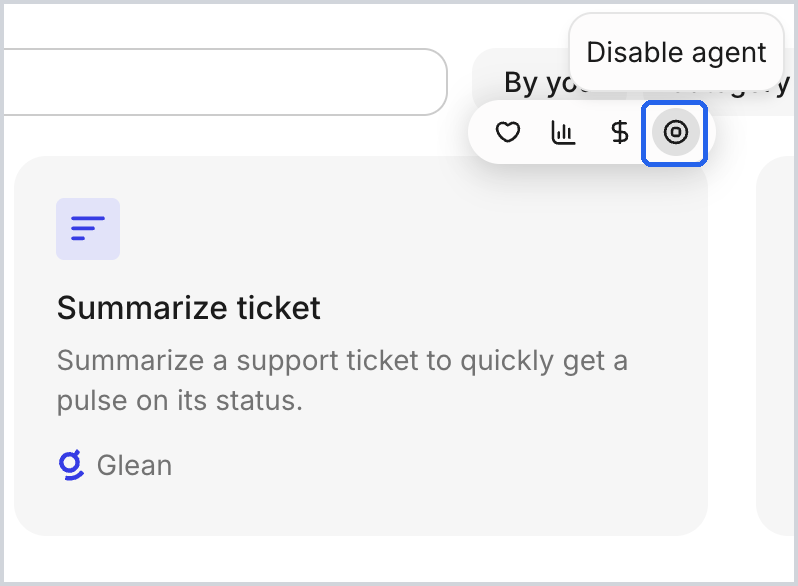
When the agent is disabled, the same control is labeled Enable agent. Disabling an agent keeps it visible in the Agent Library but blocks its use across the organization. The control is available to admins and Agent Moderators with global agent-management permissions.
If you do not see the expected Glean-managed agent or the disable or enable control, contact your organization admin or Glean Support.