Setup (Certificate)
Set up the Microsoft 365 parent connector before configuring OneDrive. The Microsoft 365 setup covers app registration, certificate generation, and uploading the certificate to Azure. OneDrive inherits the client ID, tenant ID, and certificate credentials from the parent suite and only requires the child-specific steps below.
Required permissions for setup
- The user setting up this connector must be the Global Admin.
Add OneDrive permissions to the parent app
Using the app created during Microsoft 365 setup, add the following permissions.
-
Sign in to the Azure portal. Navigate to Microsoft Entra ID → Manage → App registrations and select the app created for the Microsoft 365 suite.
-
Click Manage → API Permissions → Add a permission and select Microsoft Graph. Choose Application permissions and add the following:
User.Read.AllGroupMember.Read.AllFiles.ReadWrite.All(for subscriptions over drives)Reports.Read.AllSites.FullControl.AllMember.Read.Hidden
-
Click Add a permission and select SharePoint. Choose Application permissions and add the following:
Sites.FullControl.All

Grant admin consent
-
Ensure you are signed in to Azure as a Global, Application, or Cloud Application Administrator.
-
Use the search box to navigate to Enterprise applications. Select the Glean app from the list of applications.
-
Click Permissions under Security. Review the permissions shown, then click Grant admin consent.

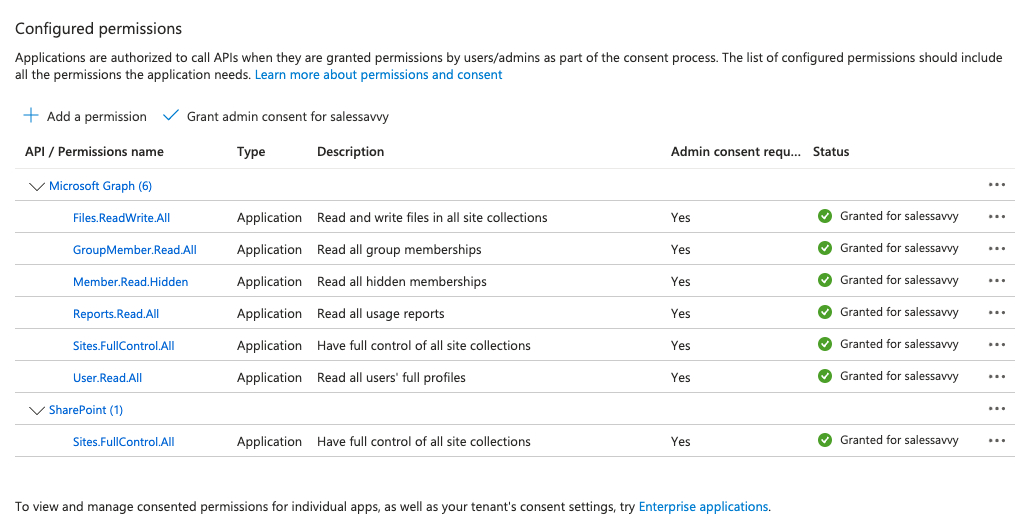
By this step, you should have the following permissions provisioned on the API Permissions page:
Configure OneDrive in Glean
-
In the Admin console, select the OneDrive child connector under the Microsoft 365 suite. The client ID, tenant ID, and certificate credentials are inherited from the parent.
-
To increase full crawl indexing speed, Glean recommends 1–10 additional applications with the same permission settings as the parent app. For each additional app, repeat the steps from Register a new app through Upload certificate to Azure in Microsoft 365 setup and the Add OneDrive permissions to the parent app steps on this page, then paste each additional Application (client) ID into Glean. You do not need to re-upload the certificate in Glean.

- Click Save. If the credentials save, you're all set!