Schedule triggers
Scheduled triggers allow users to automate and standardize business processes by enabling agents to perform tools in the background. Each user of an agent can specify when they want that agent to run, such as daily or weekly.
By systematically defining and using these triggers within the Agent builder, you can ensure your agents operate effectively, automating essential processes and improving overall productivity.
Users
Schedule trigger components
Schedule triggers involve three parts:
- Agent builder — build an agent that can run in the background.
- Agent library — activate, review, and manage your scheduled agents from the Active agents table.
- Admin console — control who can schedule agents and which tools can run without user confirmation.
Configure agents to run on a schedule
To run an agent on a schedule, first make sure the agent is designed to work in the background.
A scheduled agent should produce a clear output, such as sending a Slack message, creating or updating a record, drafting an email, or writing results to another destination. Agents that only return a conversational response are less suitable for background execution.
Auto mode vs. Workflow mode
The scheduling experience differs depending on which mode your agent uses:
| Auto mode | Workflow mode | |
|---|---|---|
| How it works | You describe the goal and tools; Glean decides how to accomplish it | You design the full execution flow step by step in a visual builder |
| Where you configure the schedule | Configure directly in the Agent builder during setup | Enable in the trigger step, then activate after publishing |
| Post-publish activation | No extra step — the schedule is set before publishing | Go to the agent in the Agent library and click Set schedule |
| Best for | Flexible tasks, faster setup, or goal-driven execution that may vary case by case | Deterministic logic, complex branching, or strict control over execution |
Start with Auto mode unless you already know the exact sequence of tools and it should not vary across use cases. Use Workflow mode when you need a prescribed, repeatable sequence with fine-grained control.
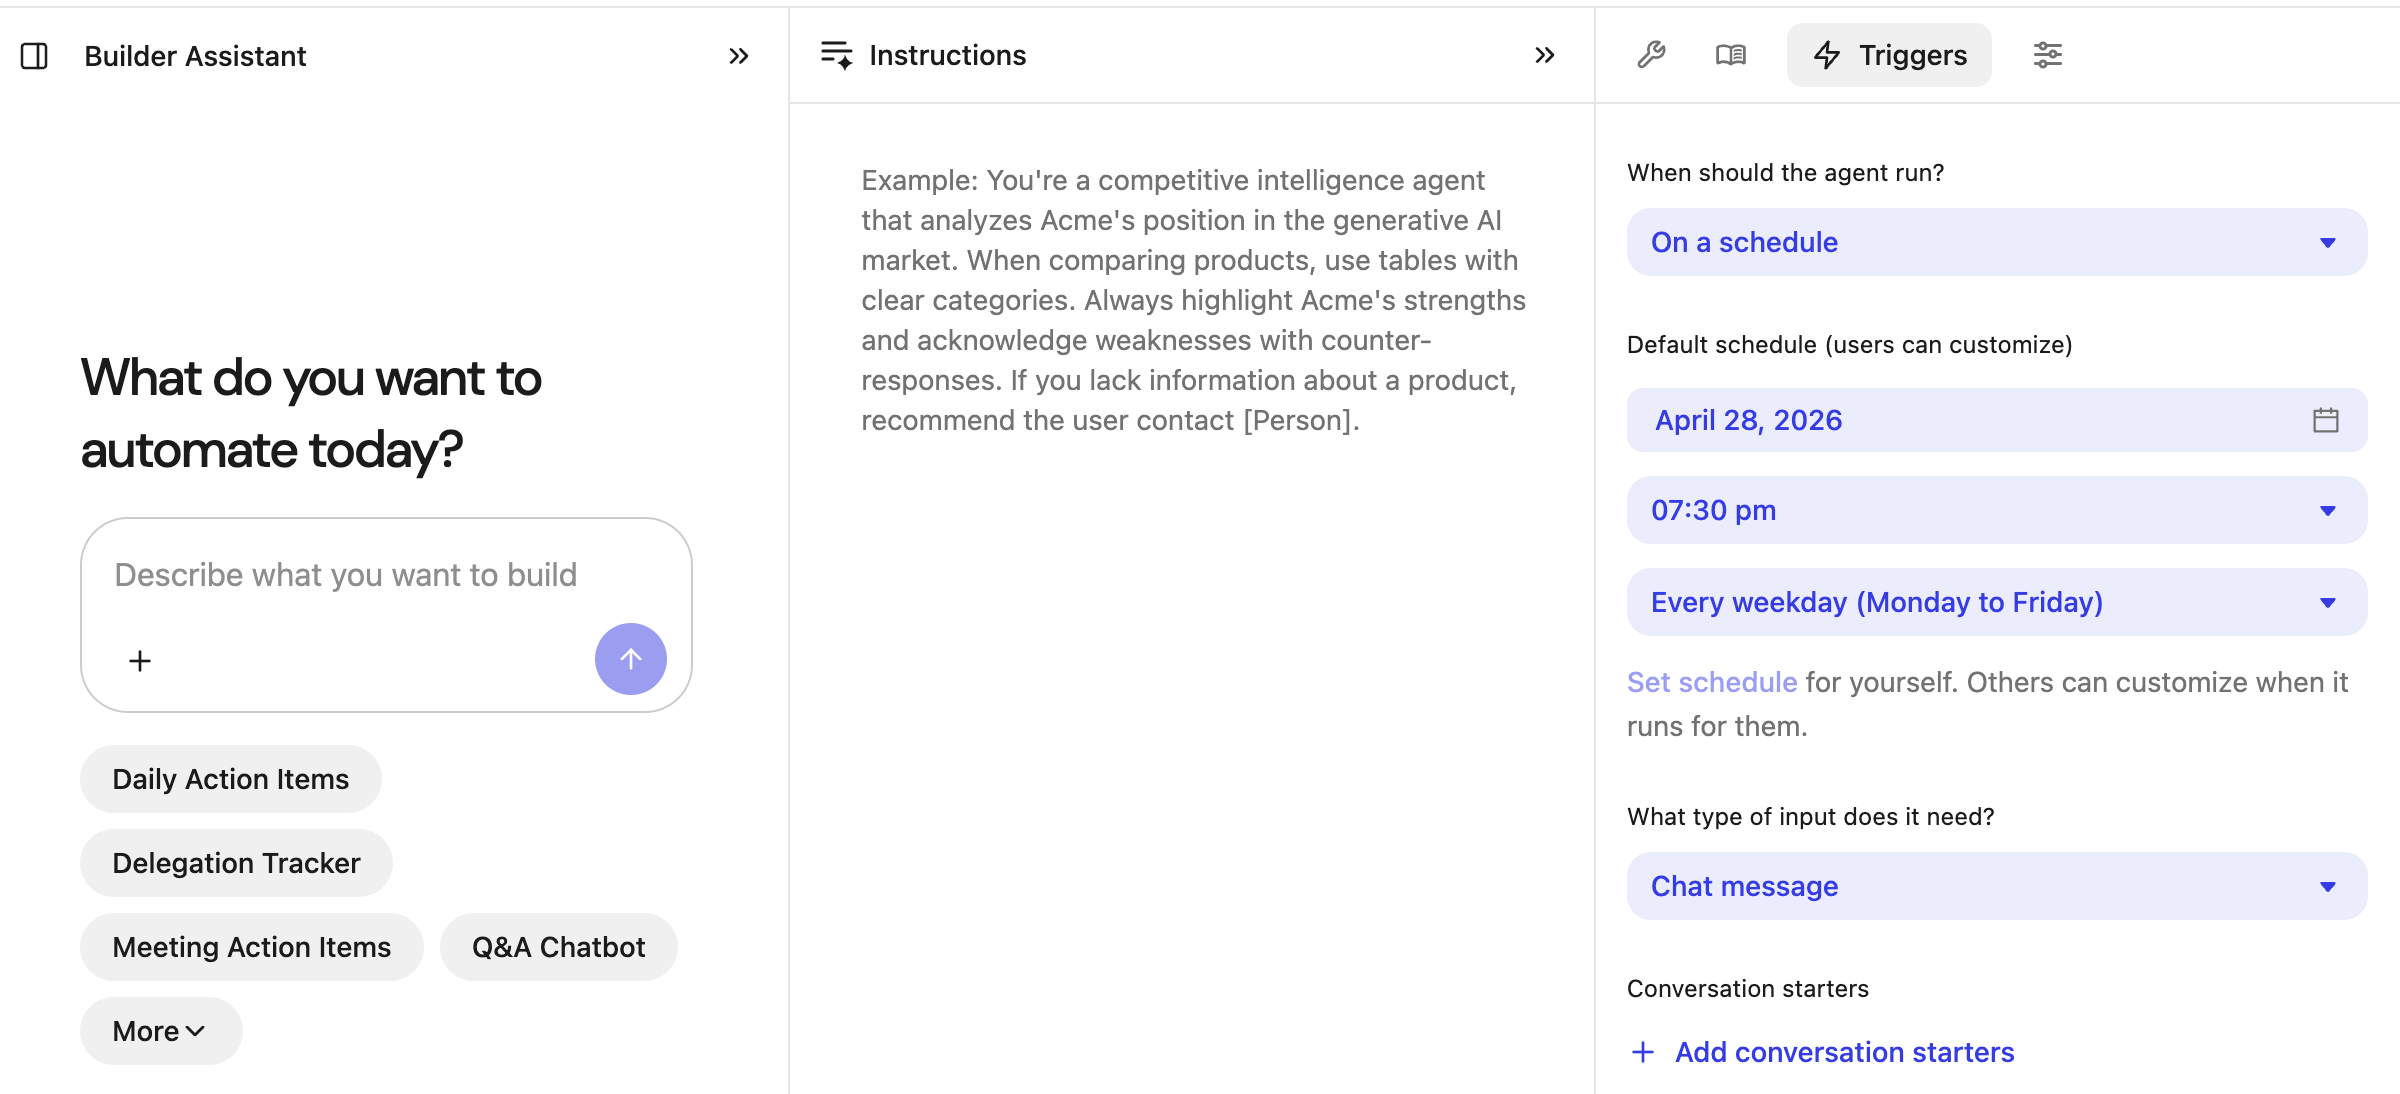
Set up a schedule trigger for Auto mode agents
- Create an agent in the Agent builder using Auto mode.
- Select Triggers.
- Select On a schedule for the field When should the agent run?.
- Add the scheduling details.
You can set a schedule for yourself. Others can customize the schedule when the agent is available to them.
-
Make sure the agent has a clear outcome for background runs.
-
Click Save and publish the agent.
The agent is ready to run on the schedule you configured. No additional activation step is required.
Set up a schedule trigger for Workflow mode agents
- Create or open an agent in Workflow mode.
- In the trigger step, select Input form trigger.
- Select the Allow agent to run on a schedule checkbox under Set schedule.
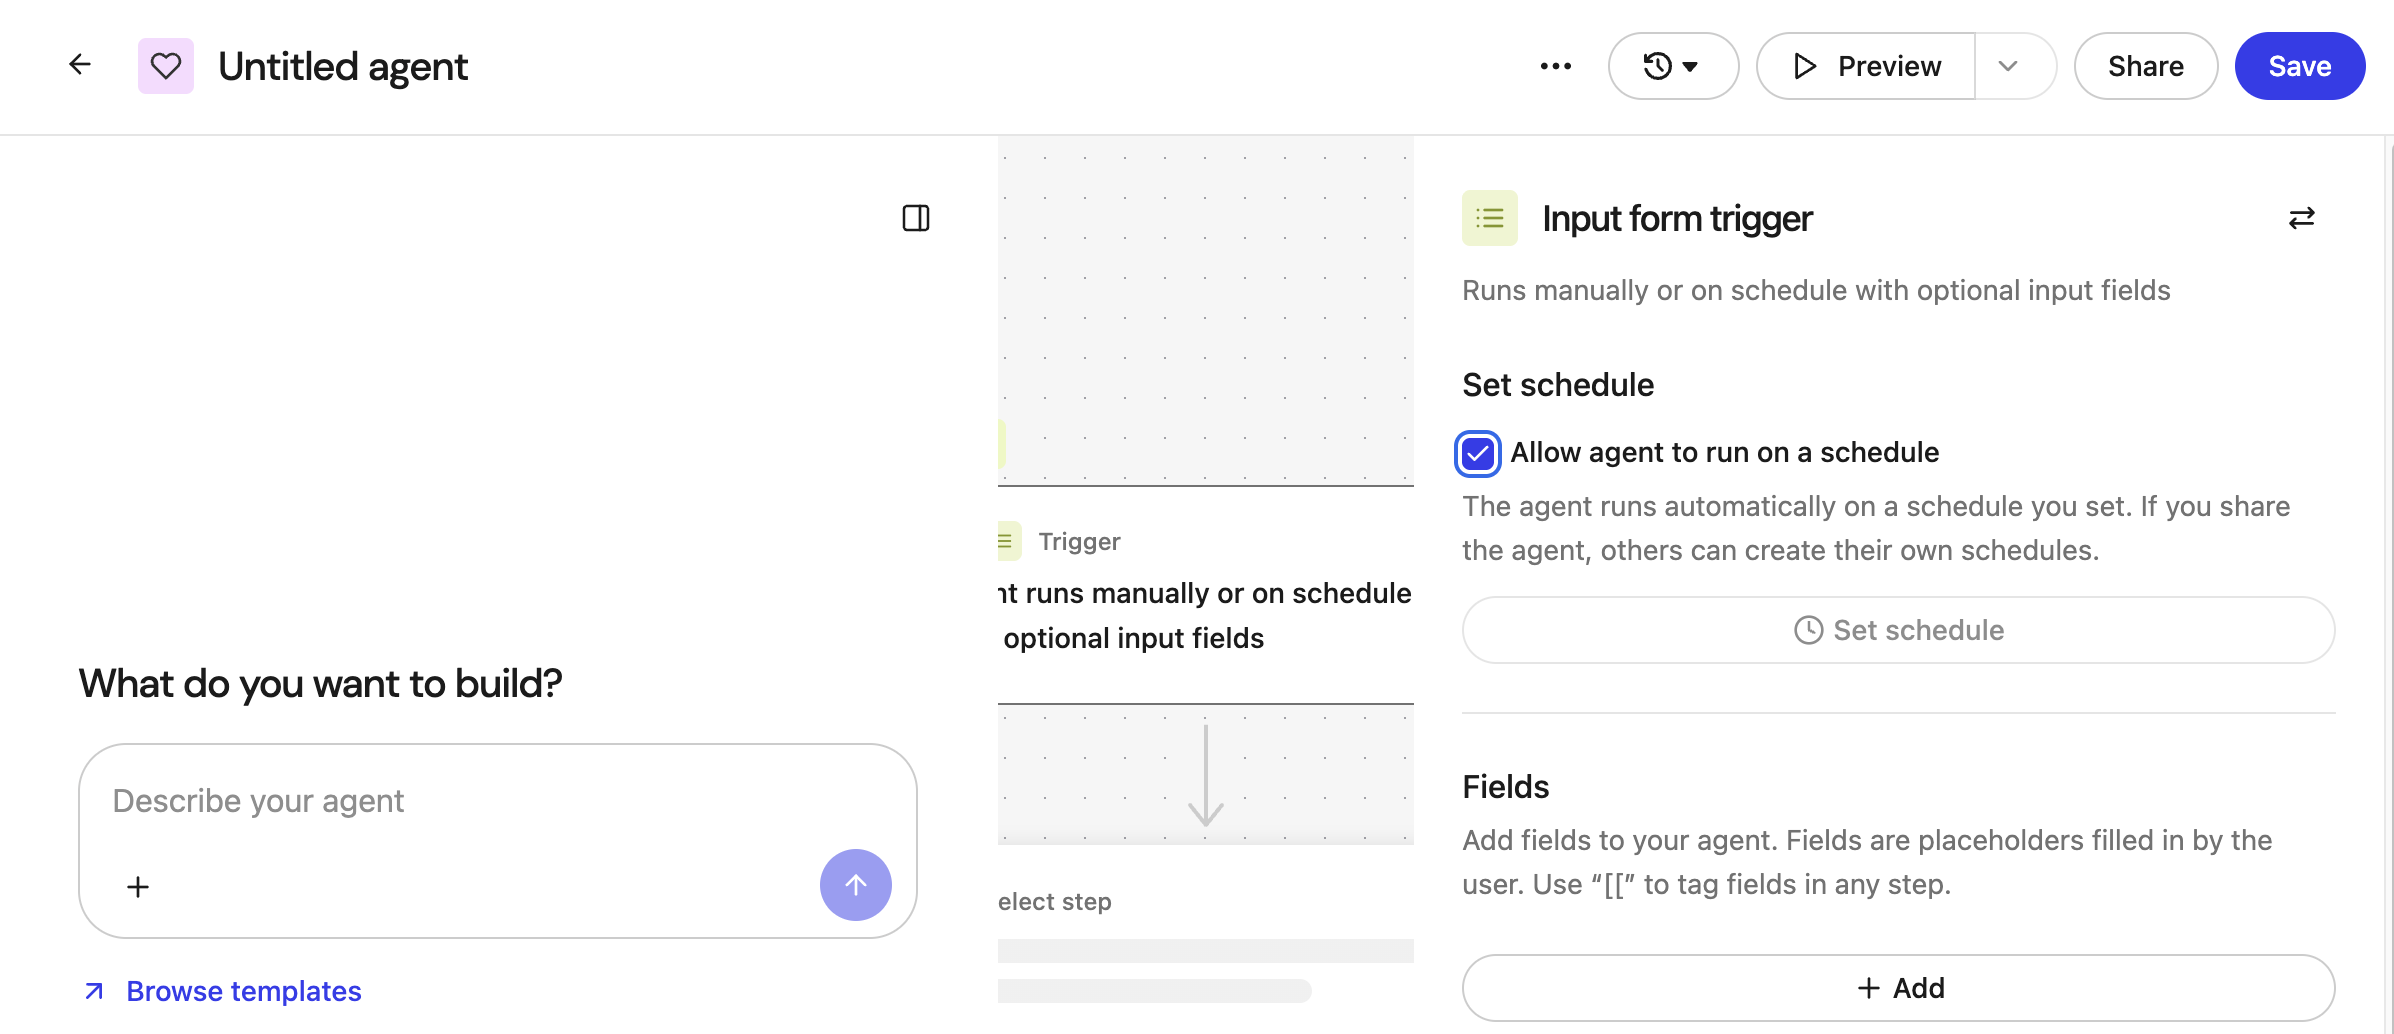
- Build the workflow you want the agent to run on a recurring basis.
- Save and publish the agent.
- After the agent is published, schedule and activate the agent.
Schedule and activate a Workflow mode agent
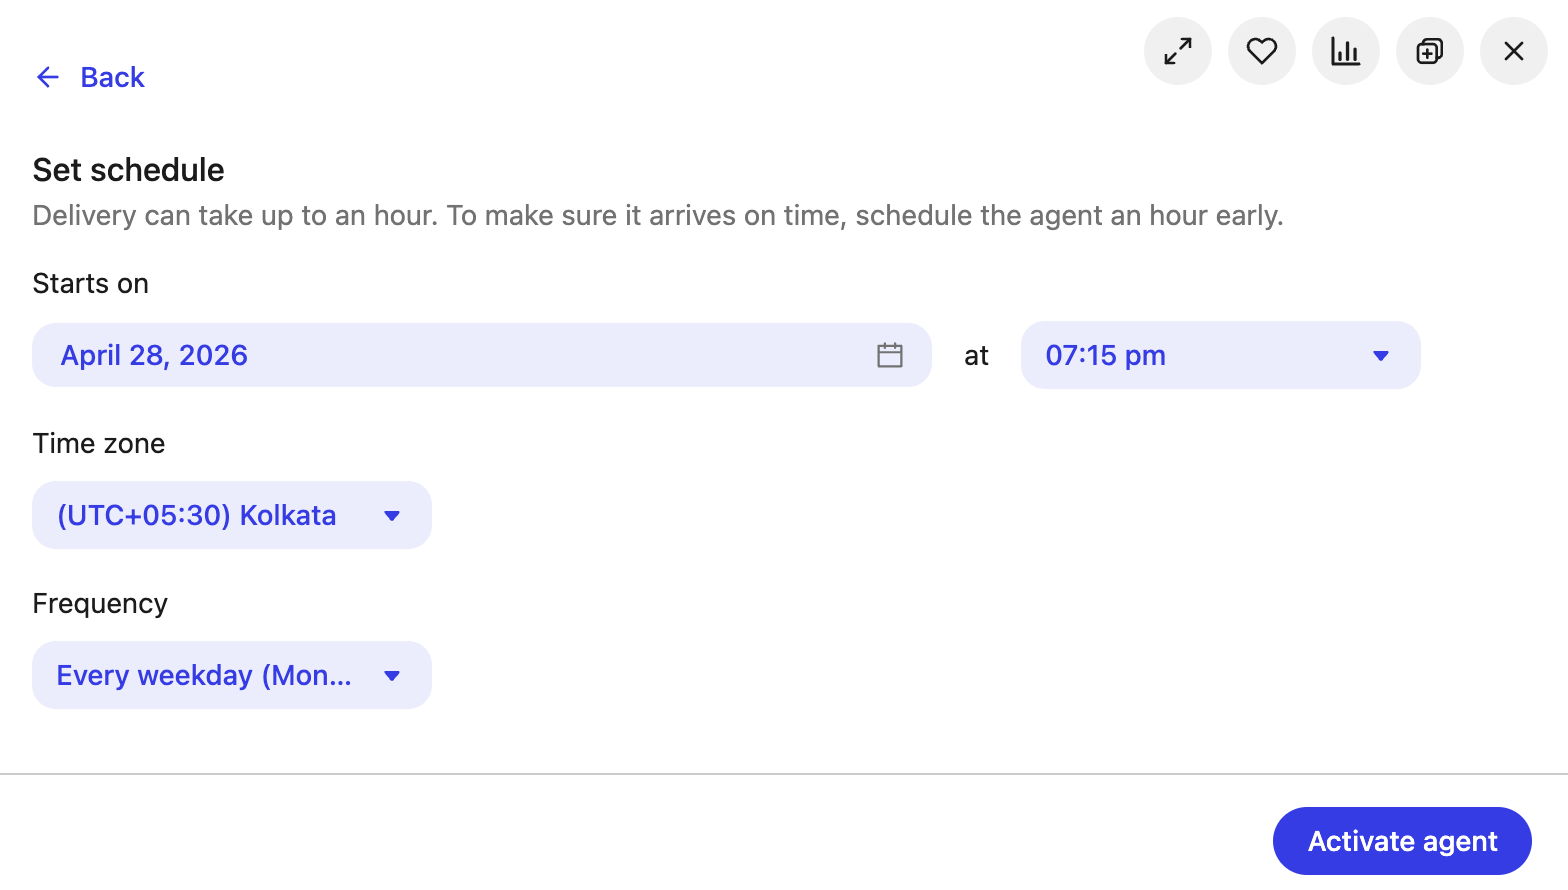
After a Workflow mode agent with schedule support is published, you must add the schedule details and activate the agent before it begins running.
- Go to a schedulable agent in the Agent library.
- Click Set schedule.
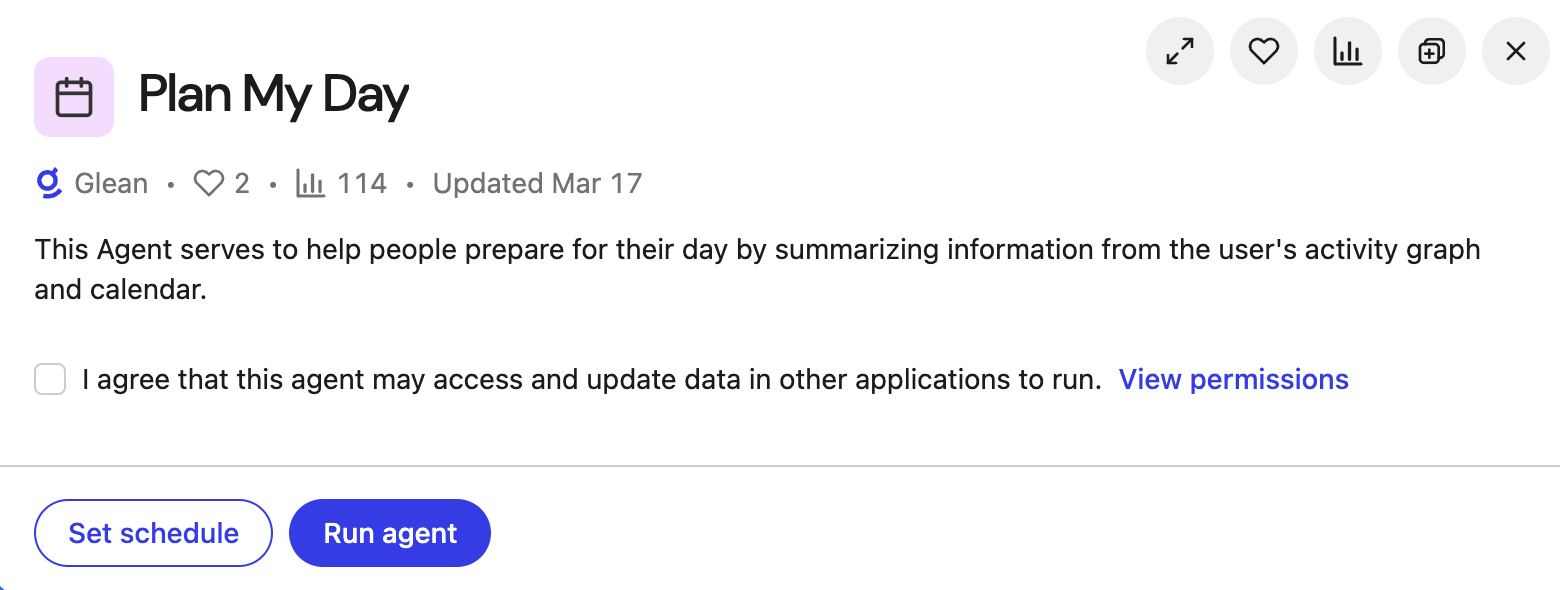
- Add the details to set a schedule for the agent and click Activate agent.
Changes that deactivate subscriptions
Routine edits do not interrupt existing subscriptions. For example, updating an input field description or changing a default value does not require subscribers to set the schedule again.
Some configuration changes pause all existing subscriptions. In these cases, each subscriber must manually re-activate the agent to resume scheduled runs.
These changes include:
- Adding a new required input field.
- Renaming an existing required input field.
- Changing the trigger type away from Input form.
- Removing a user's access to the agent.
- Turning off the schedule-enabled setting.
- Deactivating the agent.
If a background run reaches a tool that still requires user confirmation, Glean emails the subscriber instead of silently skipping that step.
Managing and monitoring agents
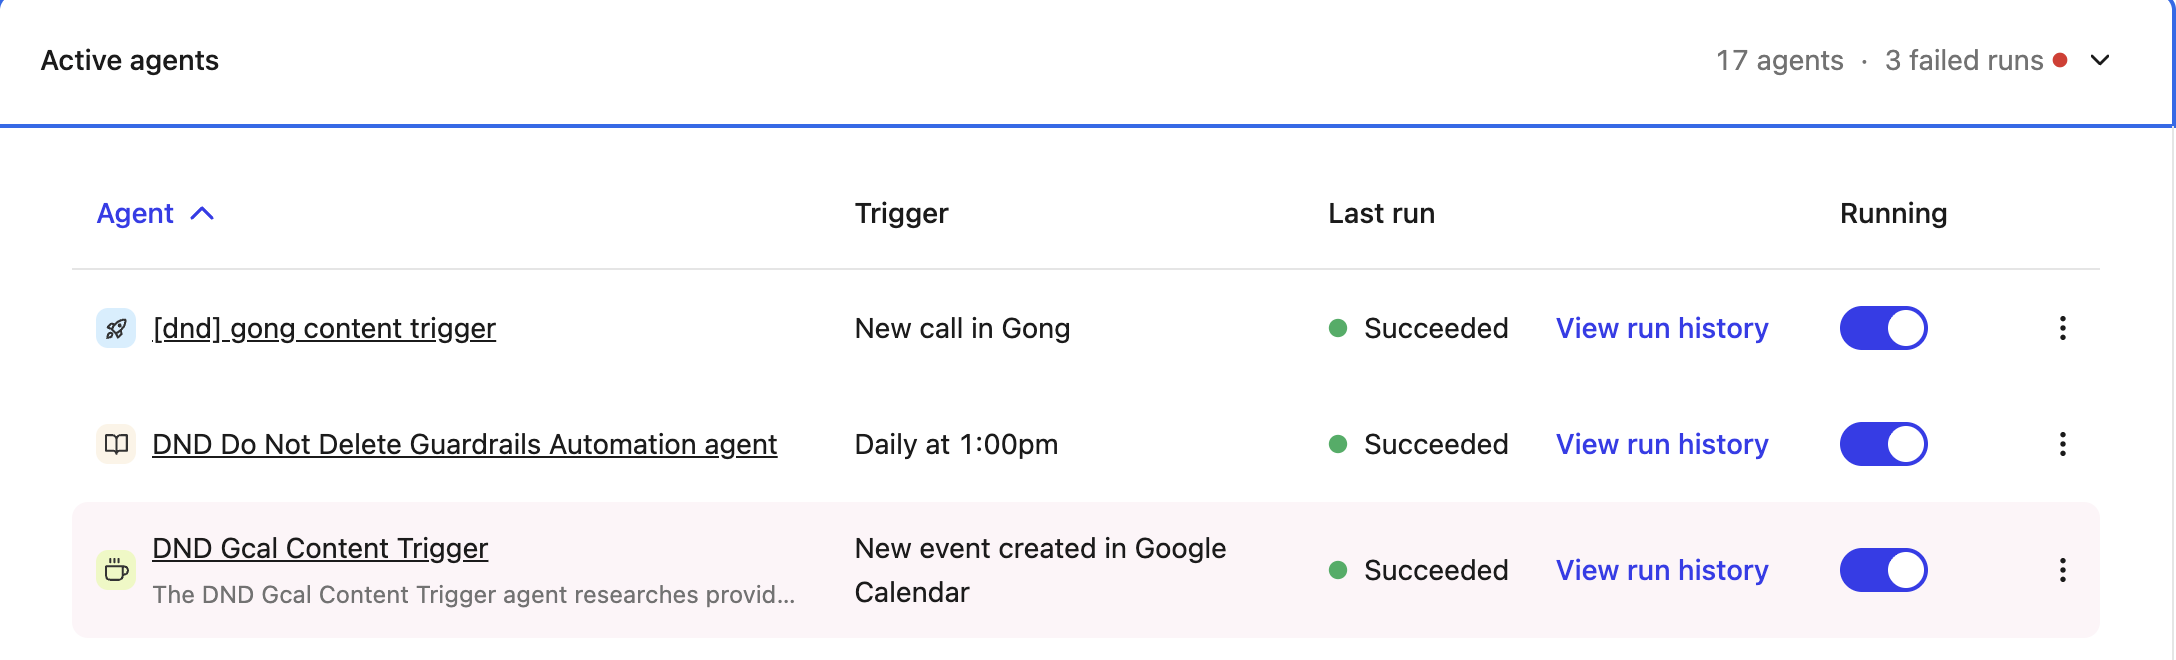
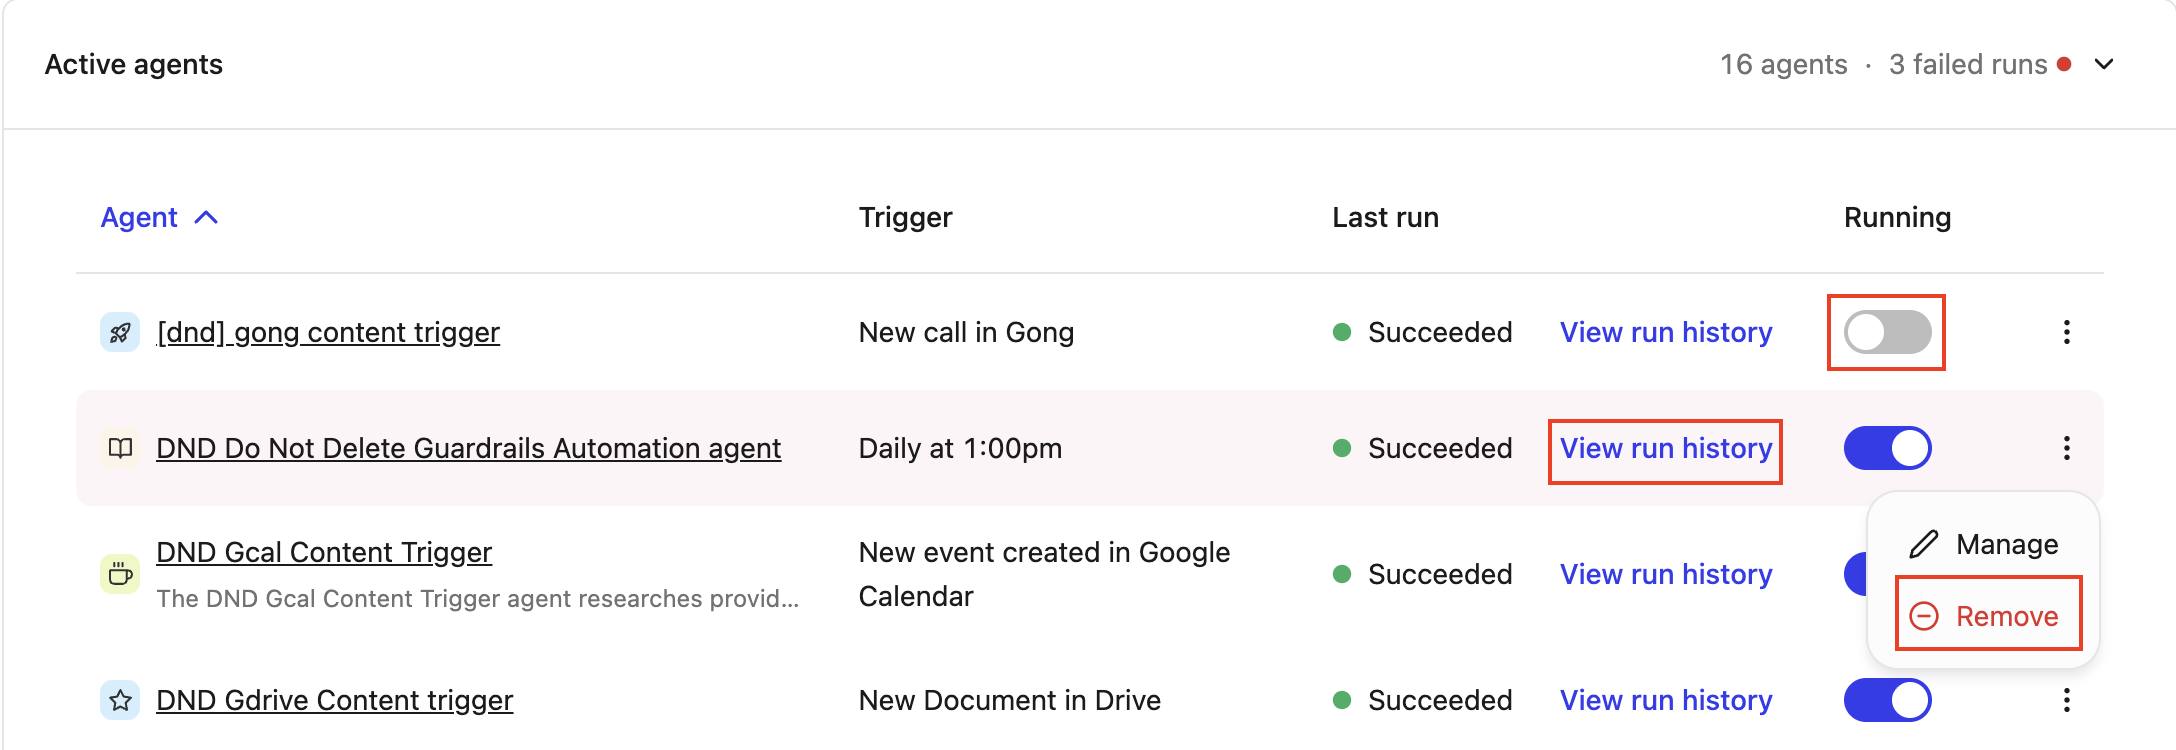
All agents you have activated are visible and manageable in the Agents → Active tab in the Library. You can see the details like triggering event, last run status, or pause/remove the schedules from the list. To view the history of agent runs, click View run history or go to Chat to check the left bar. You can quickly scan results, open full run details in one click, and use filters to see only Glean chats or runs from a specific agent.
The exact time of execution may vary depending on how many other agents are scheduled to run at the same time. If you notice a significant delay, contact Glean support.
Admin
Managing access to scheduled triggers
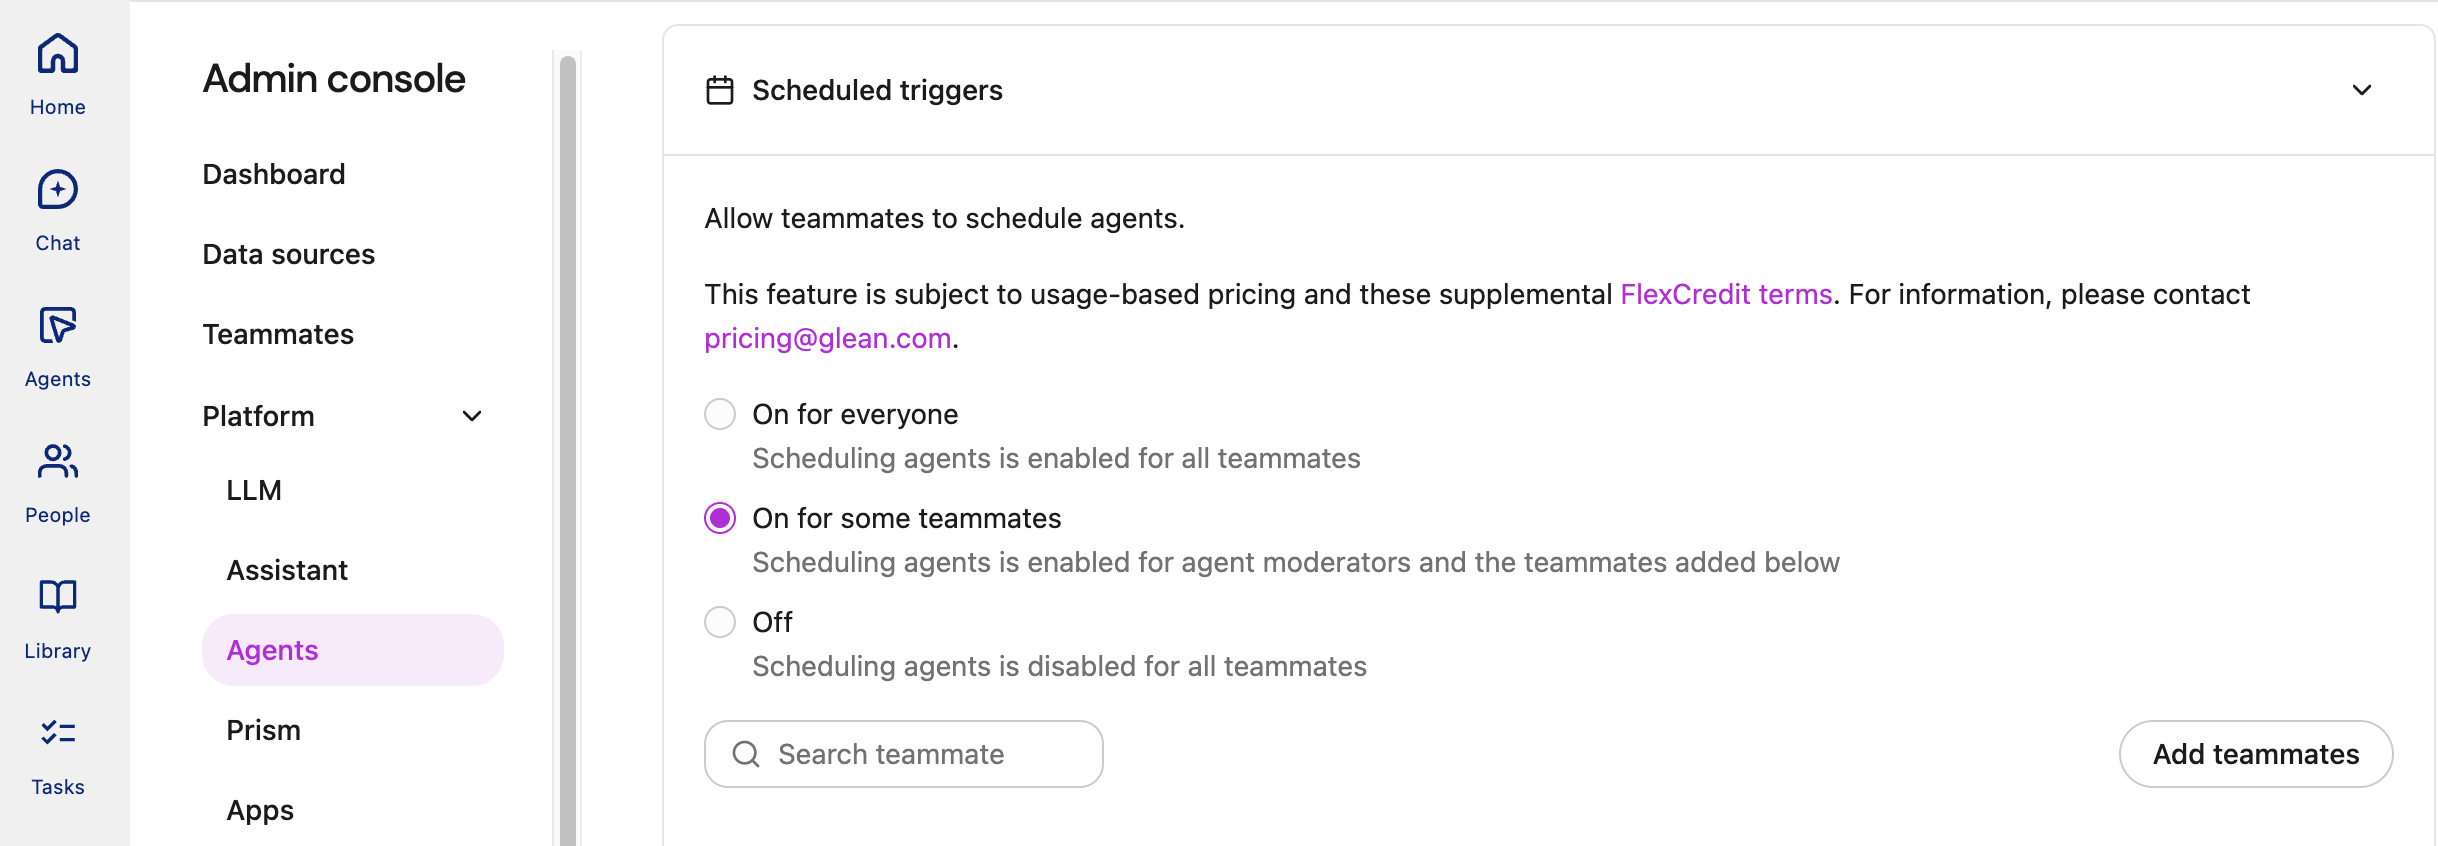
By default, scheduled triggers are turned off. In Admin console → Platform → Agents → Scheduled triggers, admins can turn the feature on for everyone or limit access to selected users and IdP groups.
If you select On for some users, you can grant access to:
-
Individual users
-
Supported IdP groups from Google Groups and Azure AD / Entra ID
Members of selected groups inherit access to agent scheduling. If group membership changes in your identity provider, Glean updates access through the existing sync behavior. This setting controls who can access agent scheduling. It does not change whether the user can create, share or publish agents, which are set under Users and permissions.
Add users or groups
To add users or groups:
-
In Glean, go to Admin console → Platform → Agents → Scheduled triggers.
-
Select On for some users.
-
Add the users (Add users) or supported IdP groups (Add groups) that you want to allow to schedule agents. Your changes are saved automatically.
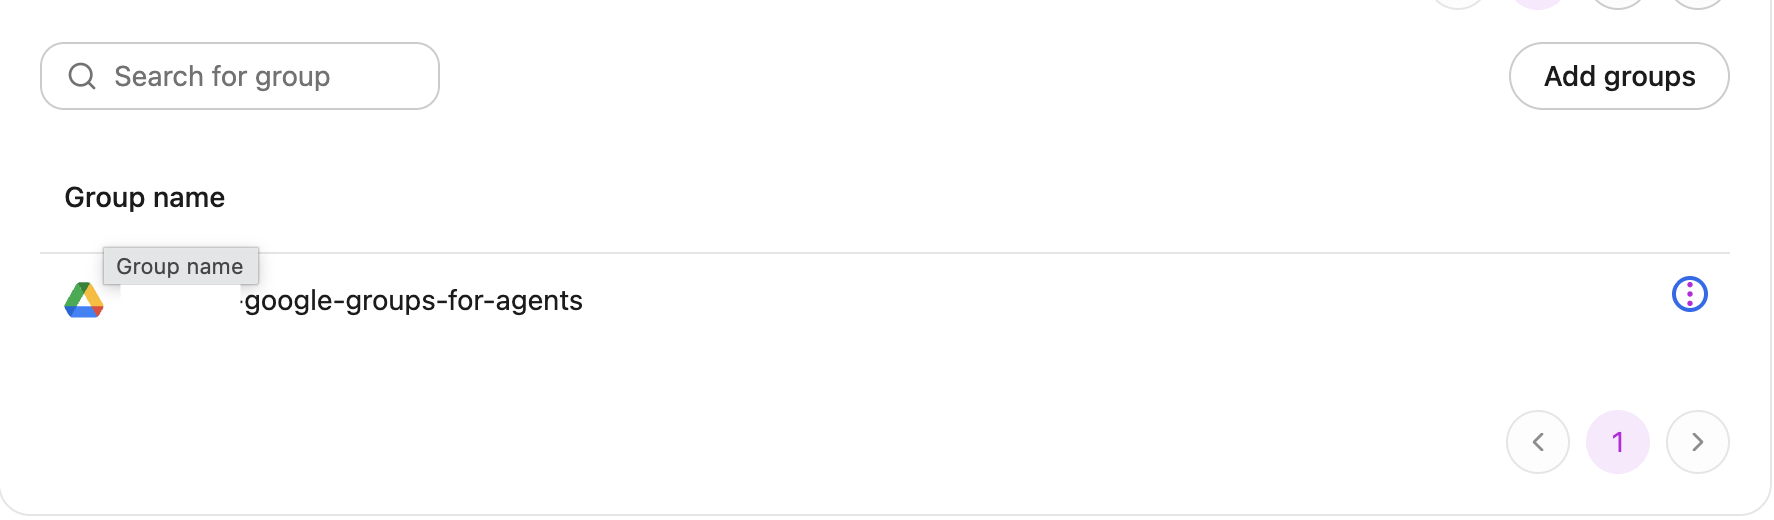
Review or remove access
To review access, open the Scheduled triggers permissions list and check the users and groups that currently have access to agent scheduling. To remove access, delete the user or group from the list. After you remove a group, its members no longer inherit access through that group.
Users who do not have access won't see the Set schedule option.
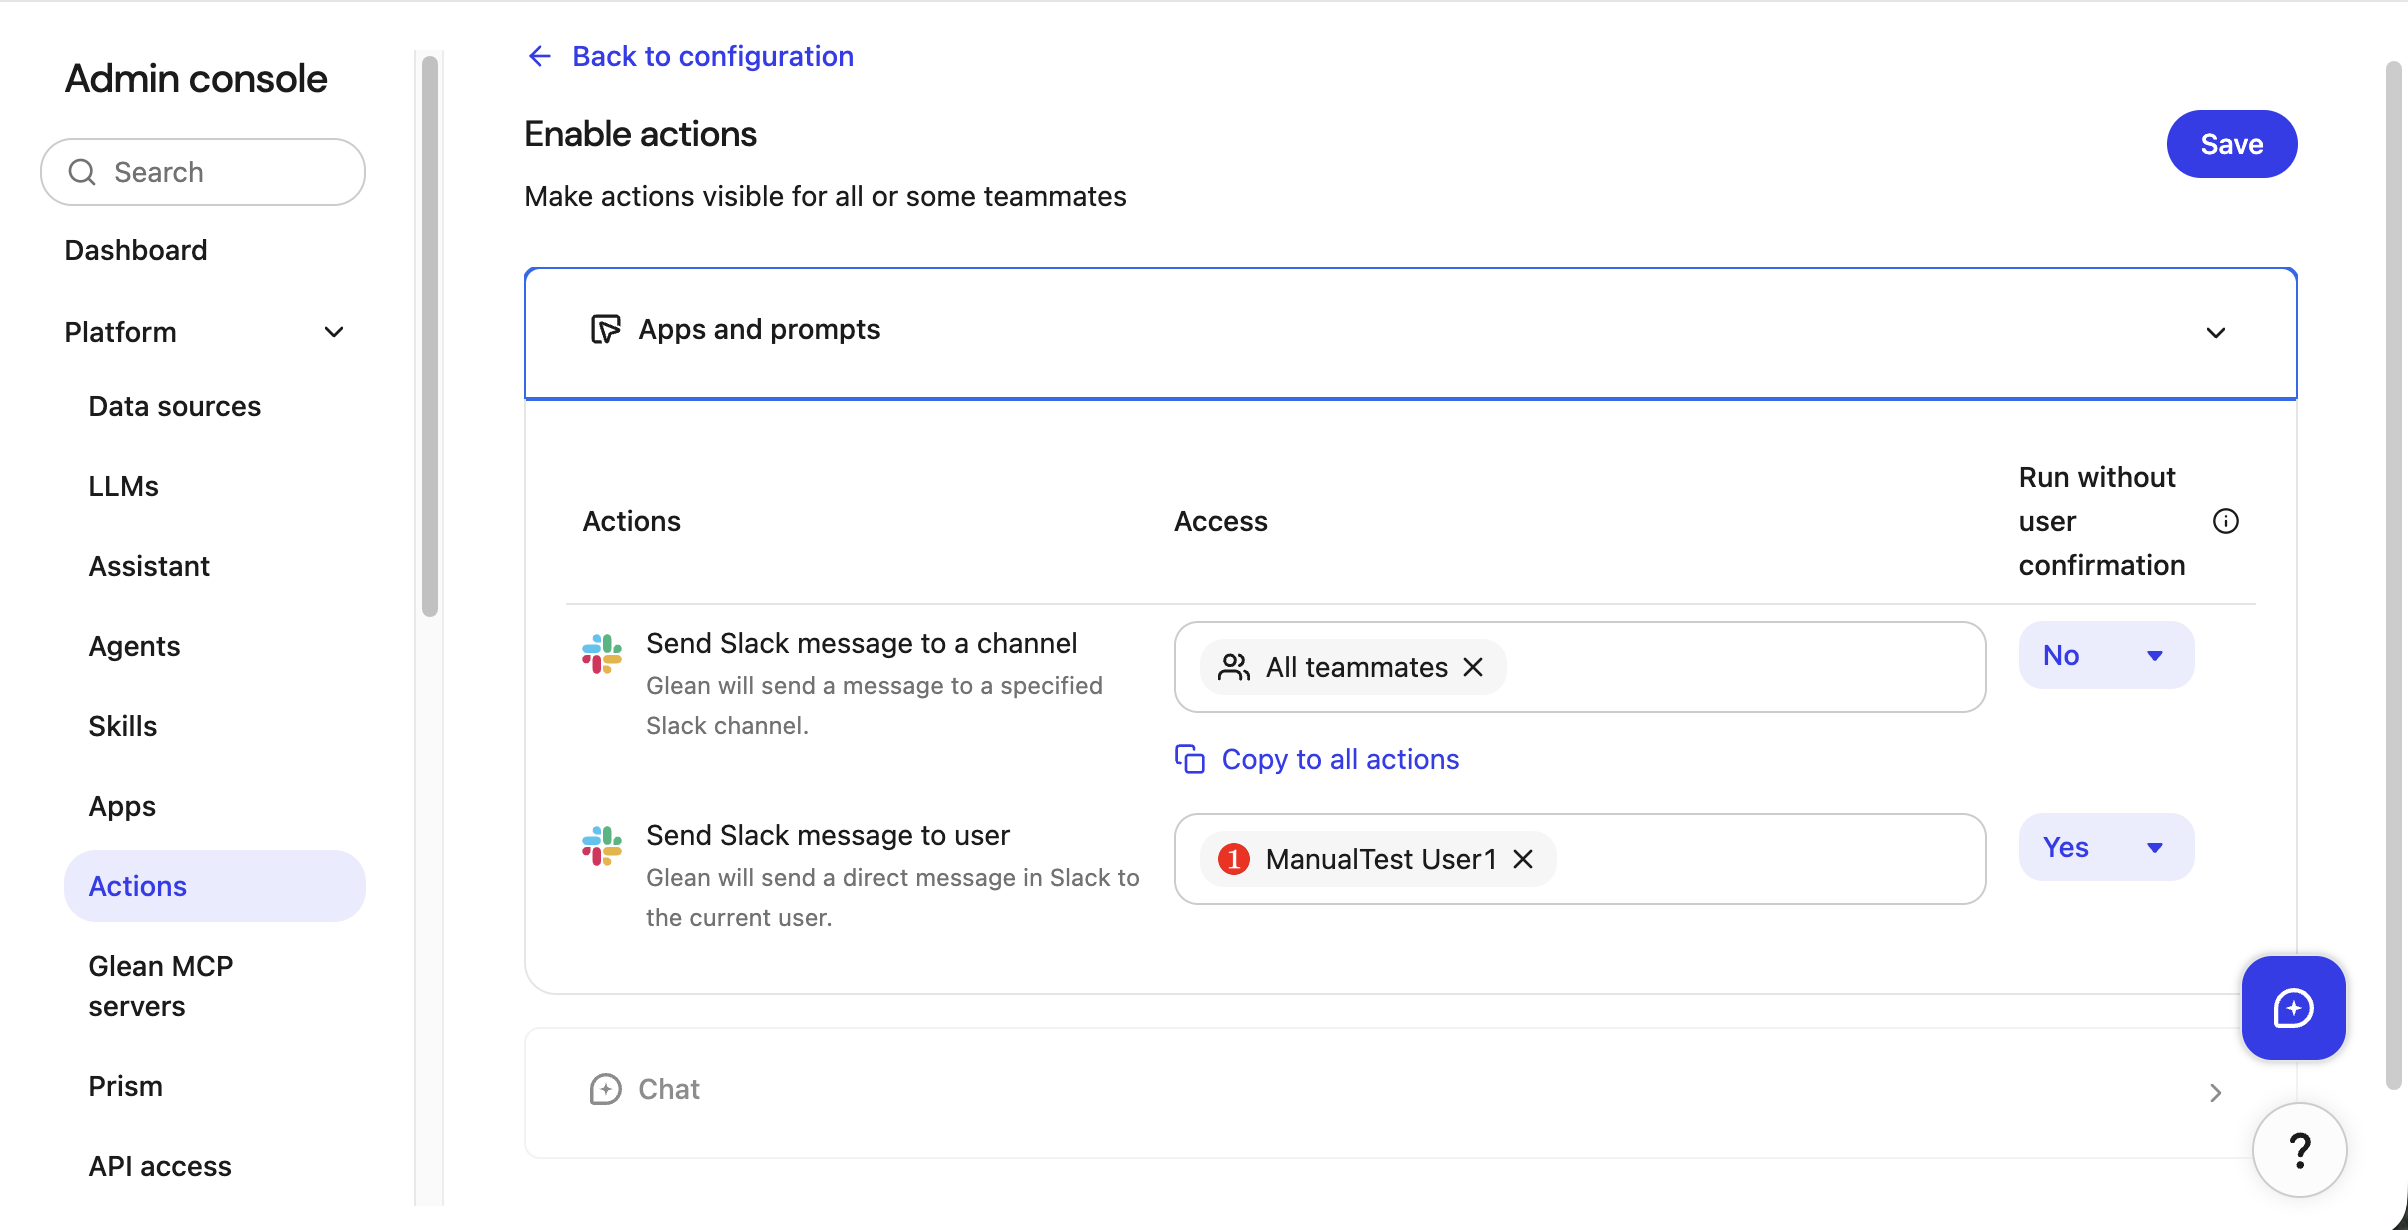
Enabling tools to run without user confirmation
-
Write tools configured to run without user confirmation can be used in scheduled agent runs. This ensures that only safe tools can be performed in the background.
-
To change the configuration, go to Tools → Tools → Configuration → Enable tools → Edit settings → Agents → Run without user confirmation and select Yes.
-
By default, read-only tools run without user confirmation. Some tools using LLM to predict inputs always ask for confirmation to ensure accuracy.
Security and limitations
Scheduled runs also have a maximum end-to-end execution time. Design scheduled agents to finish within that window. For the current limit and strategies to stay within it, see Scheduled run limits.
Any agent creator can configure an agent to run on a schedule, but only users with scheduled trigger access can activate scheduled runs.
Rate limits apply to prevent overload:
- A maximum of 10 active background agents can be scheduled per user.
- If you exceed this limit, remove an agent from the Active agents table before setting a schedule for another one.
If you need to run more than 10 active background agents, reach out to the Glean team.
For privacy and security, background agents can use only the tools or app capabilities that your admins have allowed to run without user confirmation.