
Customized instructions for your Glean environment are available in the Admin Console: Admin Console > Settings > Authentication
Prerequisites
Before you begin the setup process, ensure you have the following:- An active Microsoft Entra ID (Azure AD) administrator account.
- Access to your Glean admin account with Admin or Setup Admin roles to configure SSO settings.
- Basic understanding of SSO concepts.
Entra ID Configuration
1 - Application Setup
Create a new App Registration in the Entra ID portal to complete the SSO integration and synchronize your user directory with Glean.- In the Azure portal, open the Microsoft Entra ID service blade.
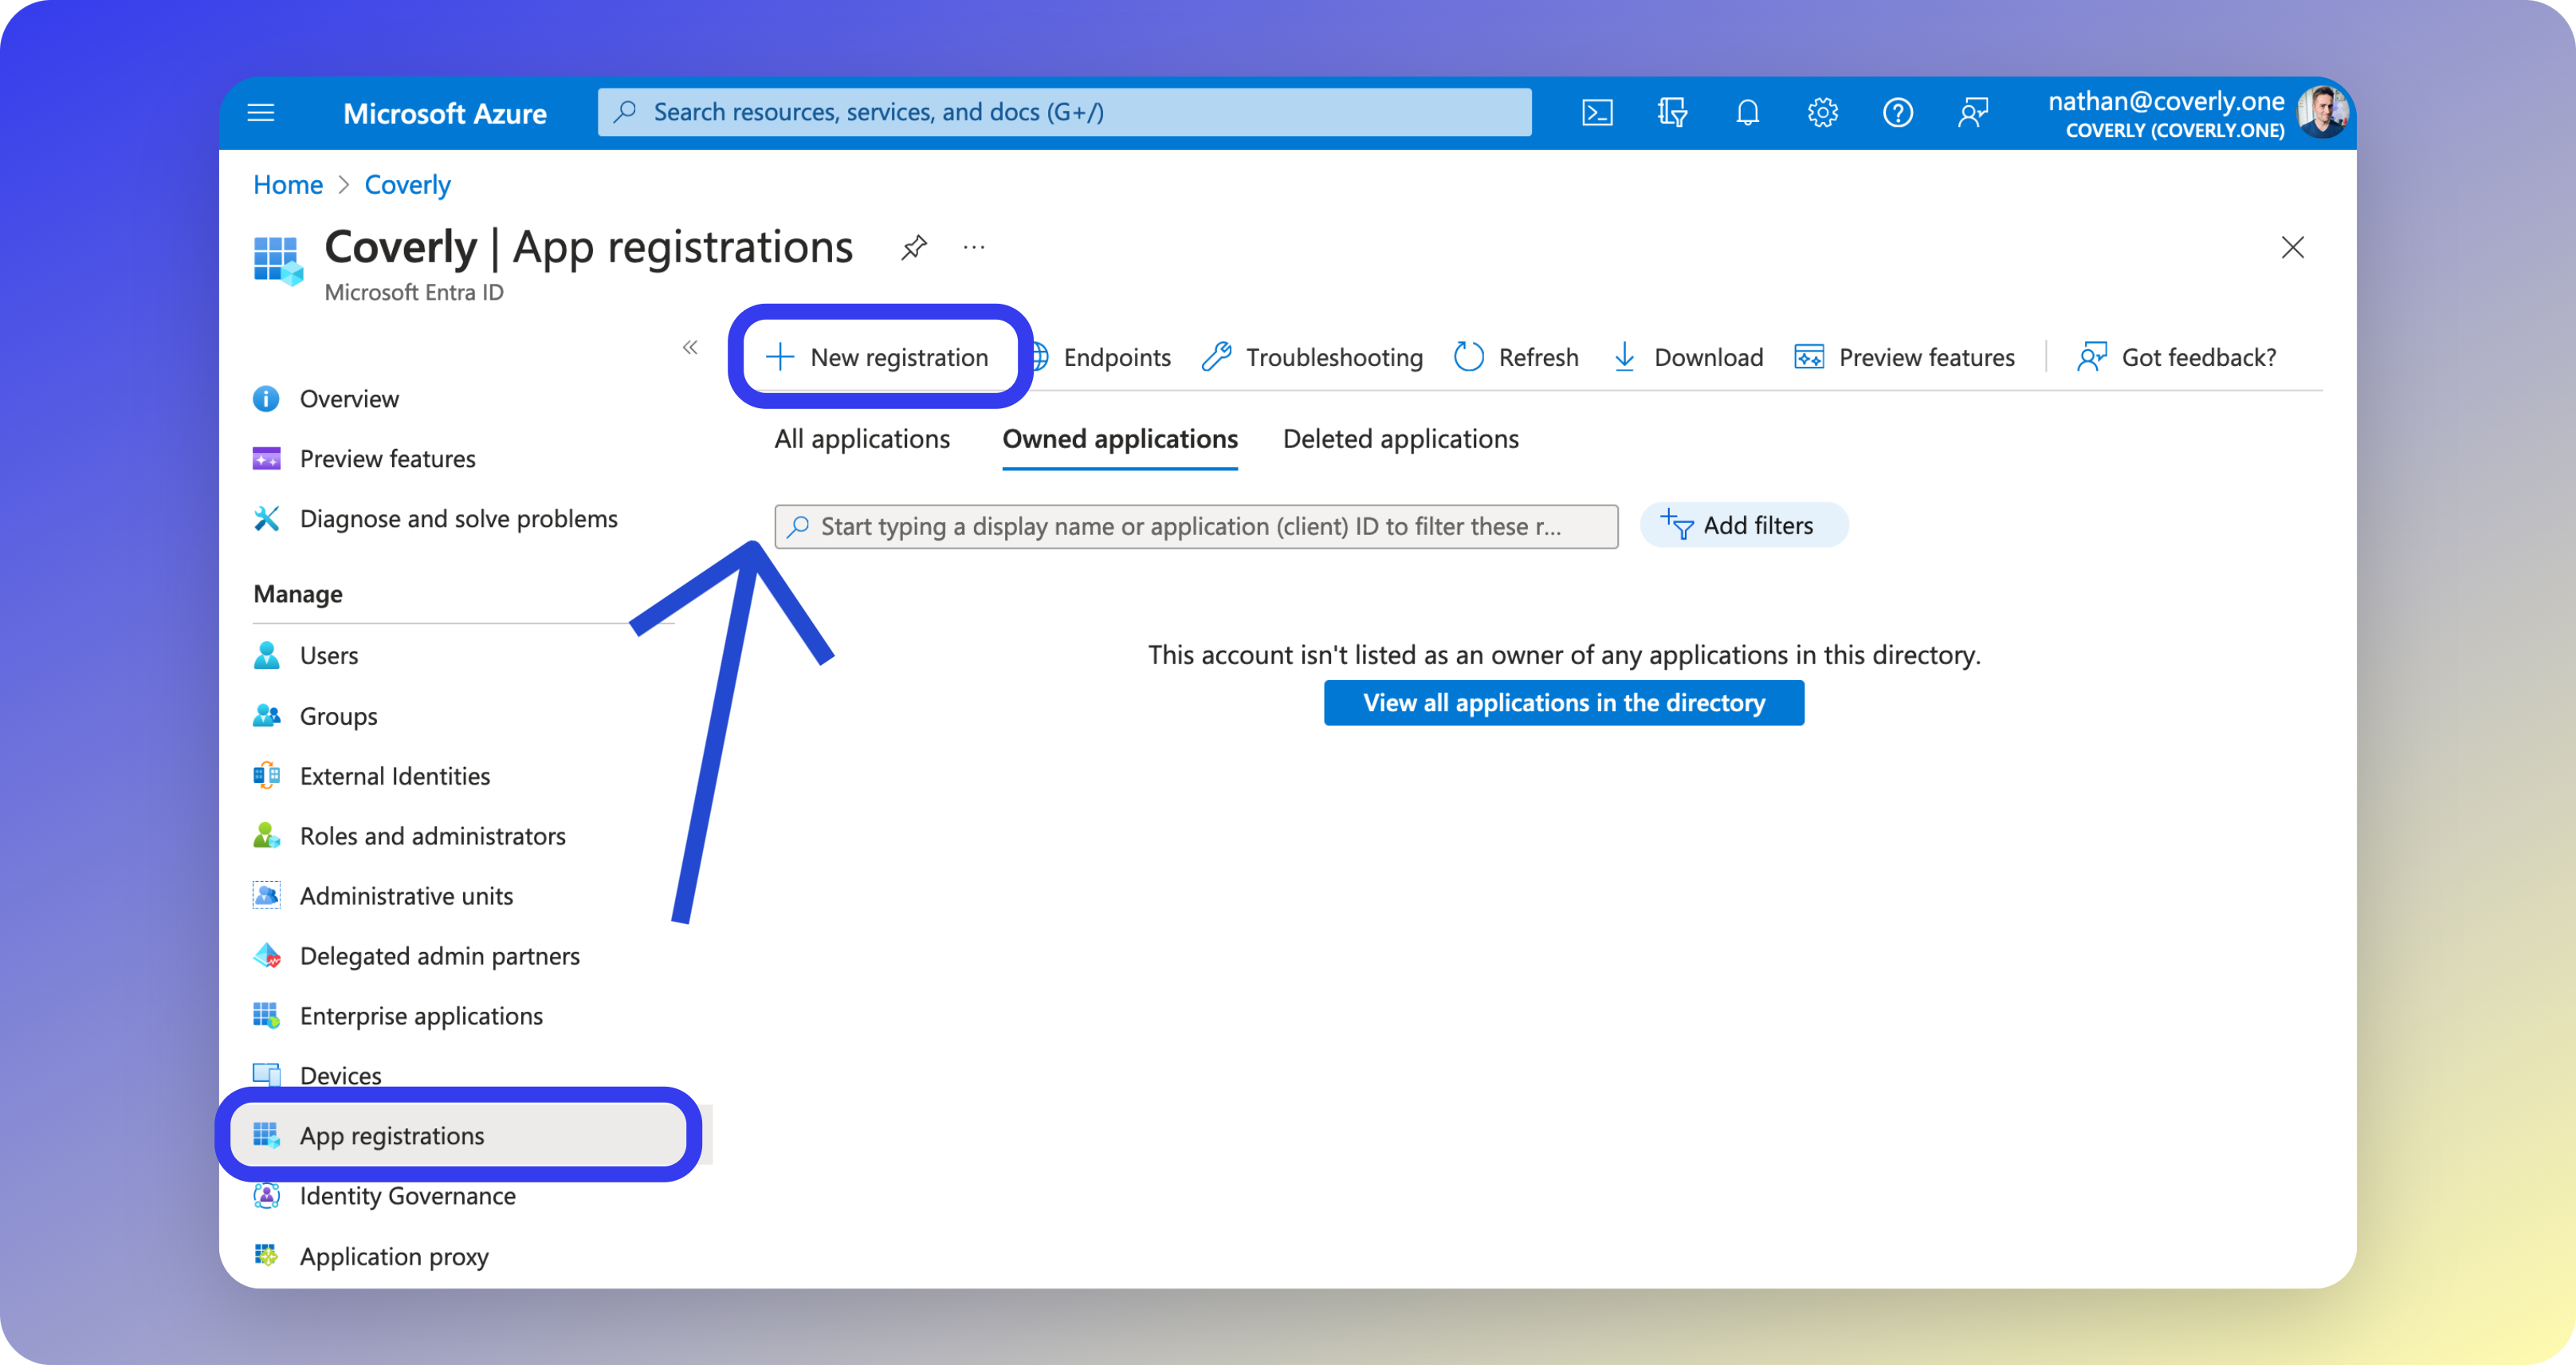
- From the left sidebar menu, select App registration, then click New Registration.
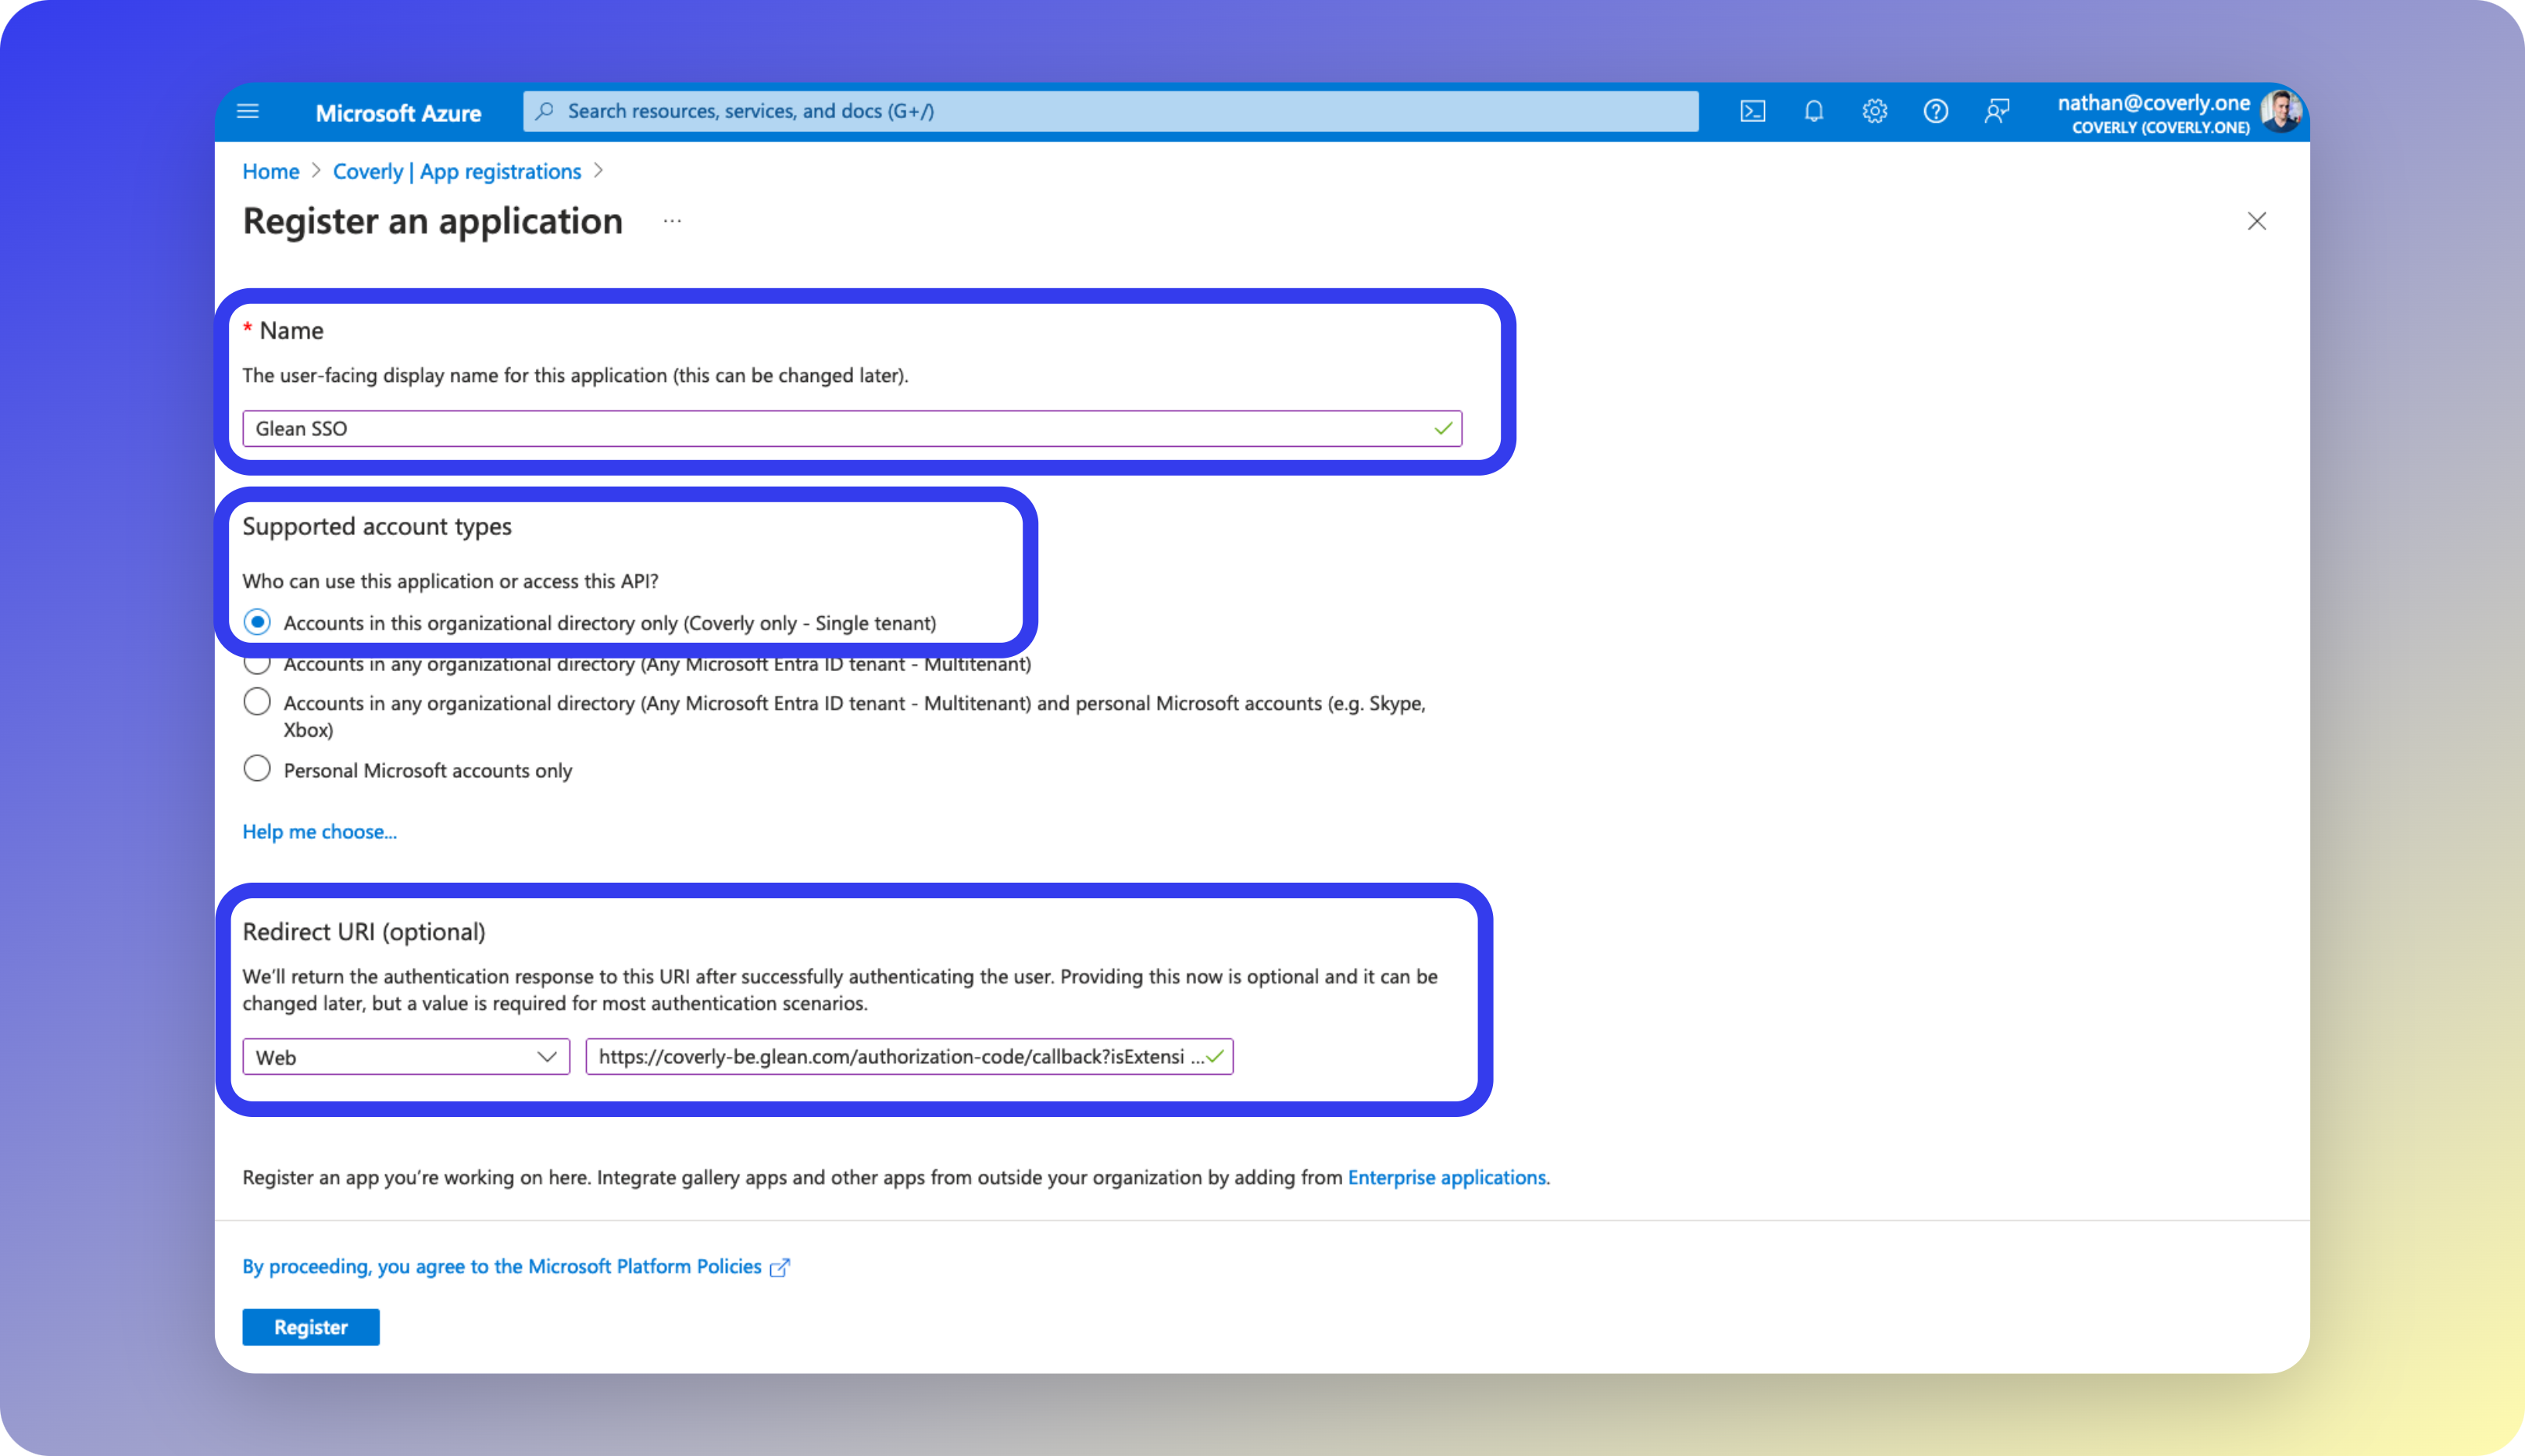
- Set the following values on the Register an application page, then click Register:
| Field Name | Value |
|---|---|
| Name | Glean SSO |
| Supported account type | ✓ Accounts in this organizational directory only |
| Redirect URI (platform) | Web |
| Redirect URI (URI) | https://[tenant_name]-be.glean.com/authorization-code/callback?isExtension=1 |
[tenant_name] with your actual tenant ID.
2 - Add Redirect URI
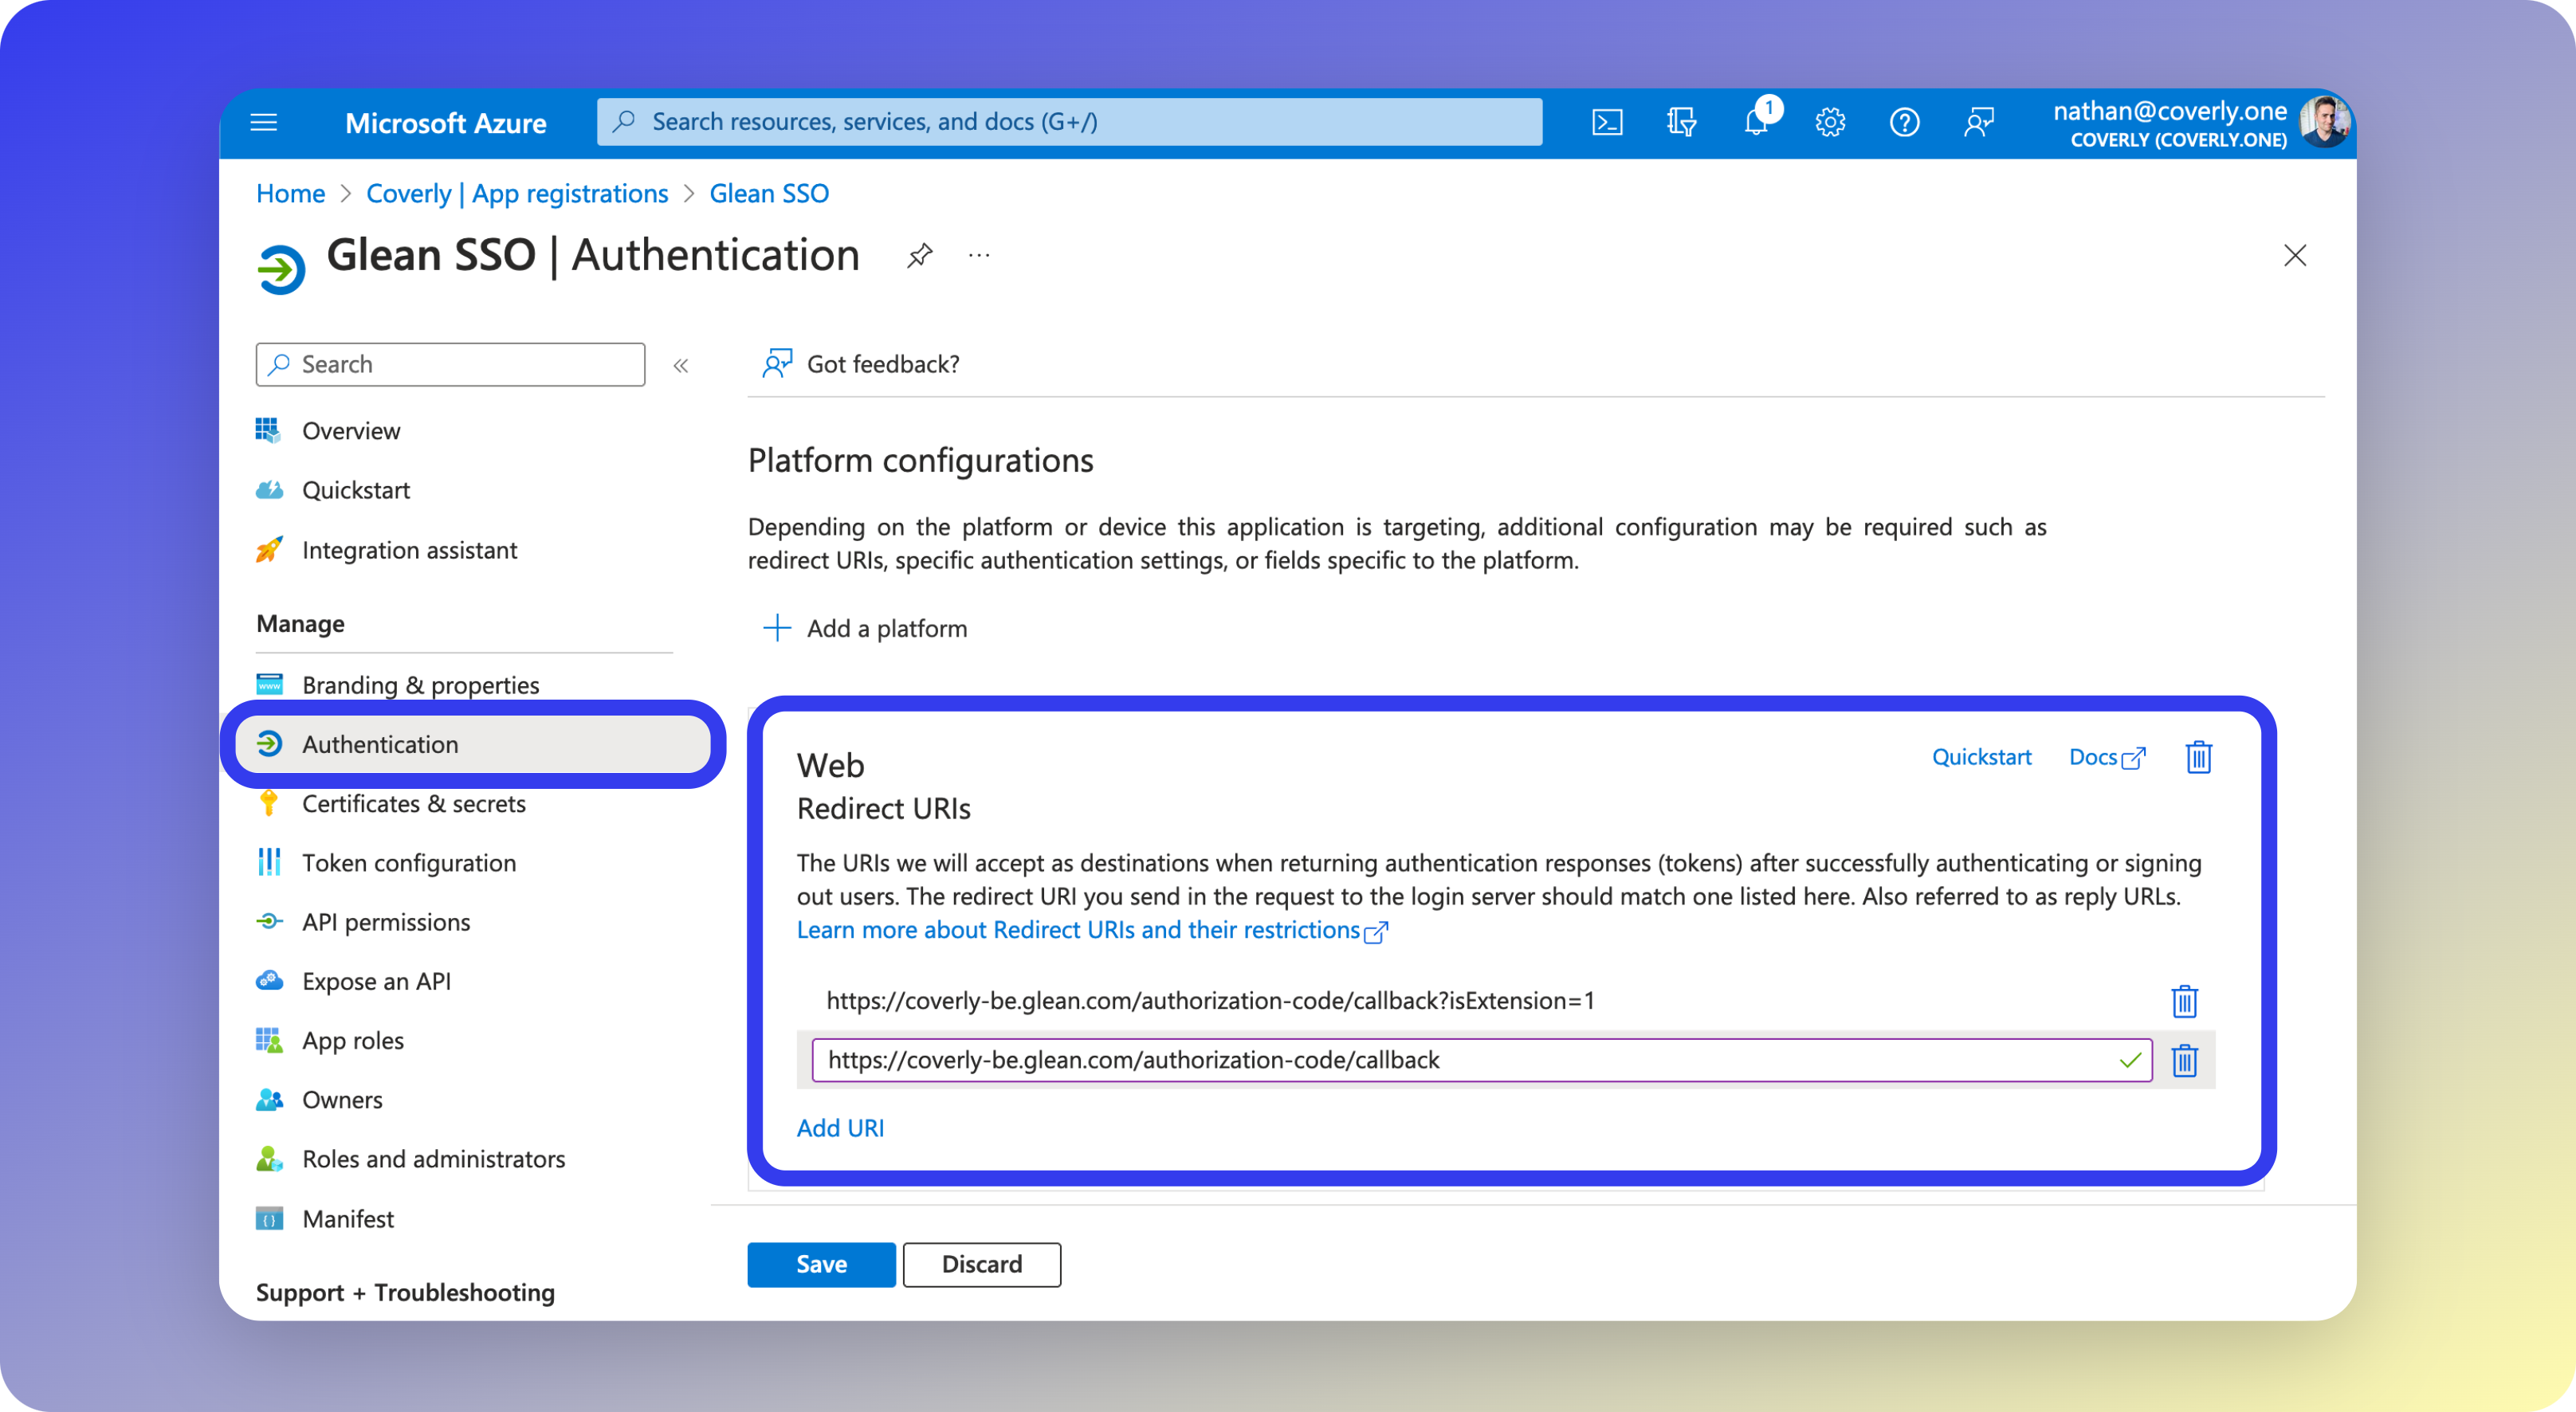
- Once the App Registration for Glean SSO has been created, select Authentication from the left sidebar menu.
- Under Web - Redirect URIs, click Add URI and paste the following as a second URI:
tenant_name with your actual tenant ID.
3 - Configure Permissions
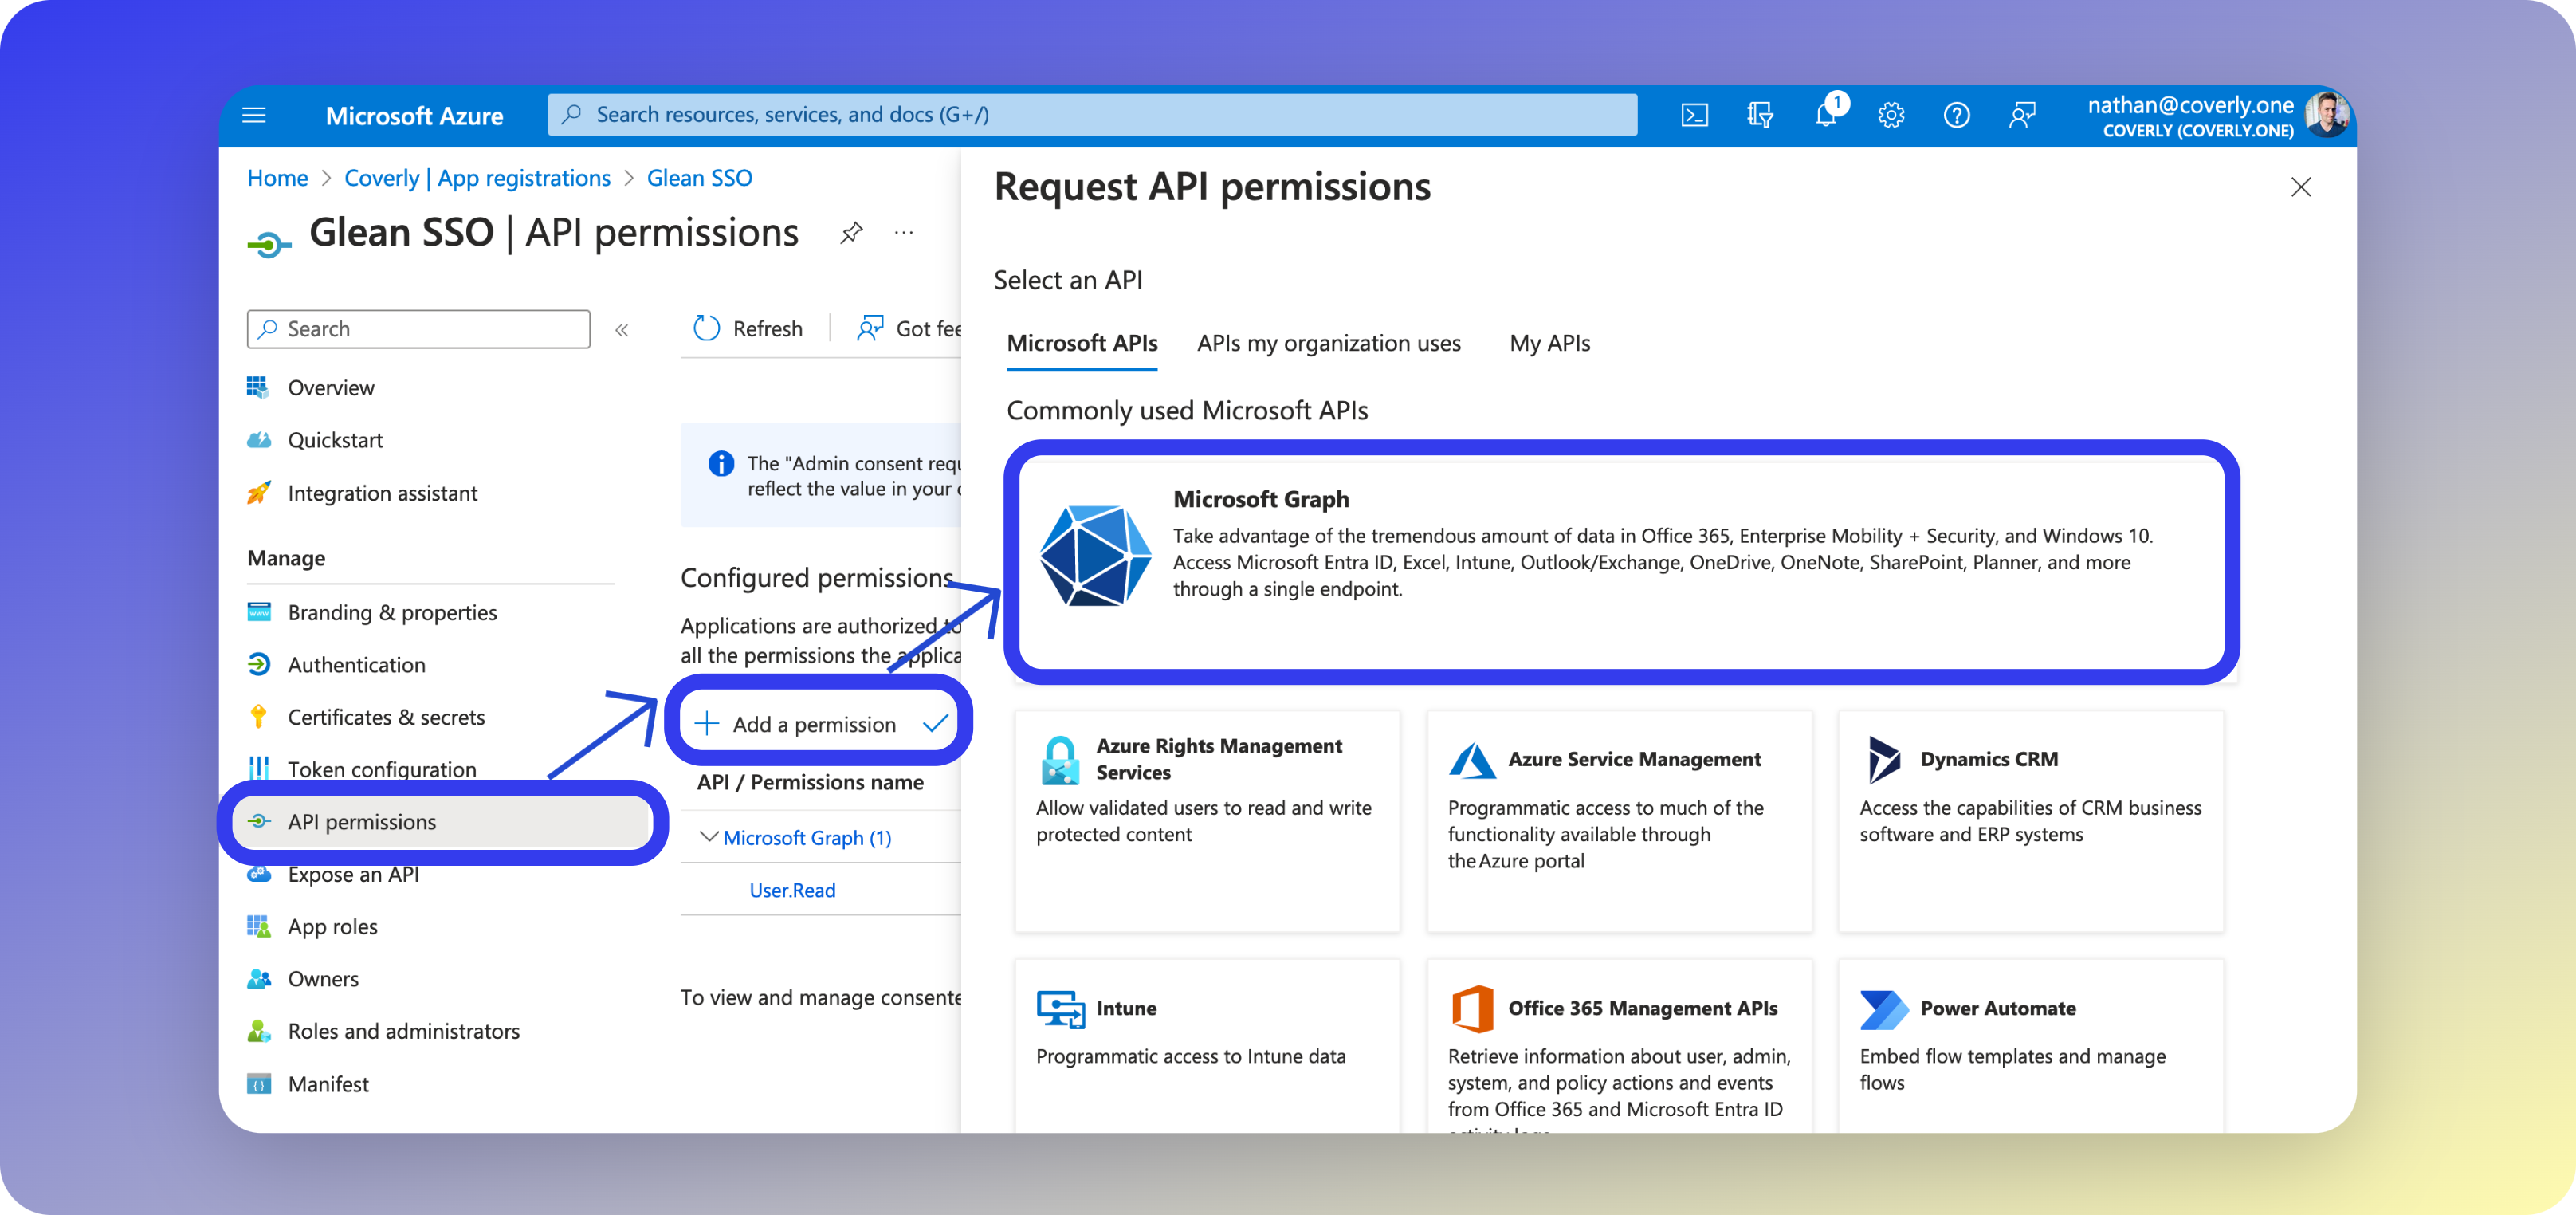
In this section, you will configure the granular read-only permissions required by Glean. These permissions allow access to the Microsoft Graph API for verifying and synchronizing user identity information.- On the left sidebar menu, select API permissions.
- Click Add a permission and select Microsoft Graph.
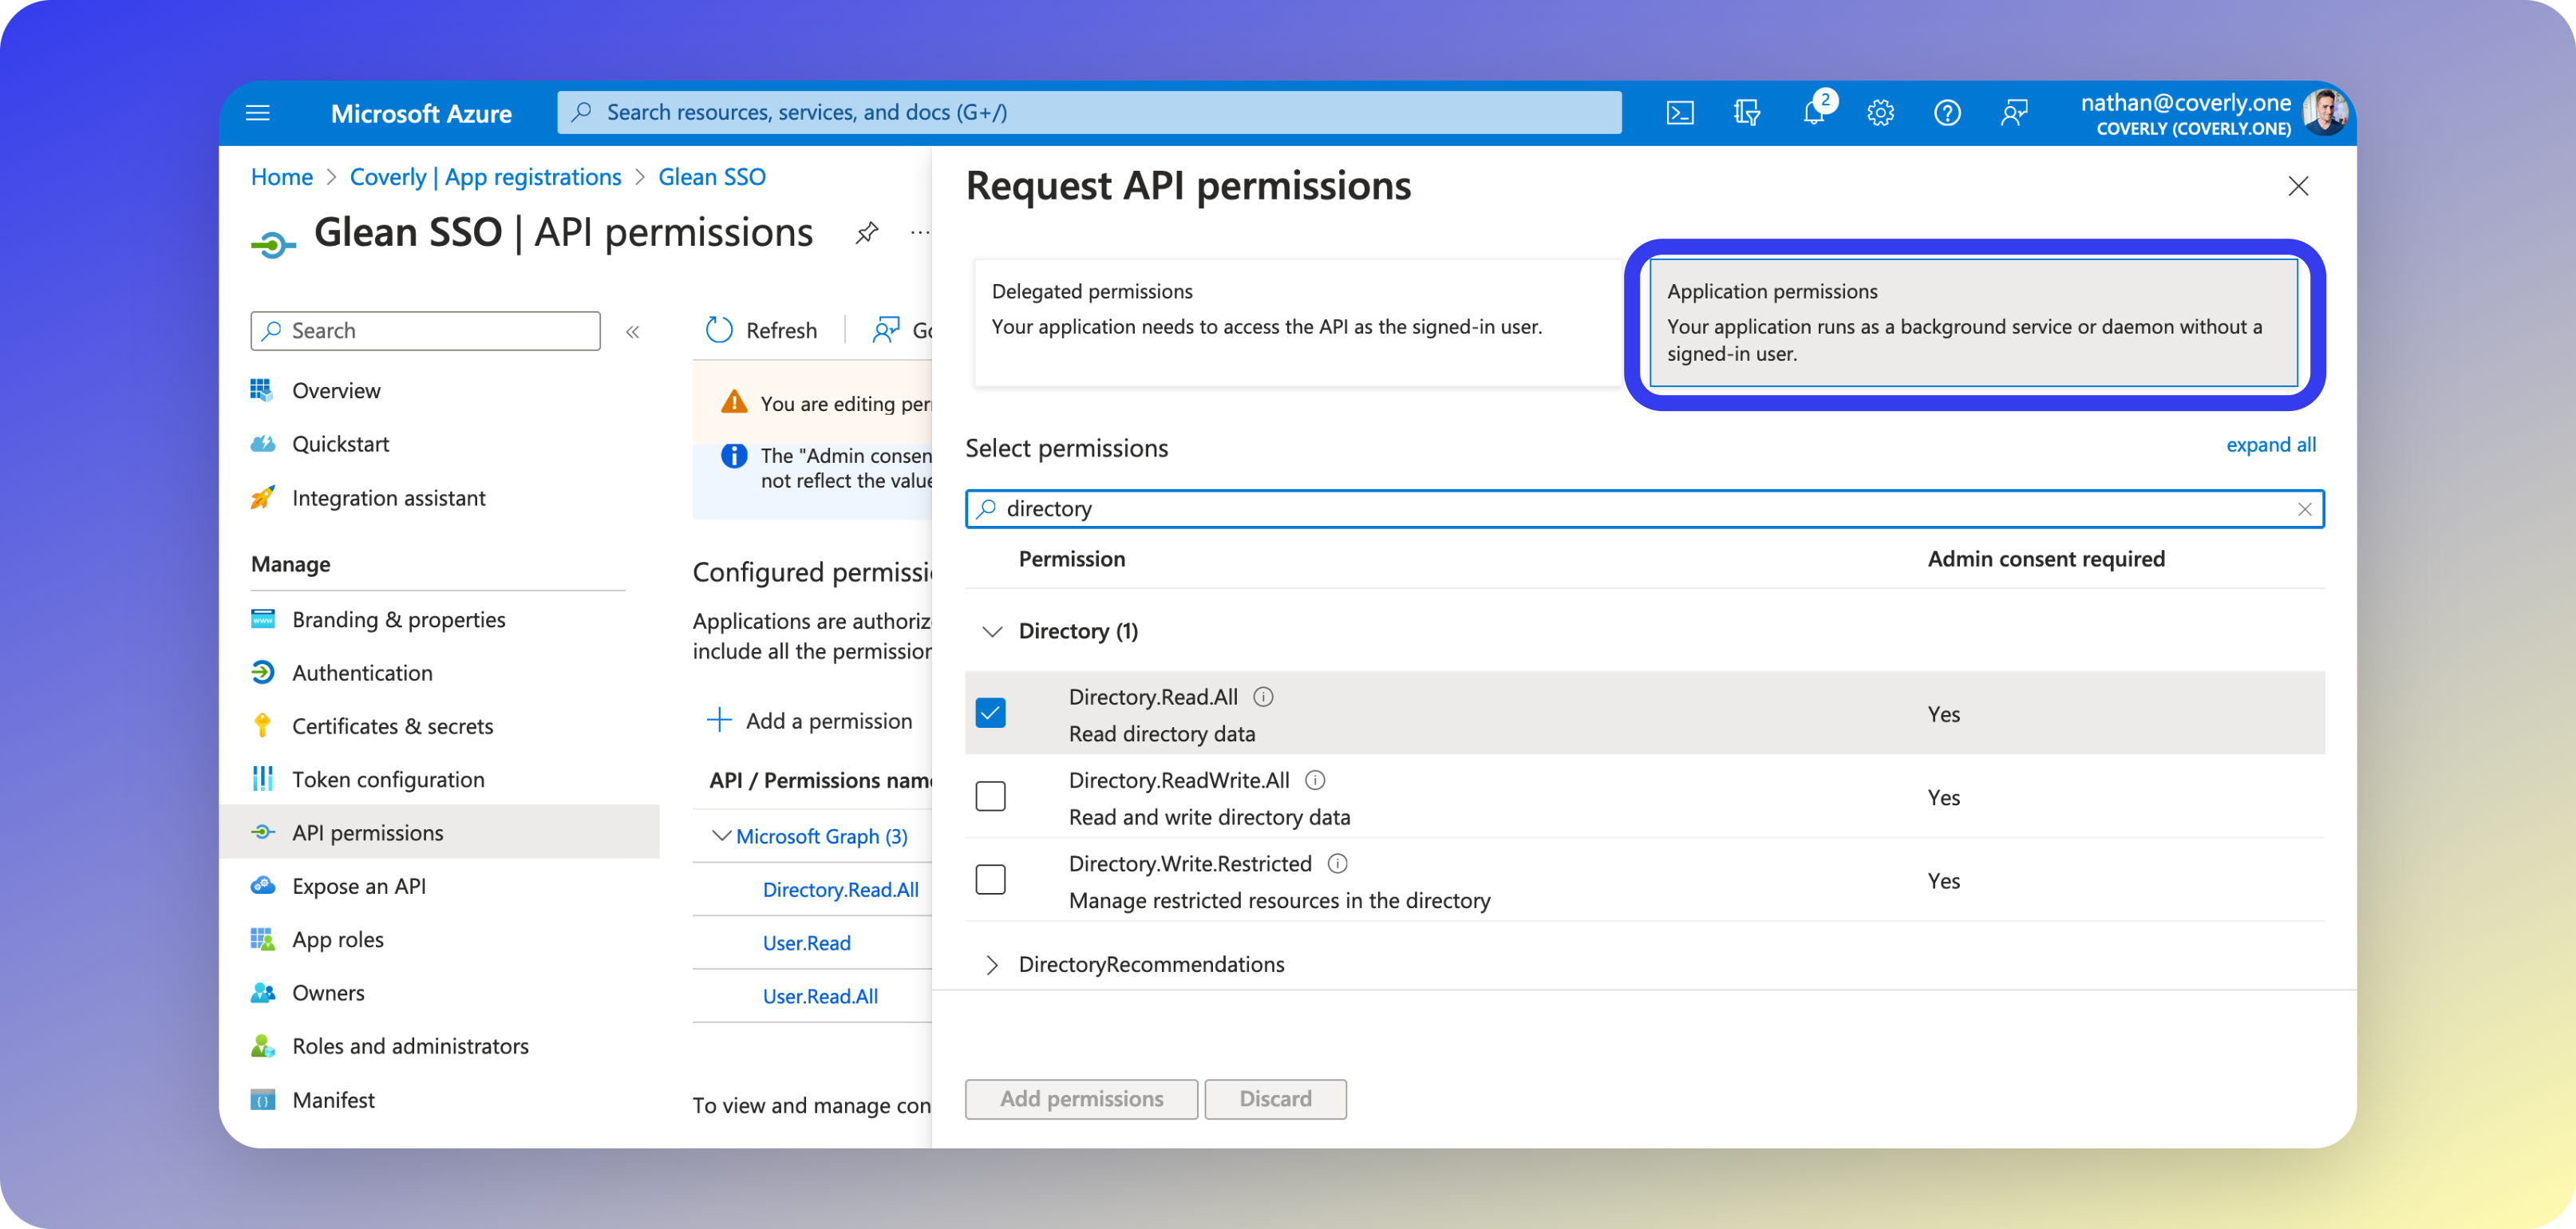
- Select Application permissions and the following:
About these permissions
About these permissions
This permission allows Glean to fetch and validate user and group identity information within Entra ID, and Application Permissions allow Glean to do this asynchronously. This ensures that changes in your directory are reflected within Glean immediately, which is vital for security.
- For example: You onboard a new employee, change user information, or deactivate a terminated employee.
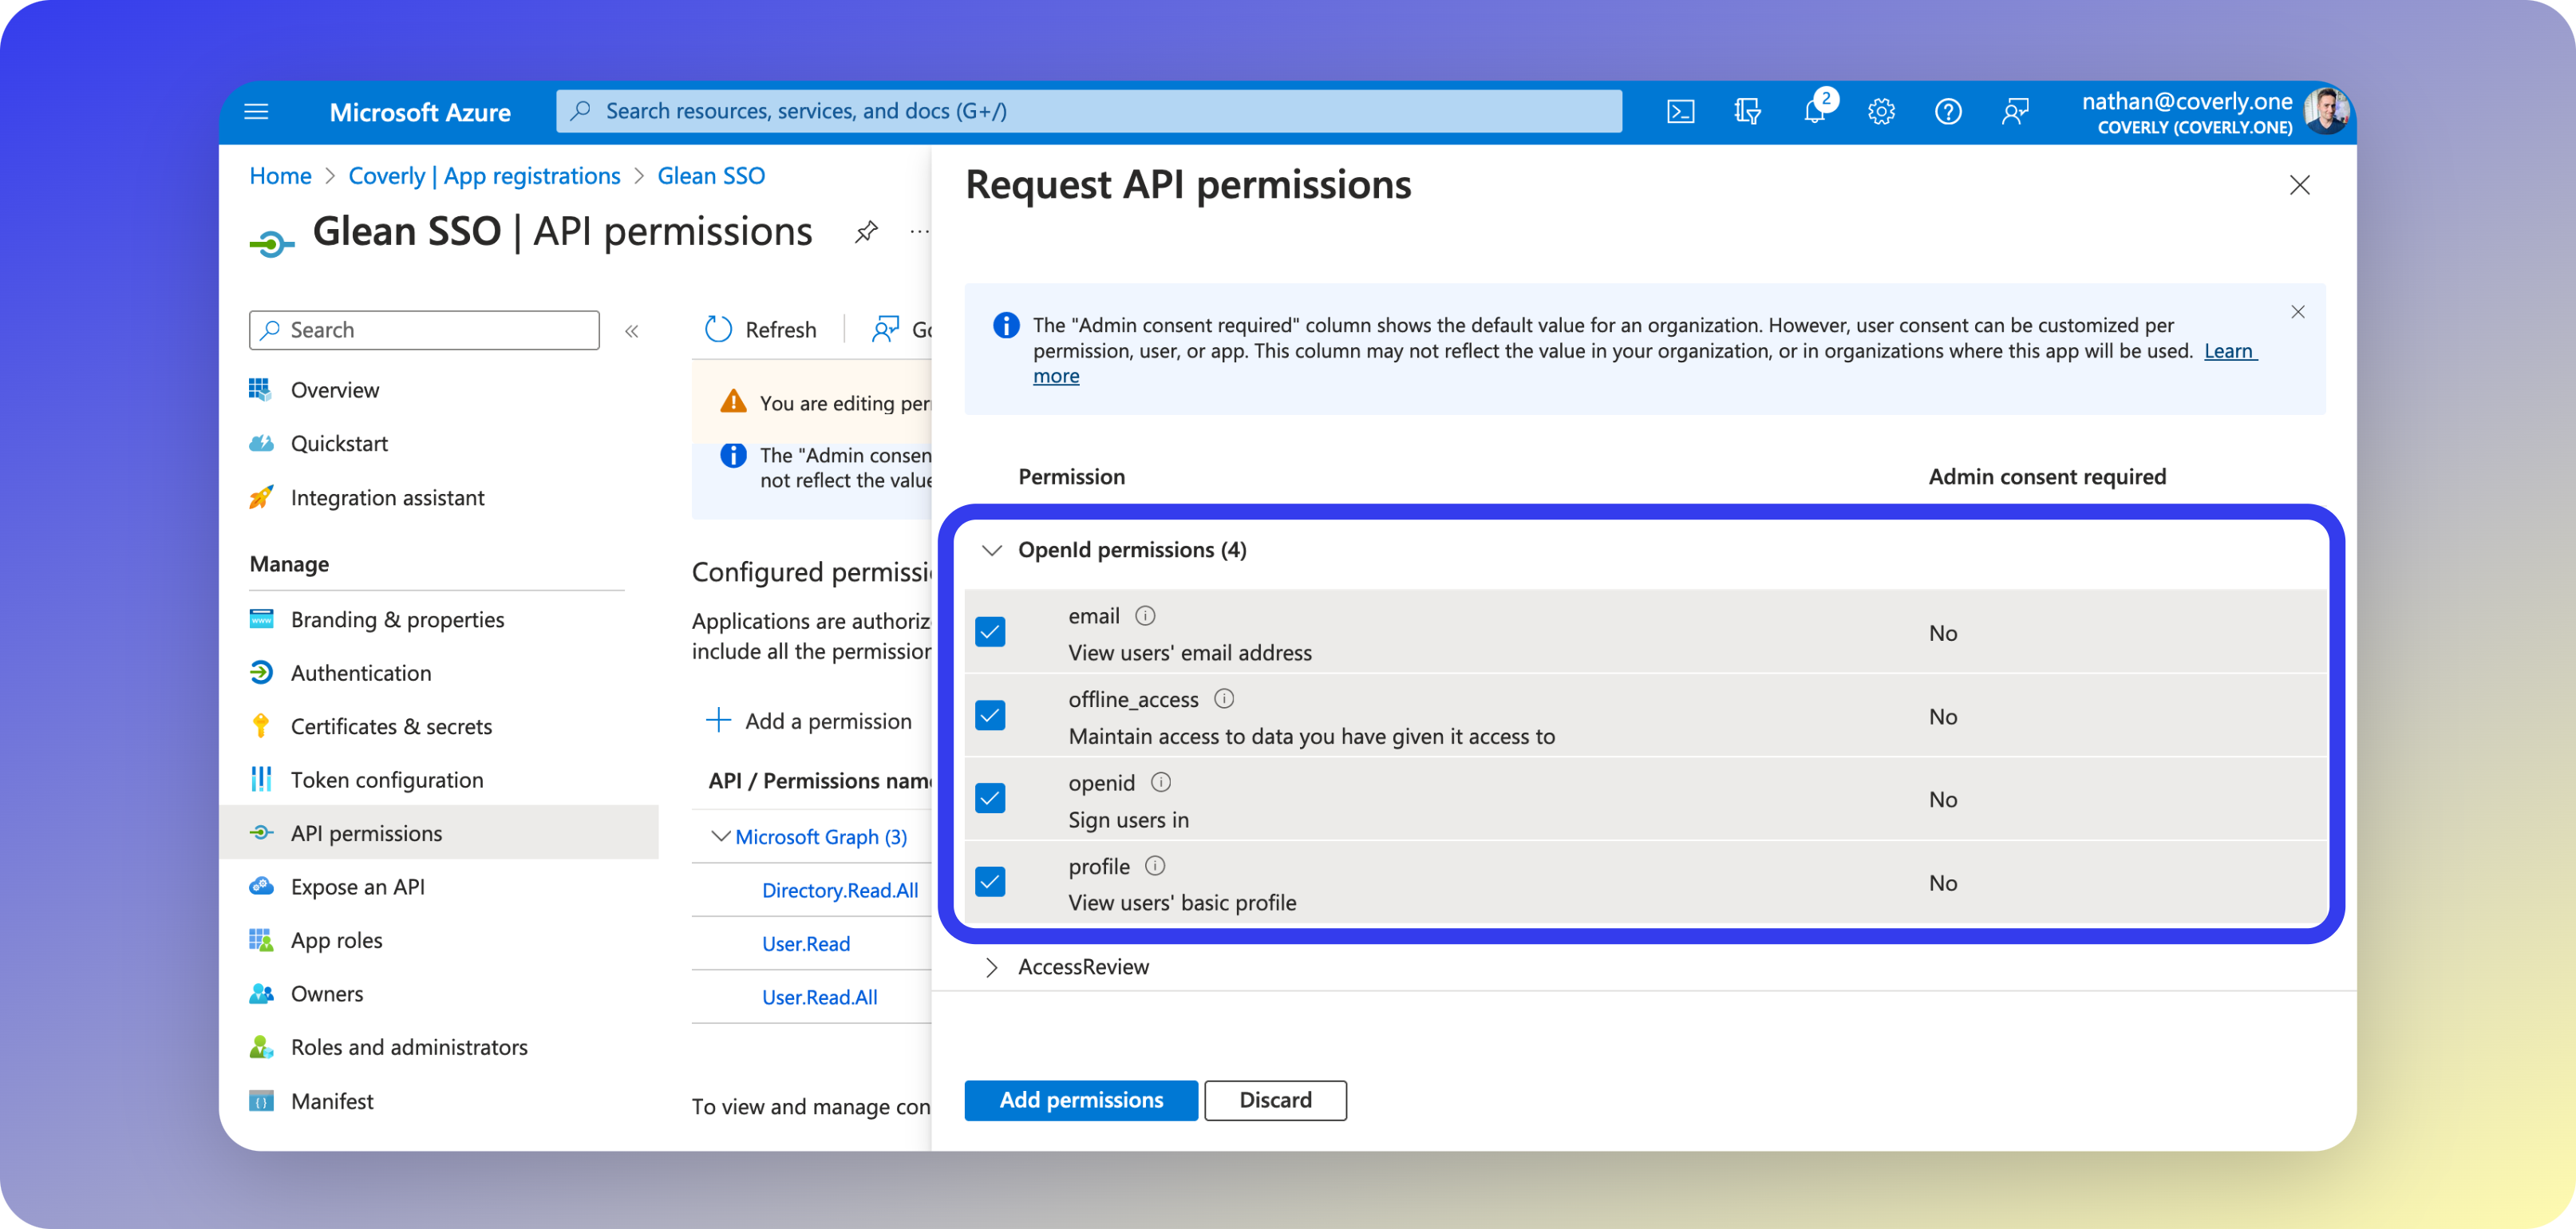
- Click Add a permission again, and select Microsoft Graph. Select Delegated permissions and add each of the following:
About these permissions
About these permissions
These permissions allow Glean to validate information regarding the user request for authorized login to the platform. Only delegated permissions are needed, as it is not necessary for this information to be fetched asynchronously: only on user login and re-authentication.Glean only requests the default permissions specified in the Microsoft Authentication Library (MSAL) for authorization and token requests (
openid, email, offline_access, and profile).More specifically (from the Microsoft Graph Permissions Reference document):- openid:
Allows users to sign in to the app (Glean) with their work or school accounts and allows the app (Glean) to see basic user profile information. - email:
Allows the app (Glean) to read your users’ primary email address. - offline_access:
Allows the app (Glean) to see and update the data you gave it access to, even when users are not currently using the app (Glean). This does not give the app (Glean) any additional permissions. - profile:
Allows the app (Glean) to see your users’ basic profile (e.g., name, picture, user name, email address).
- Before proceeding to the next step, ensure that you have assigned each of the below permissions with the correct permission type.
| Permission | Type |
|---|---|
| Delegated | |
| offline_access | Delegated |
| openid | Delegated |
| profile | Delegated |
| User.Read.All | Application |
4 - Grant Admin Consent
This next step must be completed by a user signed into Azure with one of the following roles: Global Administrator, Application Administrator, or Cloud Application Administrator.
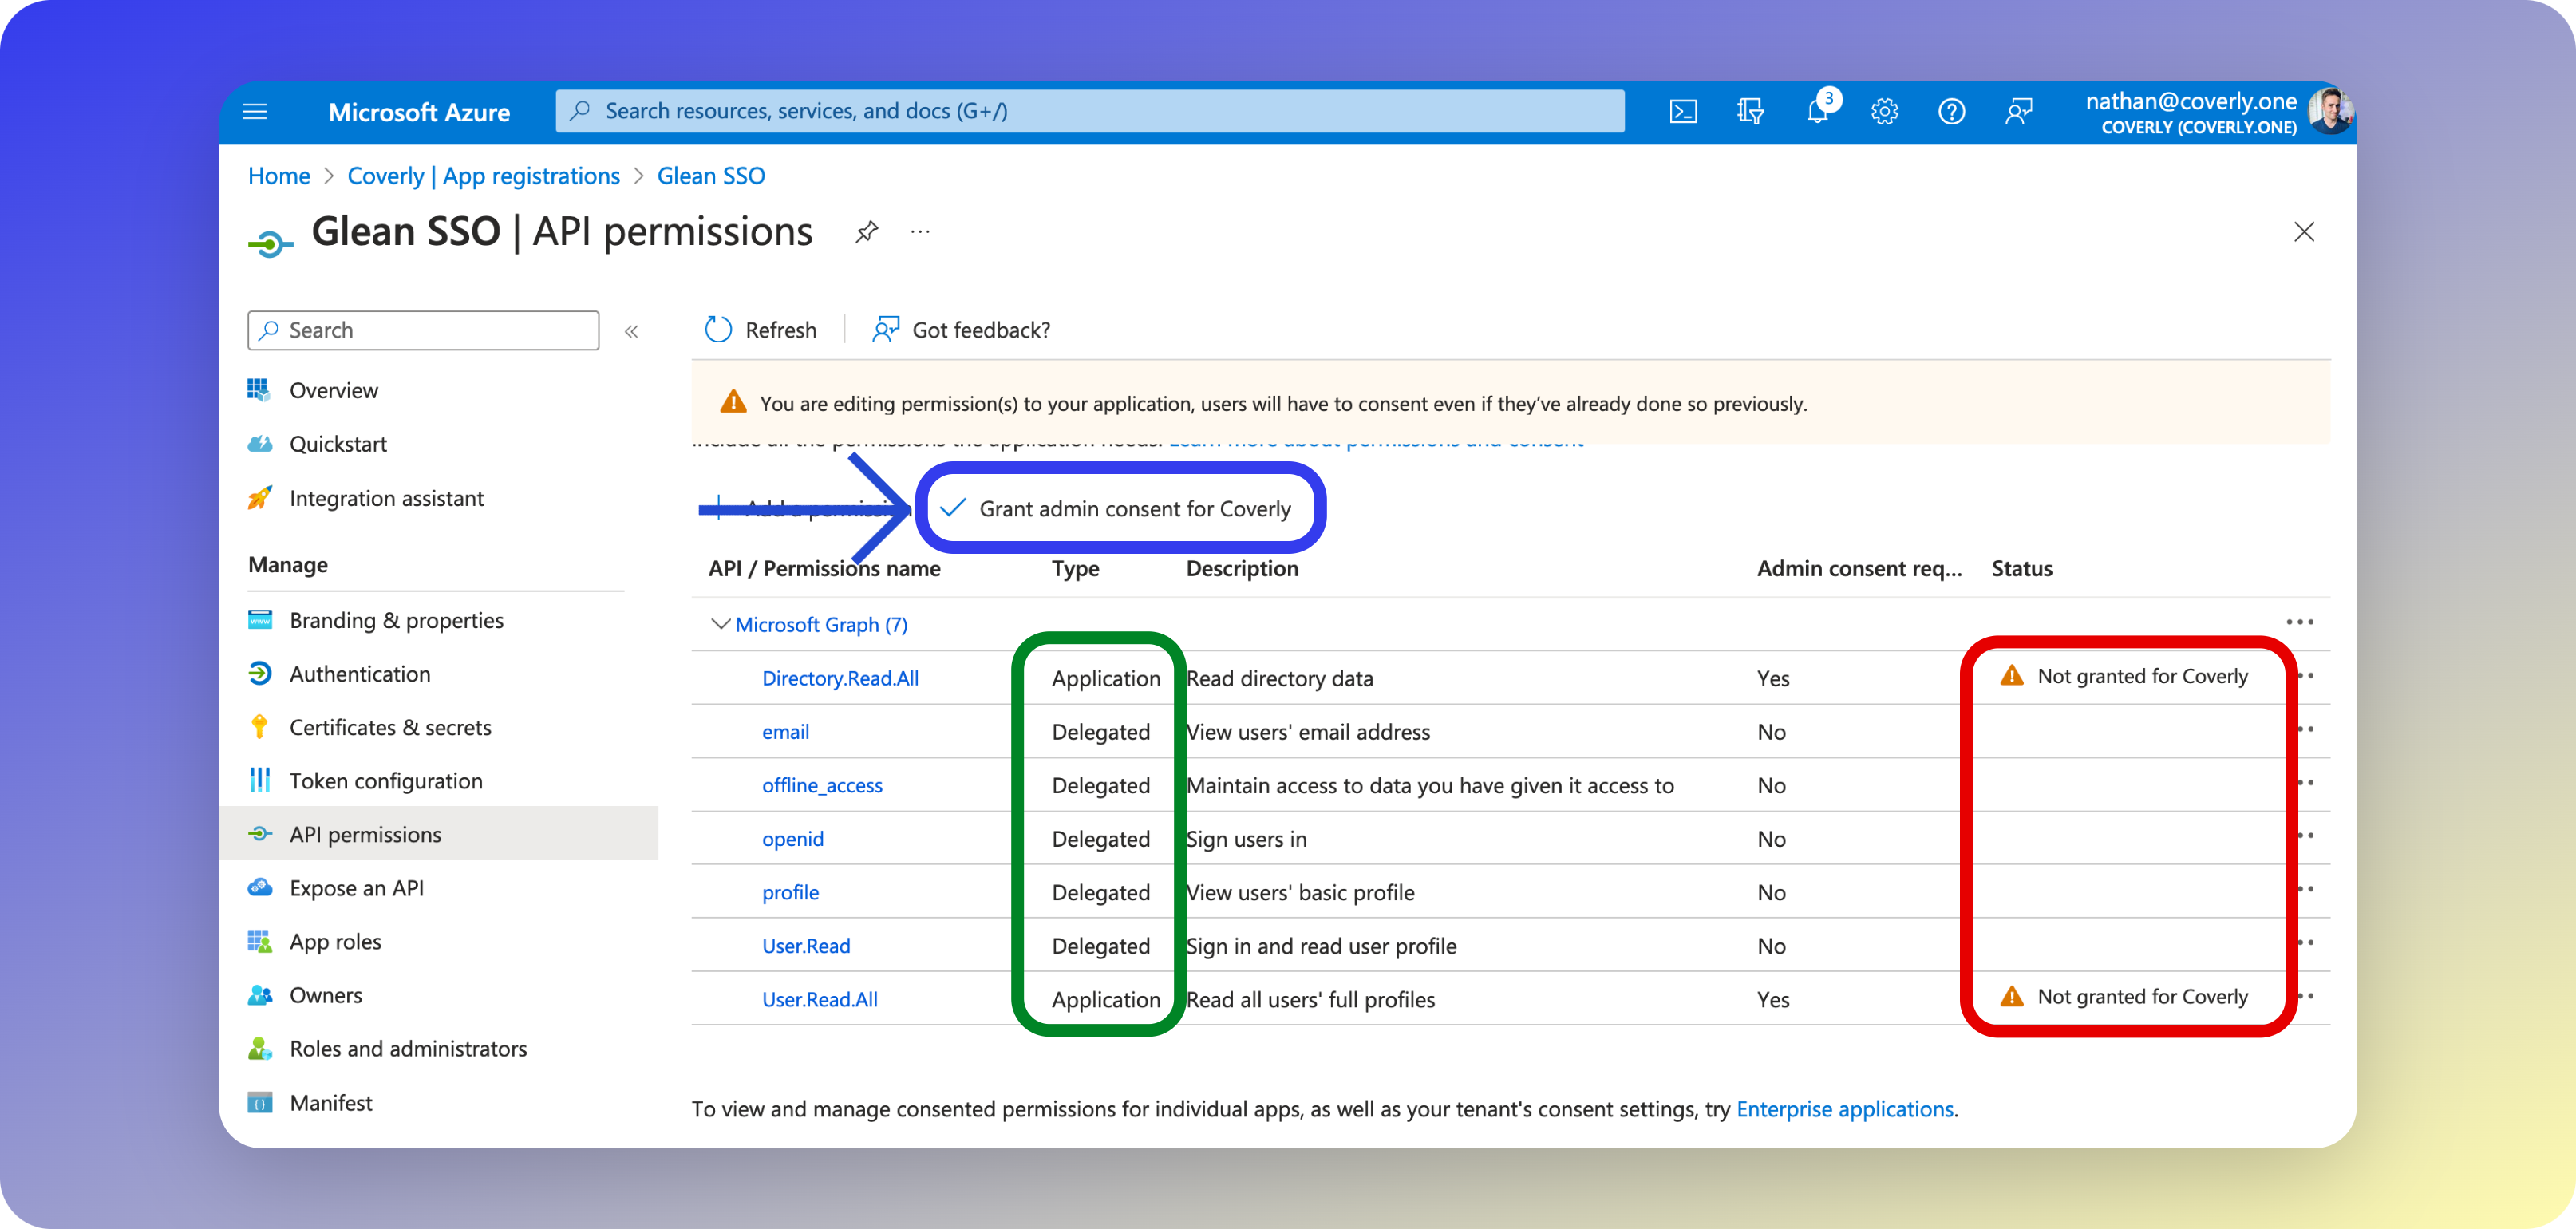
- On the same screen (API permissions), click the Grant admin consent button to authorize the selected permissions. If this button is not visible to you, it means that you do not have the appropriate role to grant the auorization.
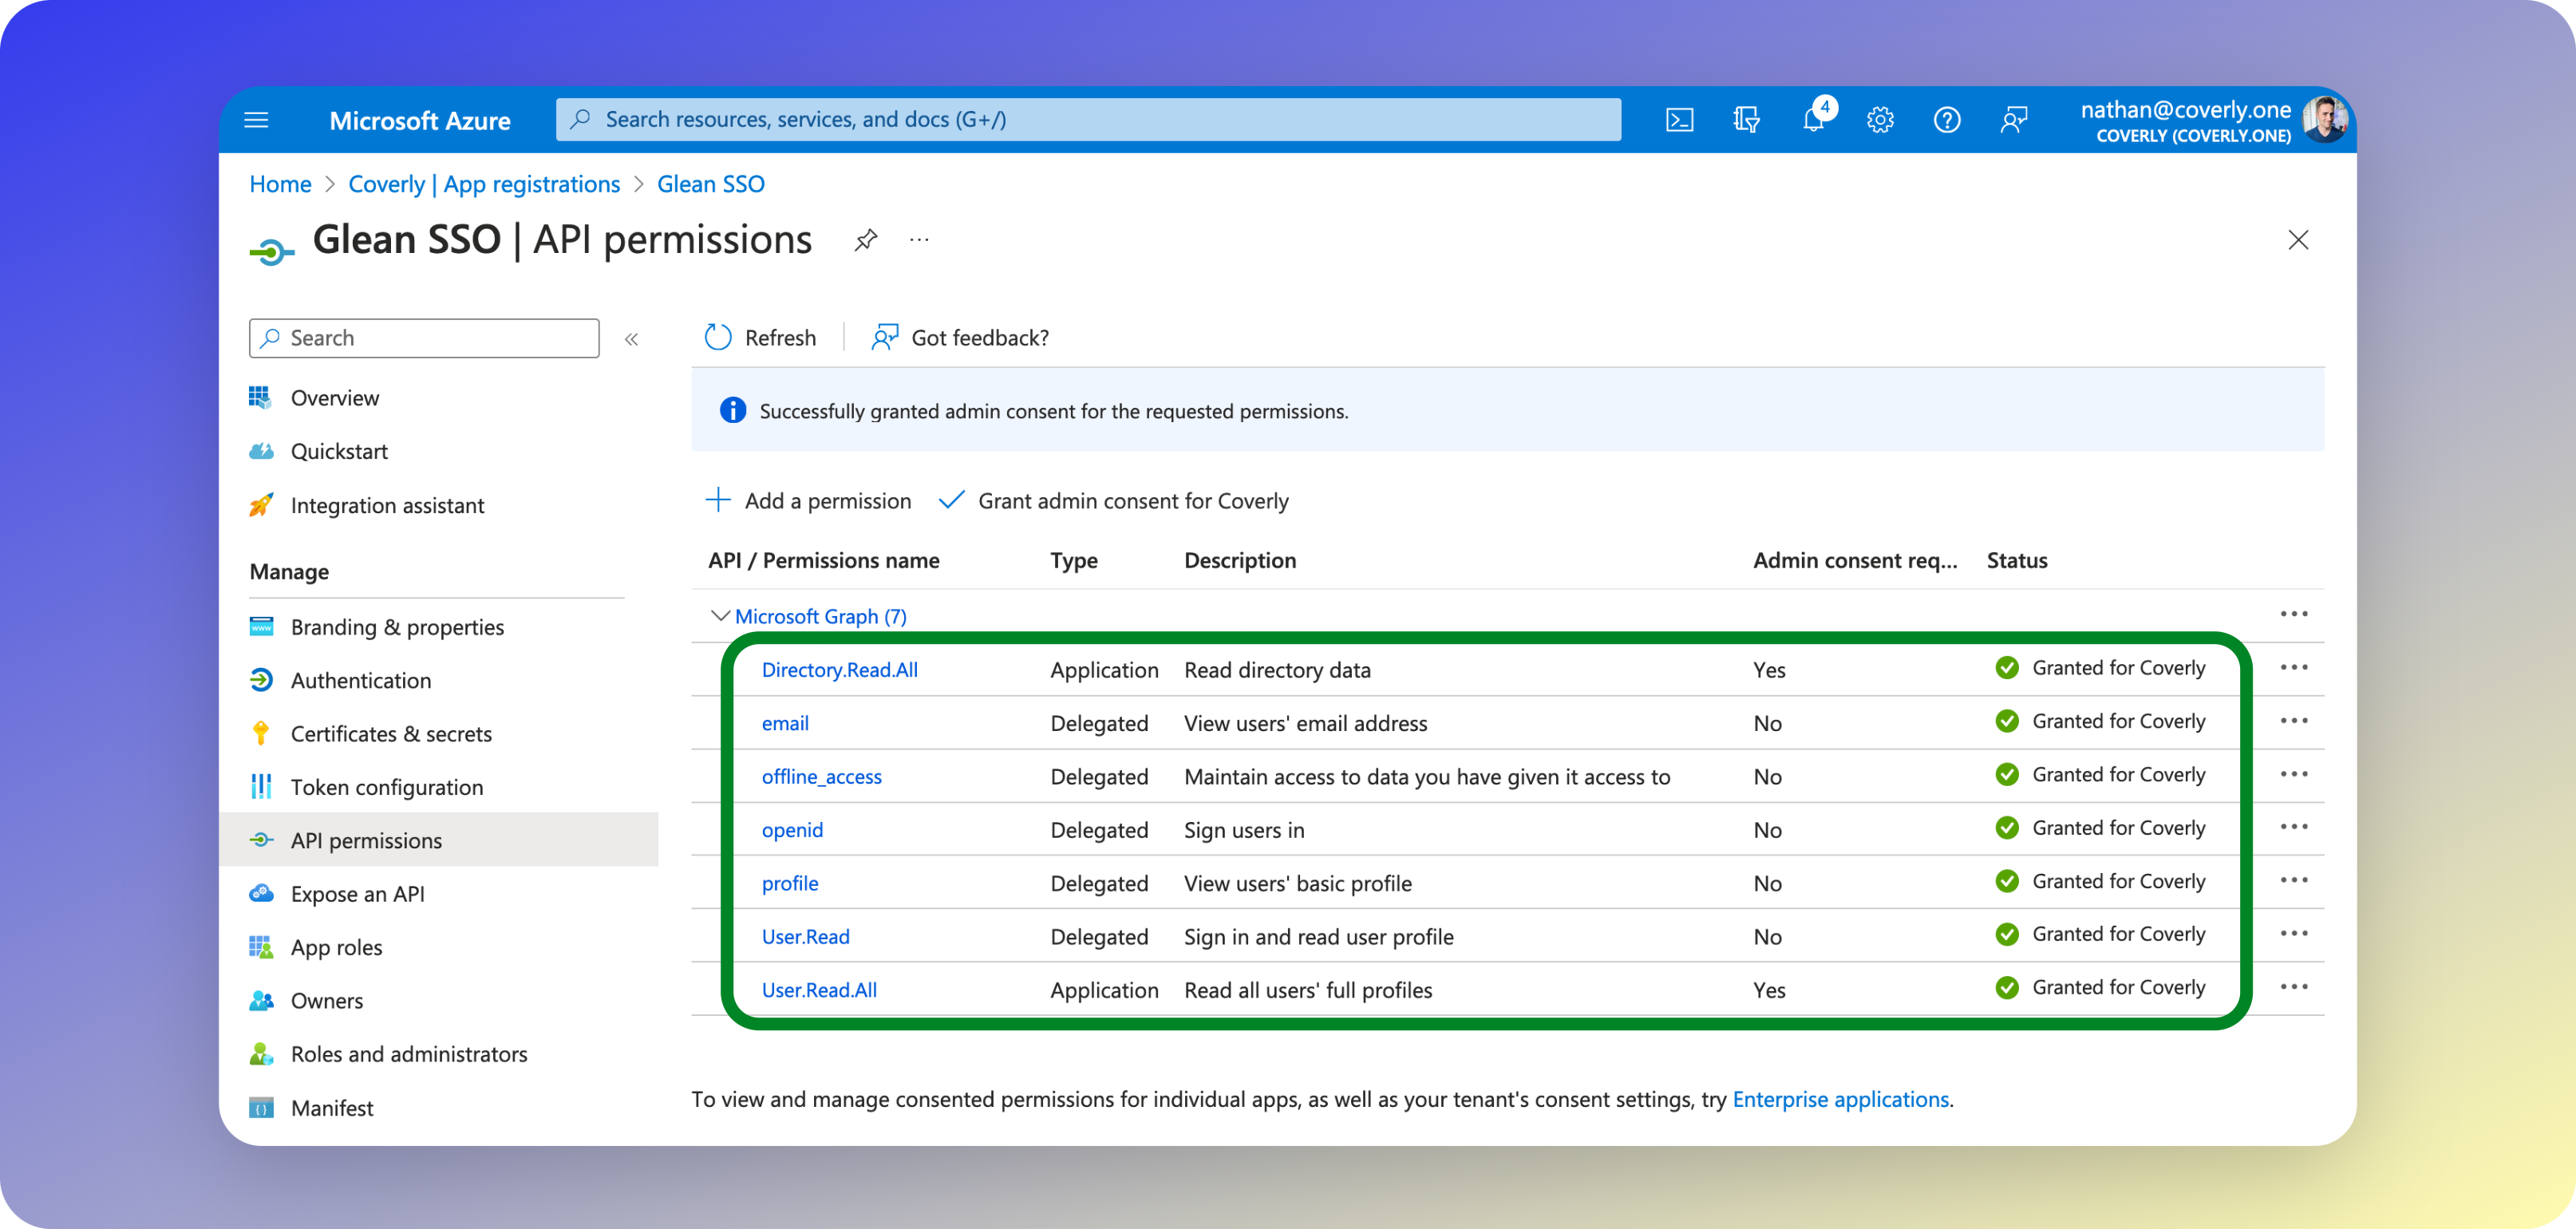
- Once admin consent has been granted, you will see a green checkmark in the status field of each permision.
5 - Generate Secret
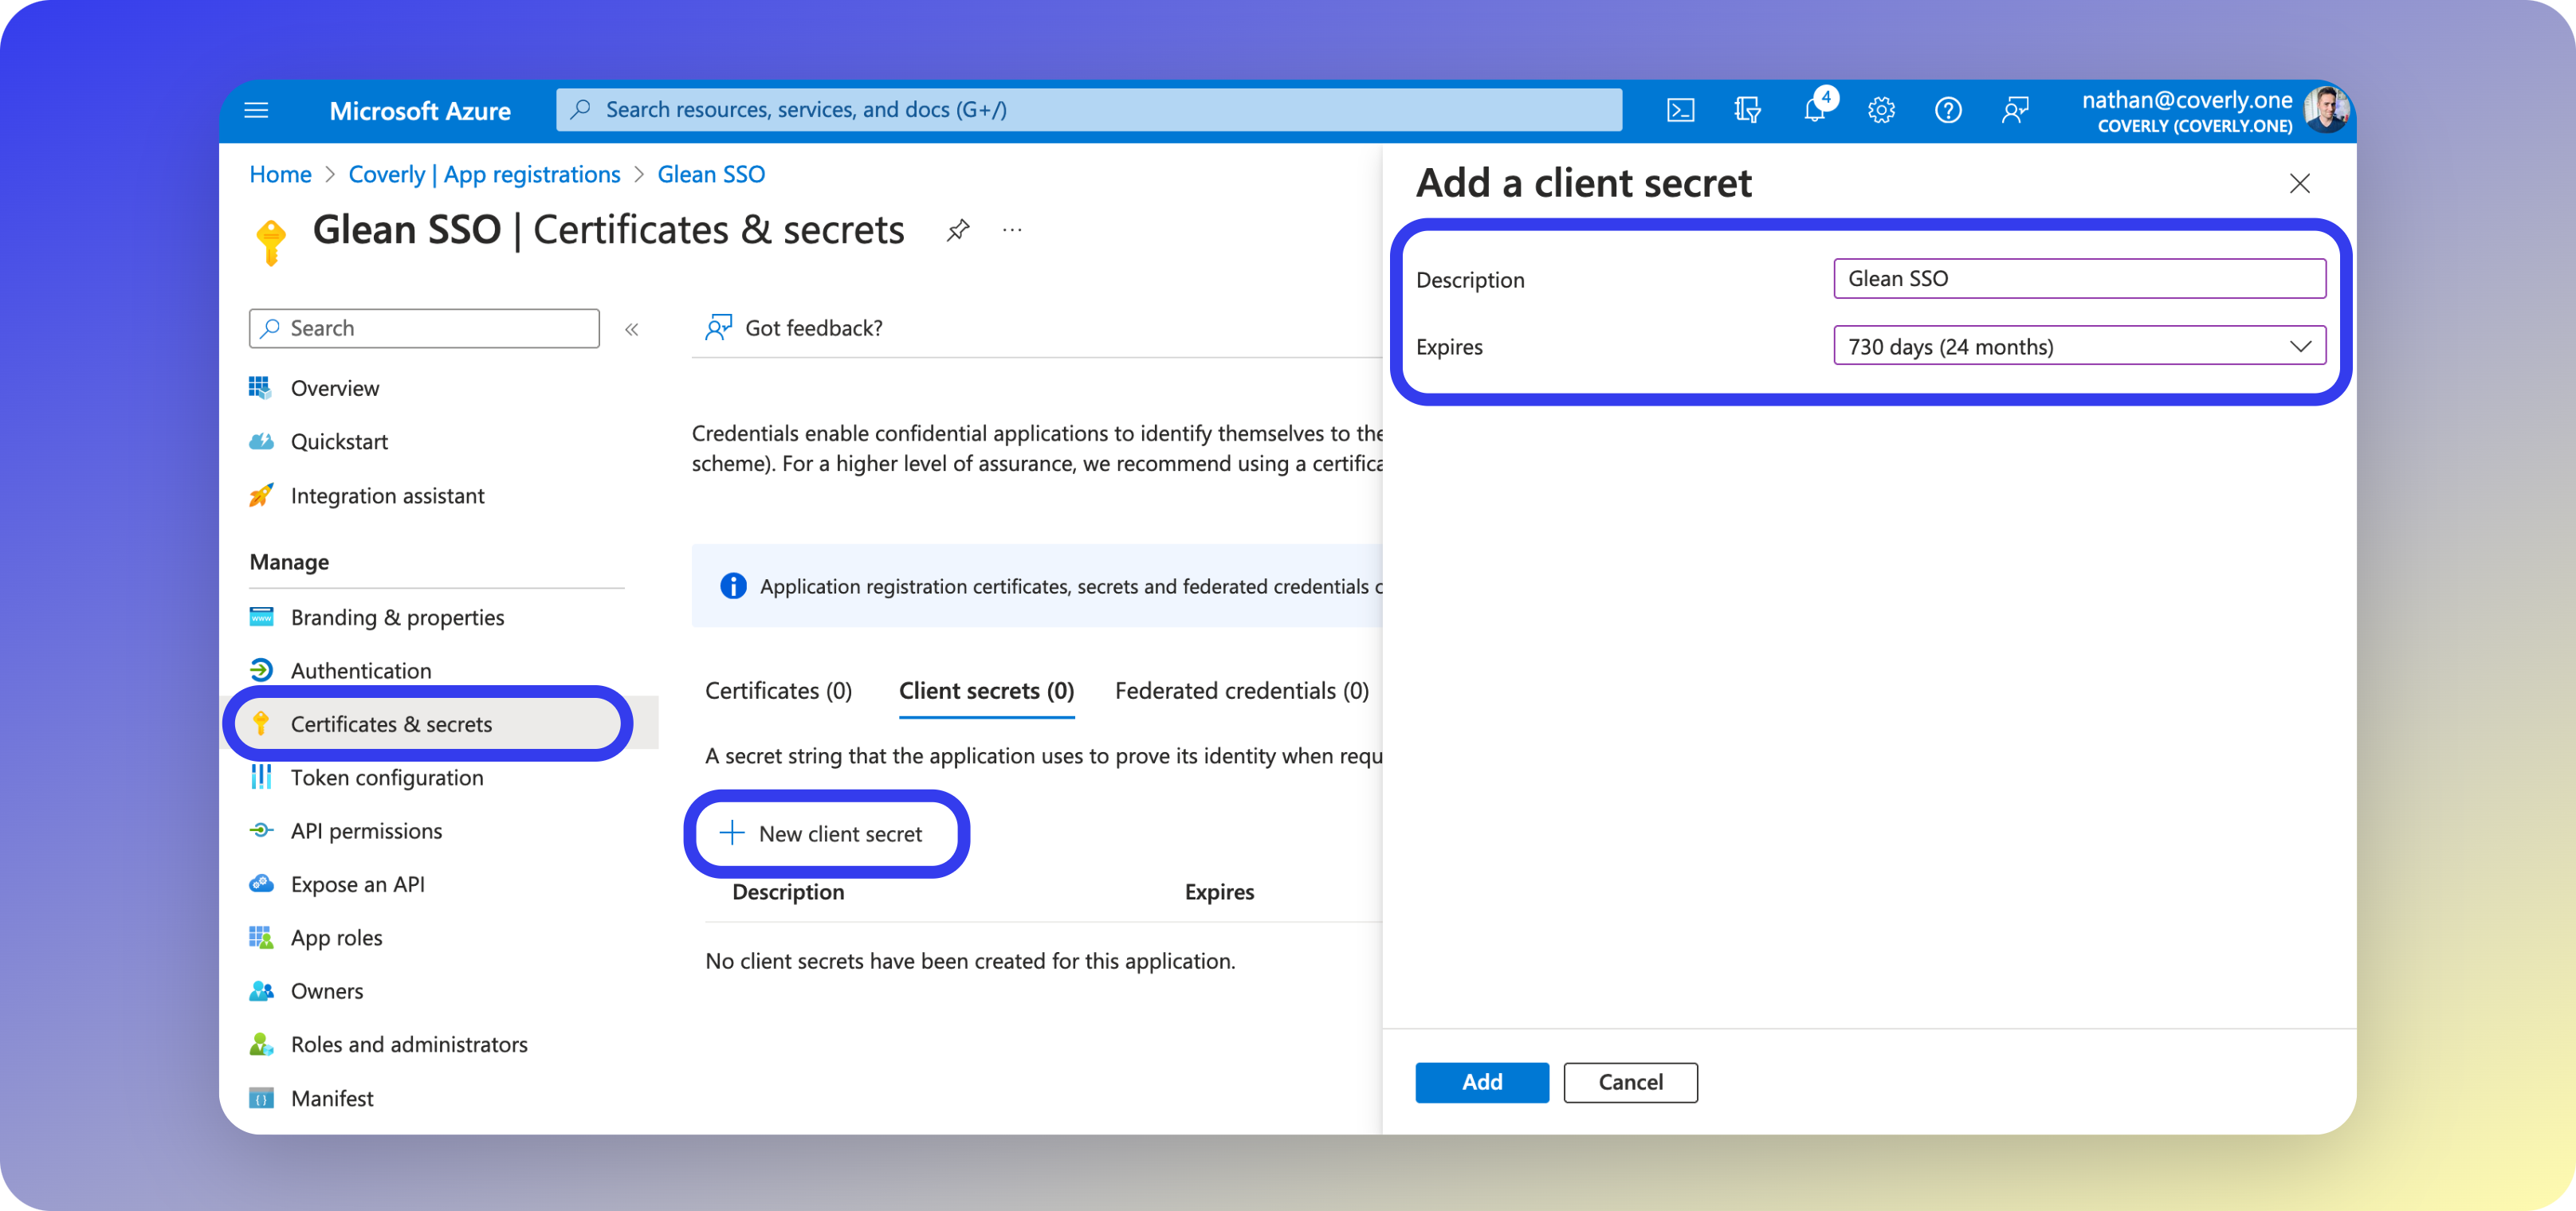
Next, you will create a secret token that Glean will use to access the Microsoft Graph API.- From the left sidebar menu, select Certificates & Secrets, then click New client secret.
- Enter Glean SSO as the name, and select 24 months for the expiry time.
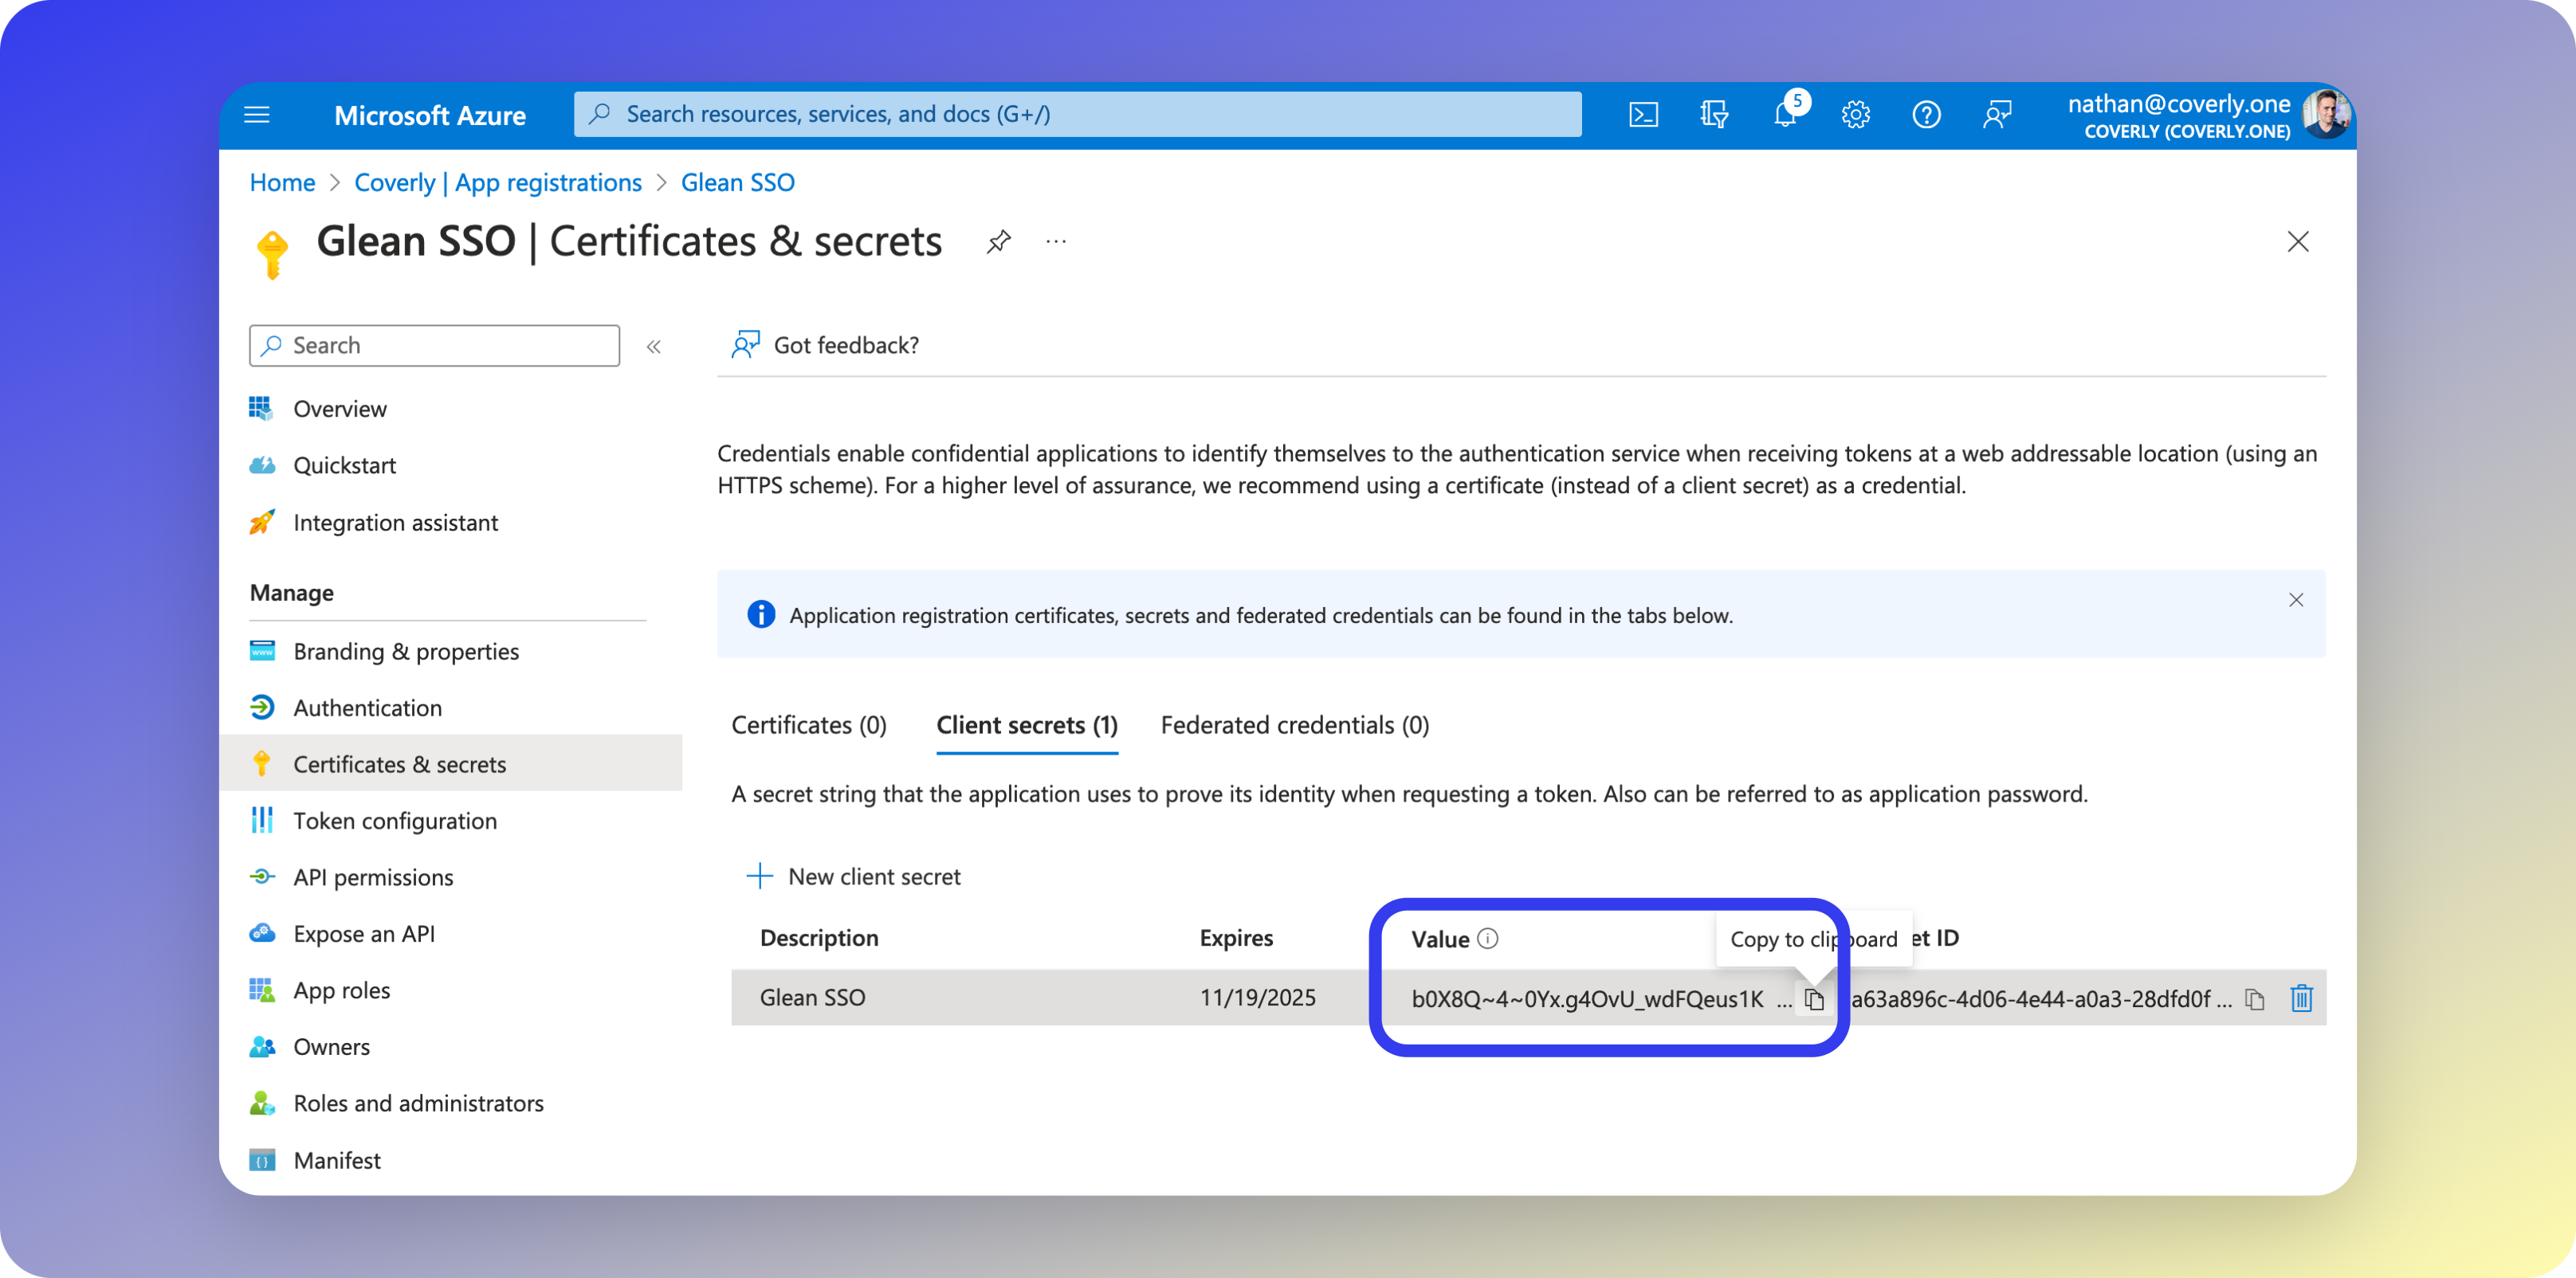
- Under the Client secrets section, copy the Value (not the Secret ID) and the expiration date. You will need this later when configuring Glean.
6 - Copy App & Directory IDs
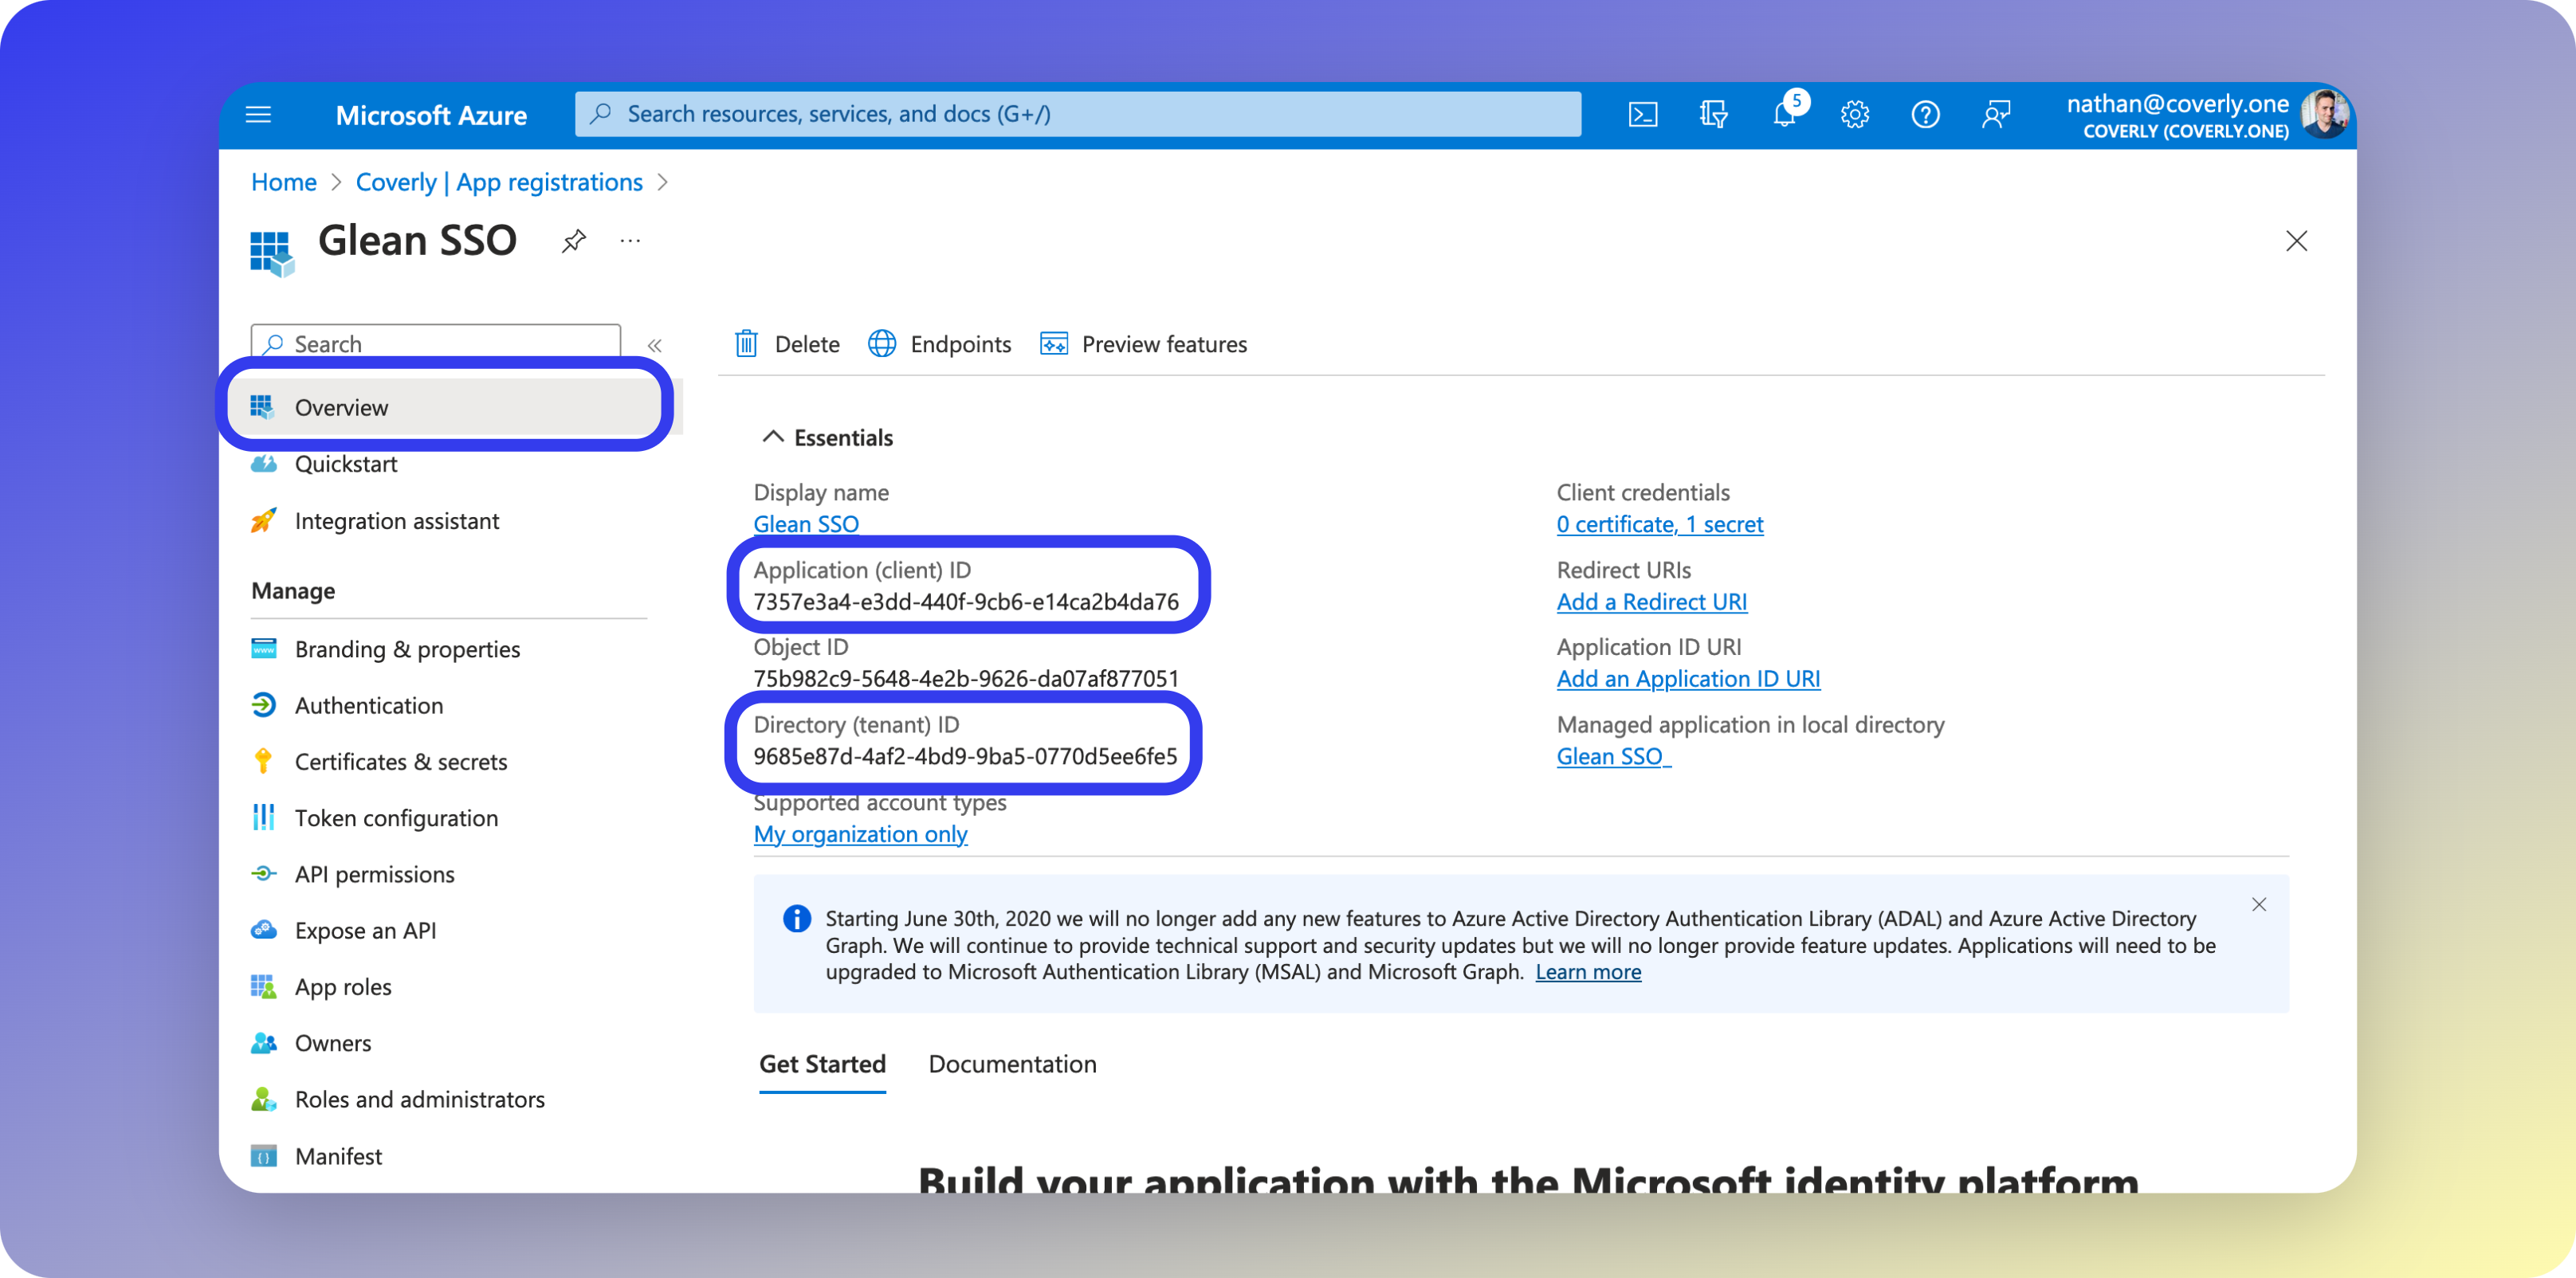
- From the left sidebar menu, select Overview.
- Copy both the Application (client) ID and the Tenant (directory) ID. You will need these later when configuring Glean.
7 - Upload Icon
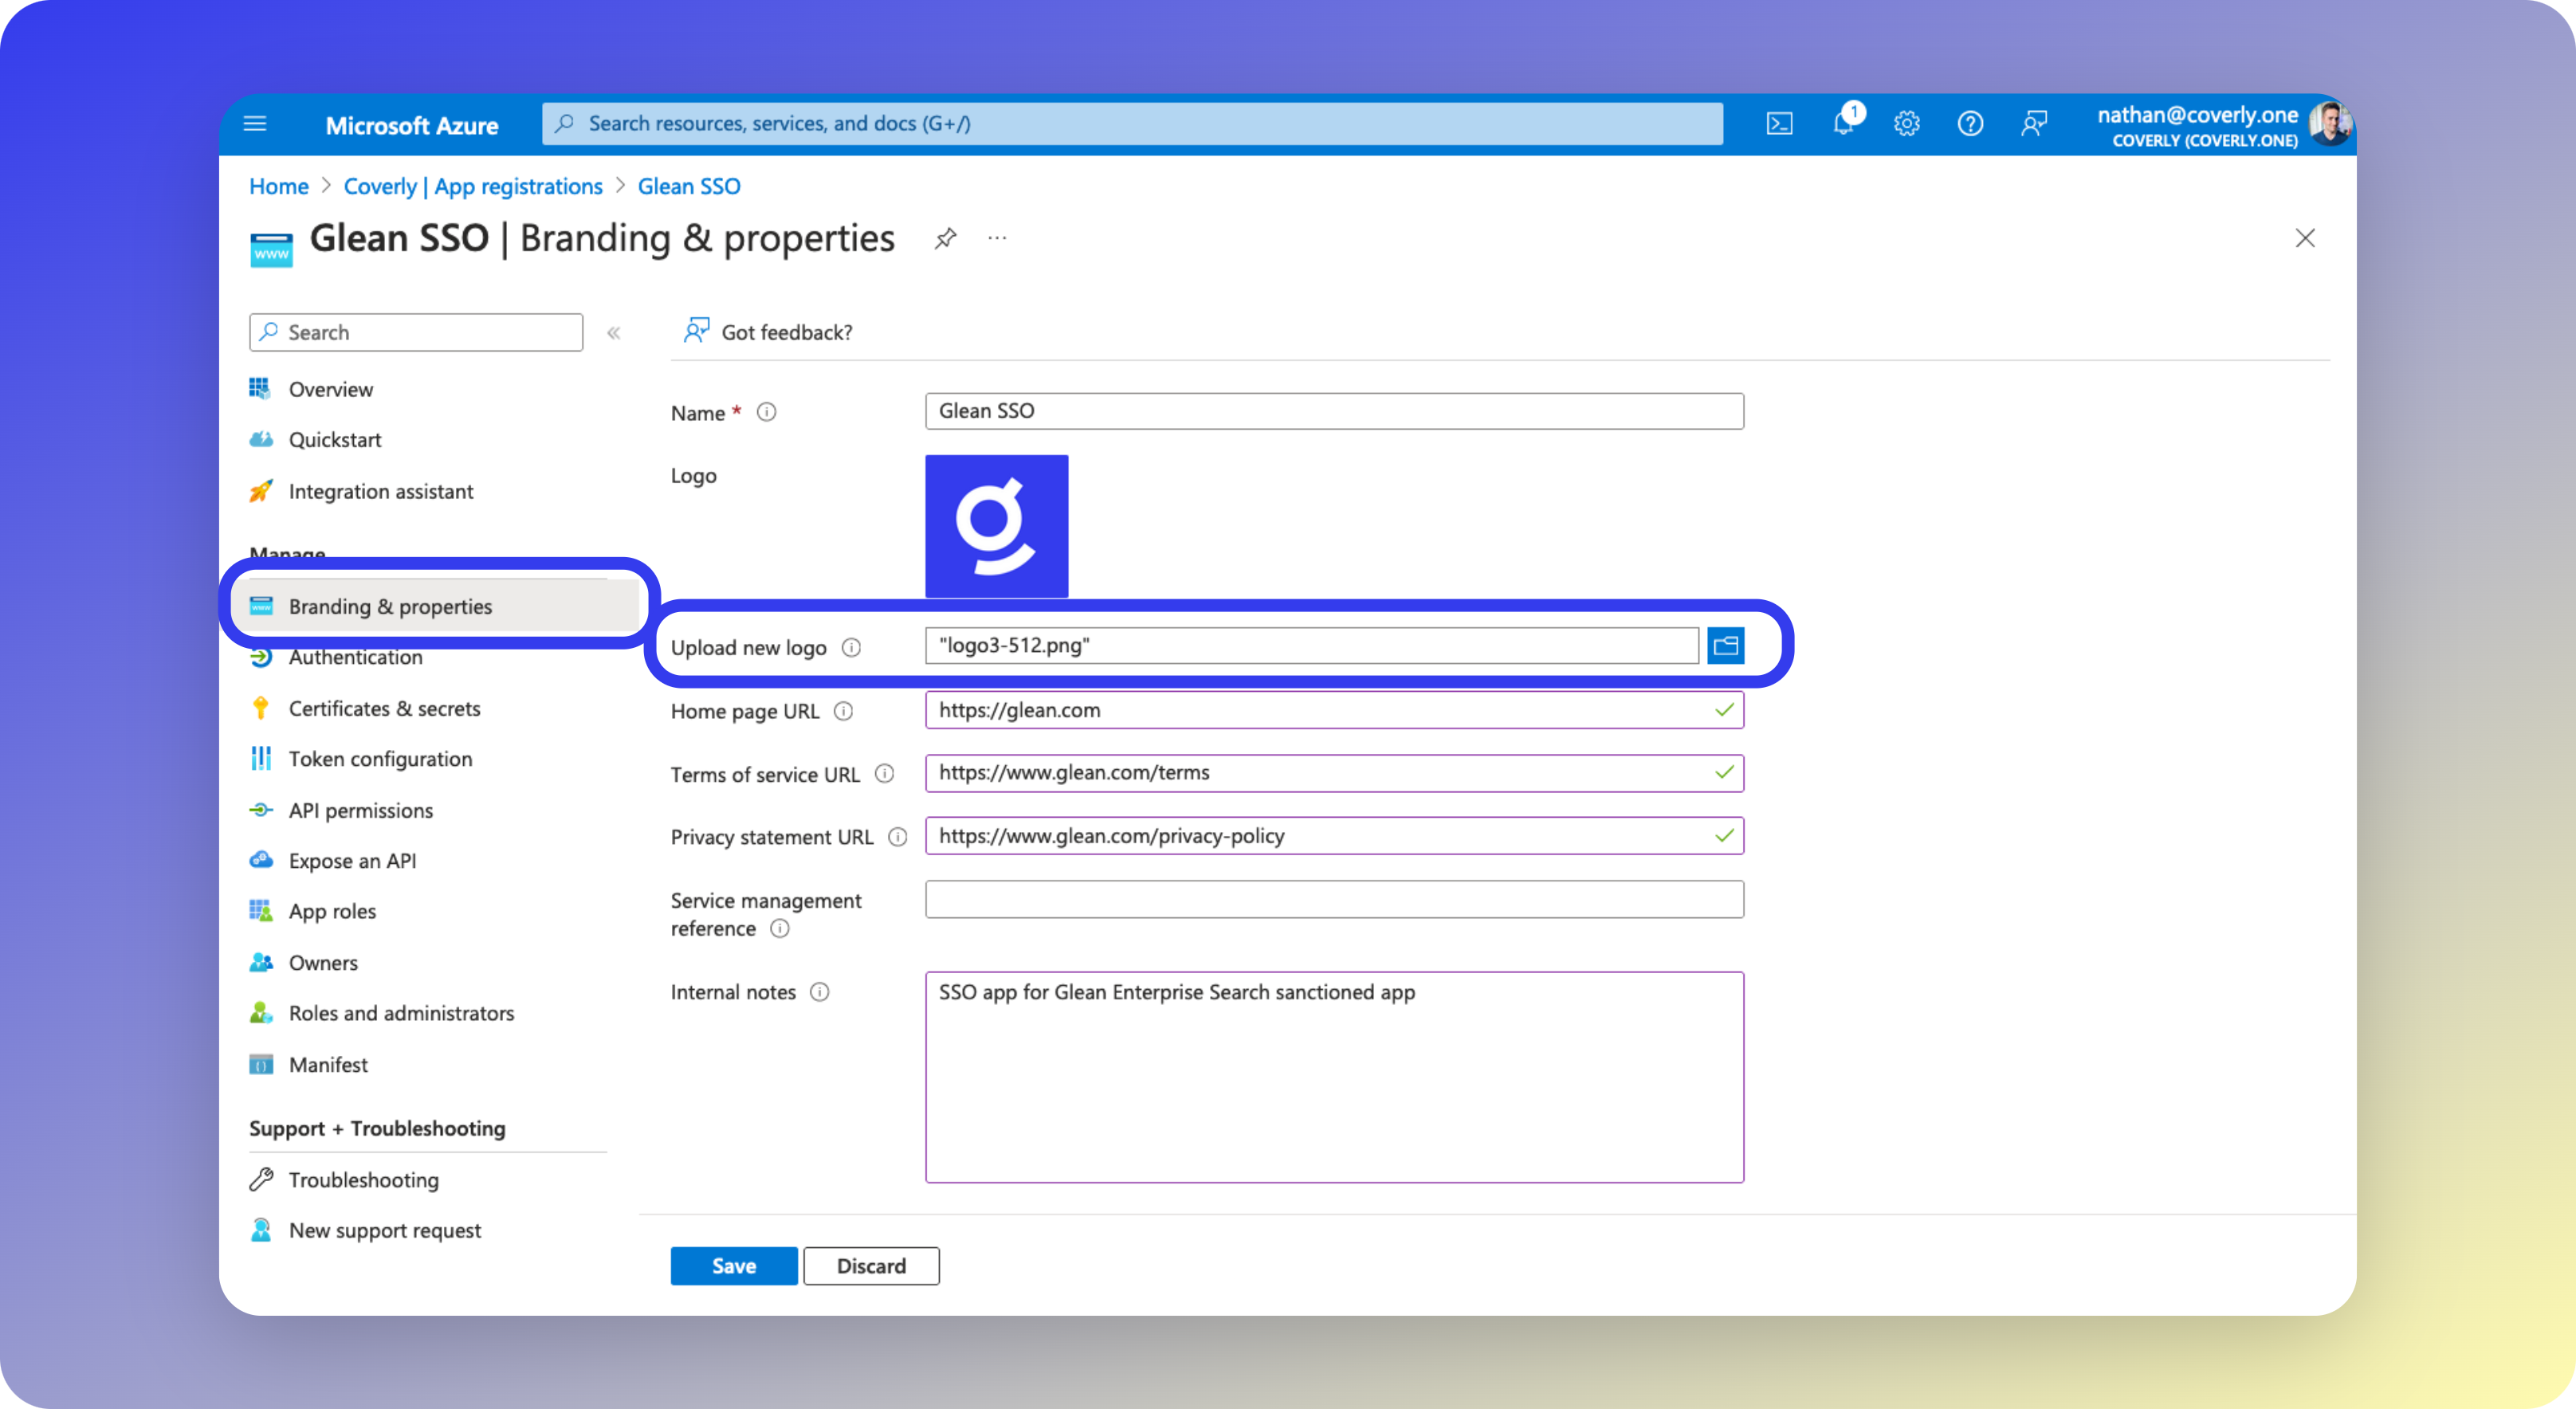
- From the left sidebar menu, select Branding & Properties.
- Fill in the fields as per the table below.
| Field | Value |
|---|---|
| Logo | Download this Glean icon to set as the app logo. |
| Home page URL (optional) | https://glean.com |
| Terms of service URL (optional) | https://www.glean.com/terms |
| Privacy statement URL (optional) | https://www.glean.com/privacy-policy |
- Leave all other fields blank, and click Save.
8 - (Optional) Restrict Users
By default, enabling SSO permits any valid user in your organization to sign into Glean. To assist with organic growth and adoption of Glean, Glean recommends that you do not restrict access to the app. If you wish to restrict access to only approved users, Glean recommends adding all approved users to a group called Glean Users and restricting access based on this group.How to: Create a new group in Entra ID
How to: Create a new group in Entra ID
To create a new group in Entra ID and add users to it:
- From the main Entra ID dashboard, select Groups, then New group.
-
Enter the information as follows:
Field Value Group type Security Group name Glean Users Group description Users that are permitted to access the Glean Enterprise Search app. Entra ID roles No Membership type Assigned Owners - Members Select the users to be part of the group.
(DO NOT select other groups here, as nested groups are not supported for app user assignment). - Click Create to create the group.
- Return to the main Entra ID dashboard and select Enterprise applications.
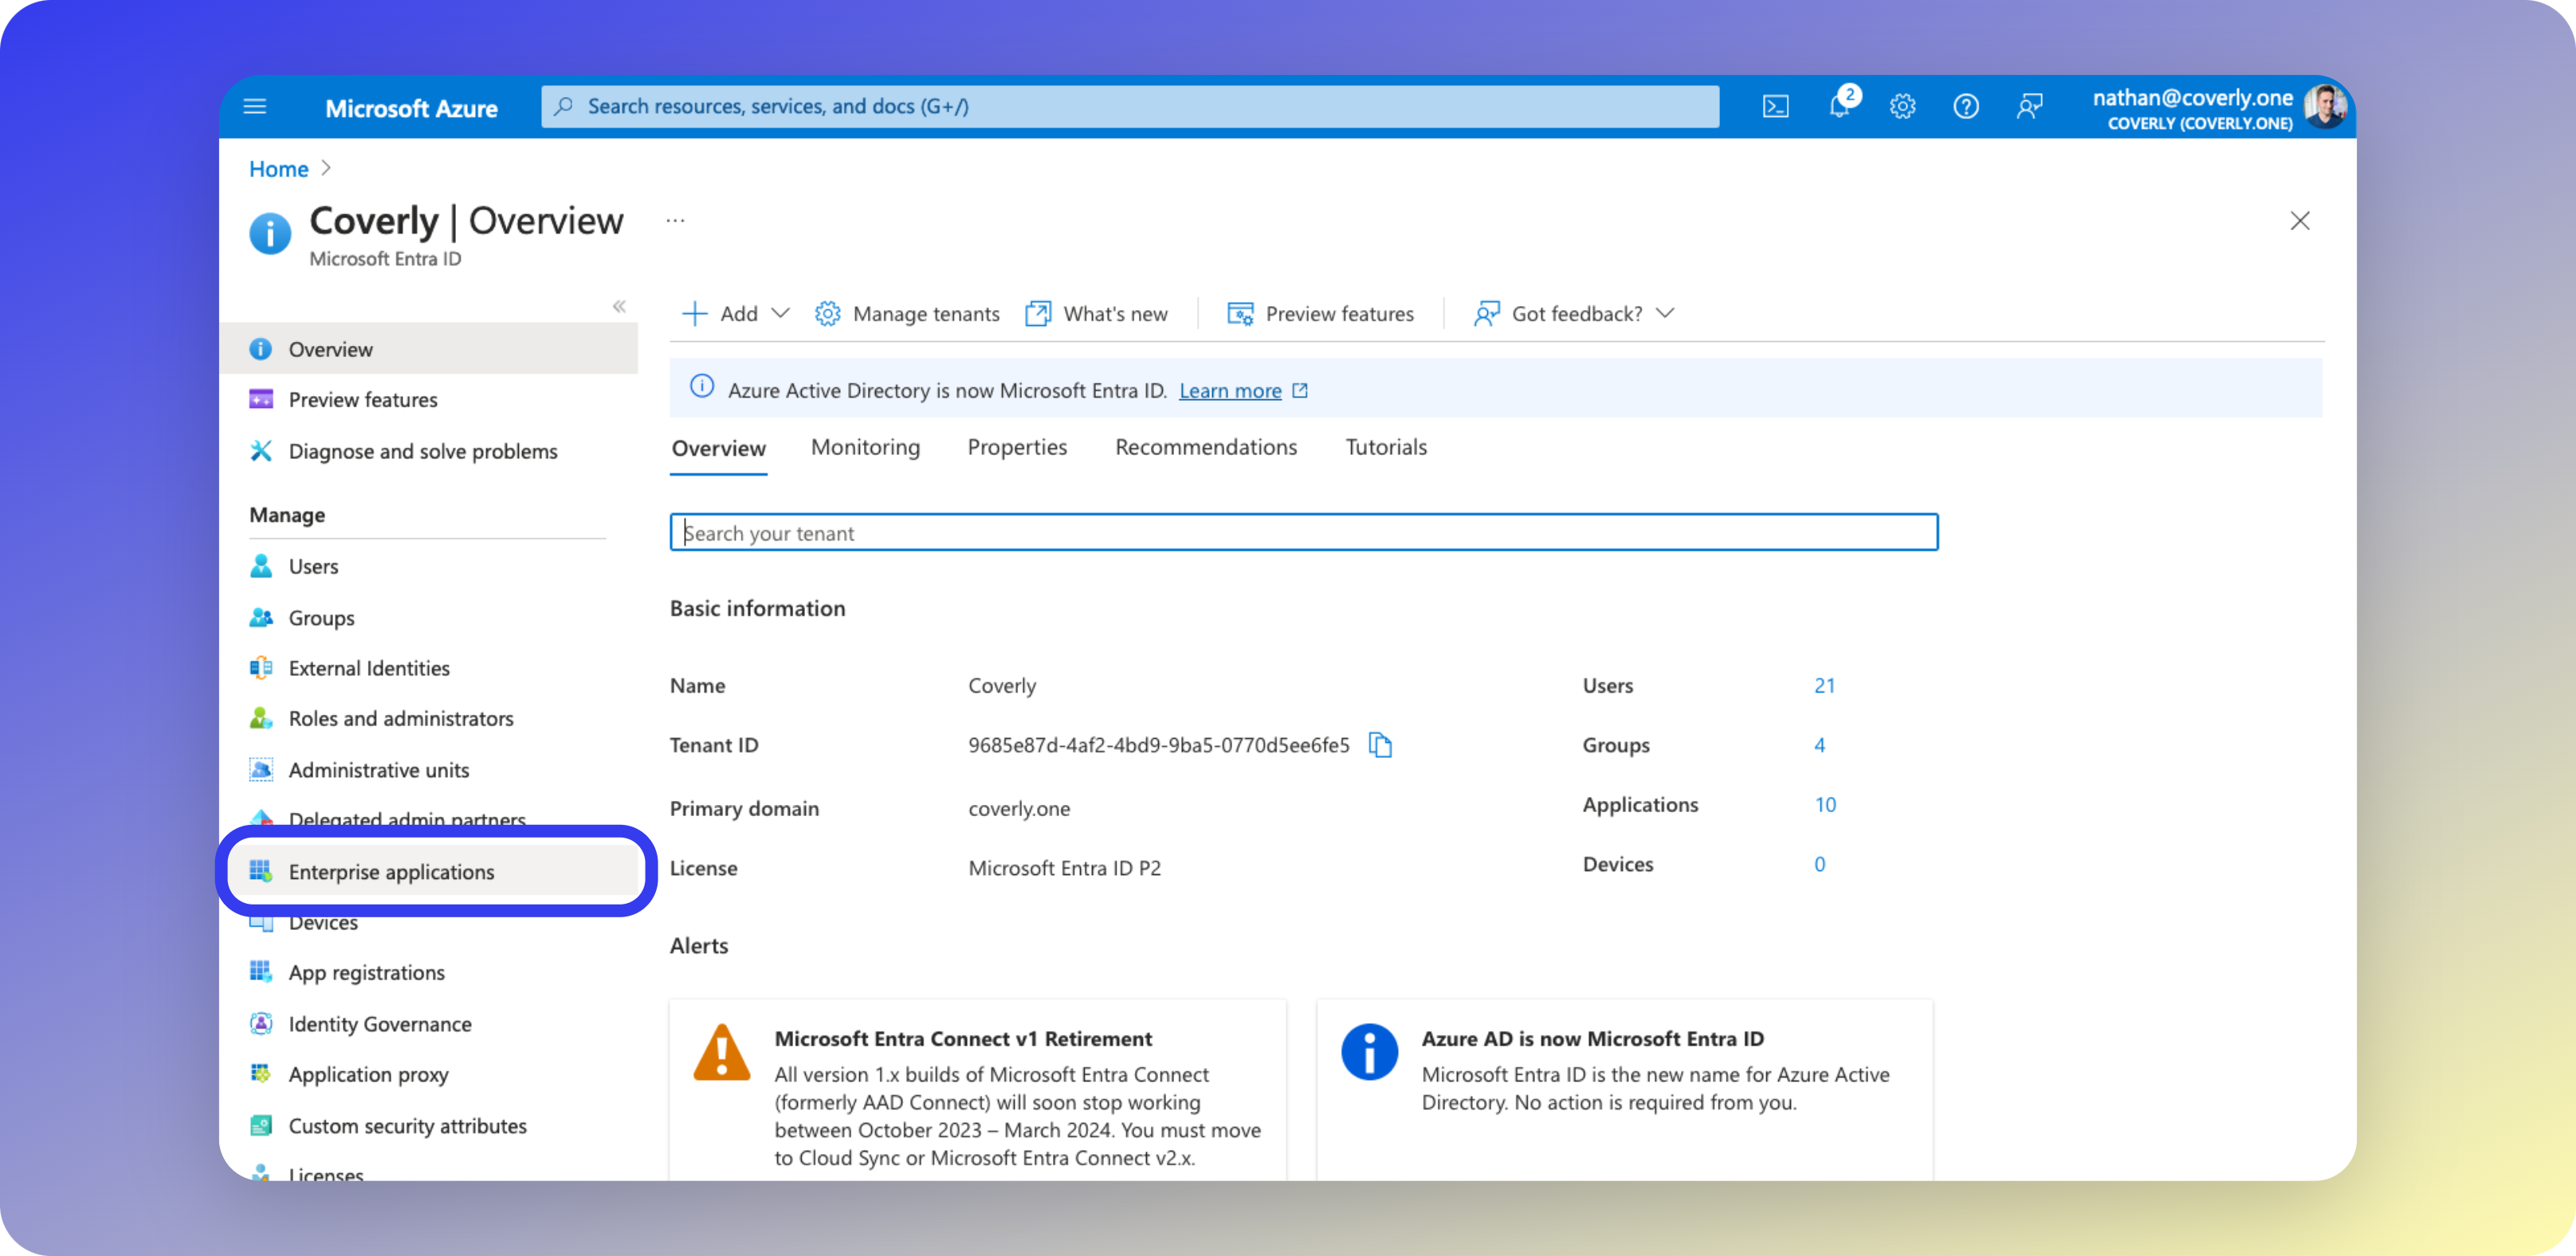
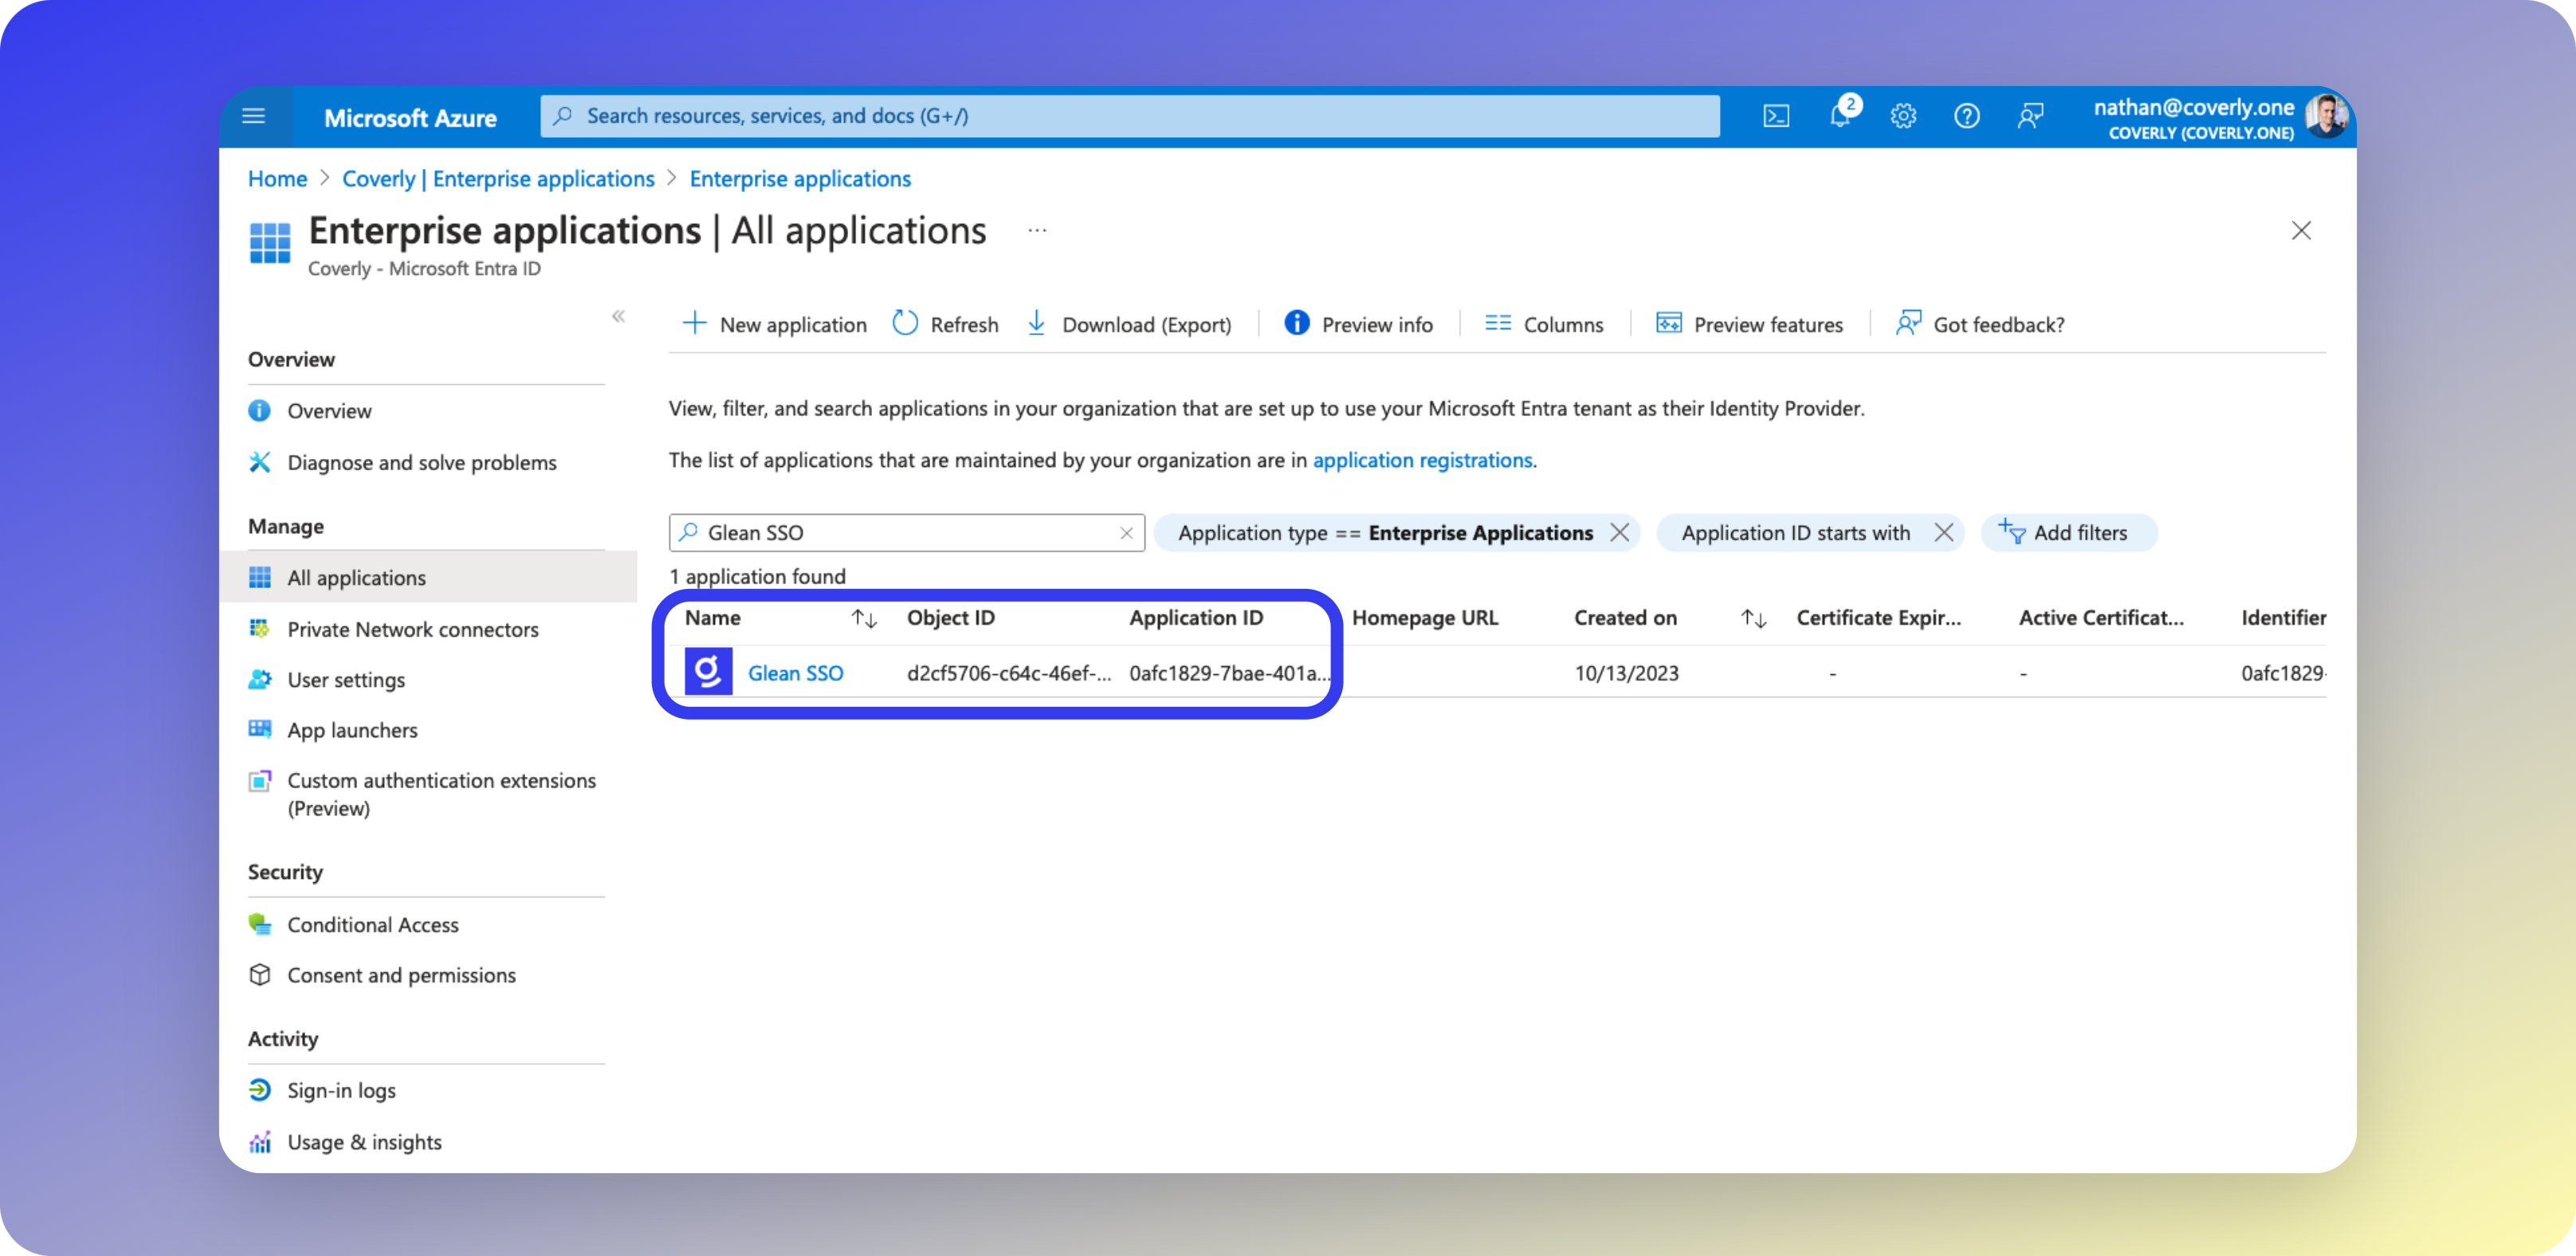
- Creating the App Registration for Glean also creates a corresponding Enterprise Application, called Glean SSO. Select Glean SSO from your list of Enterprise Apps.
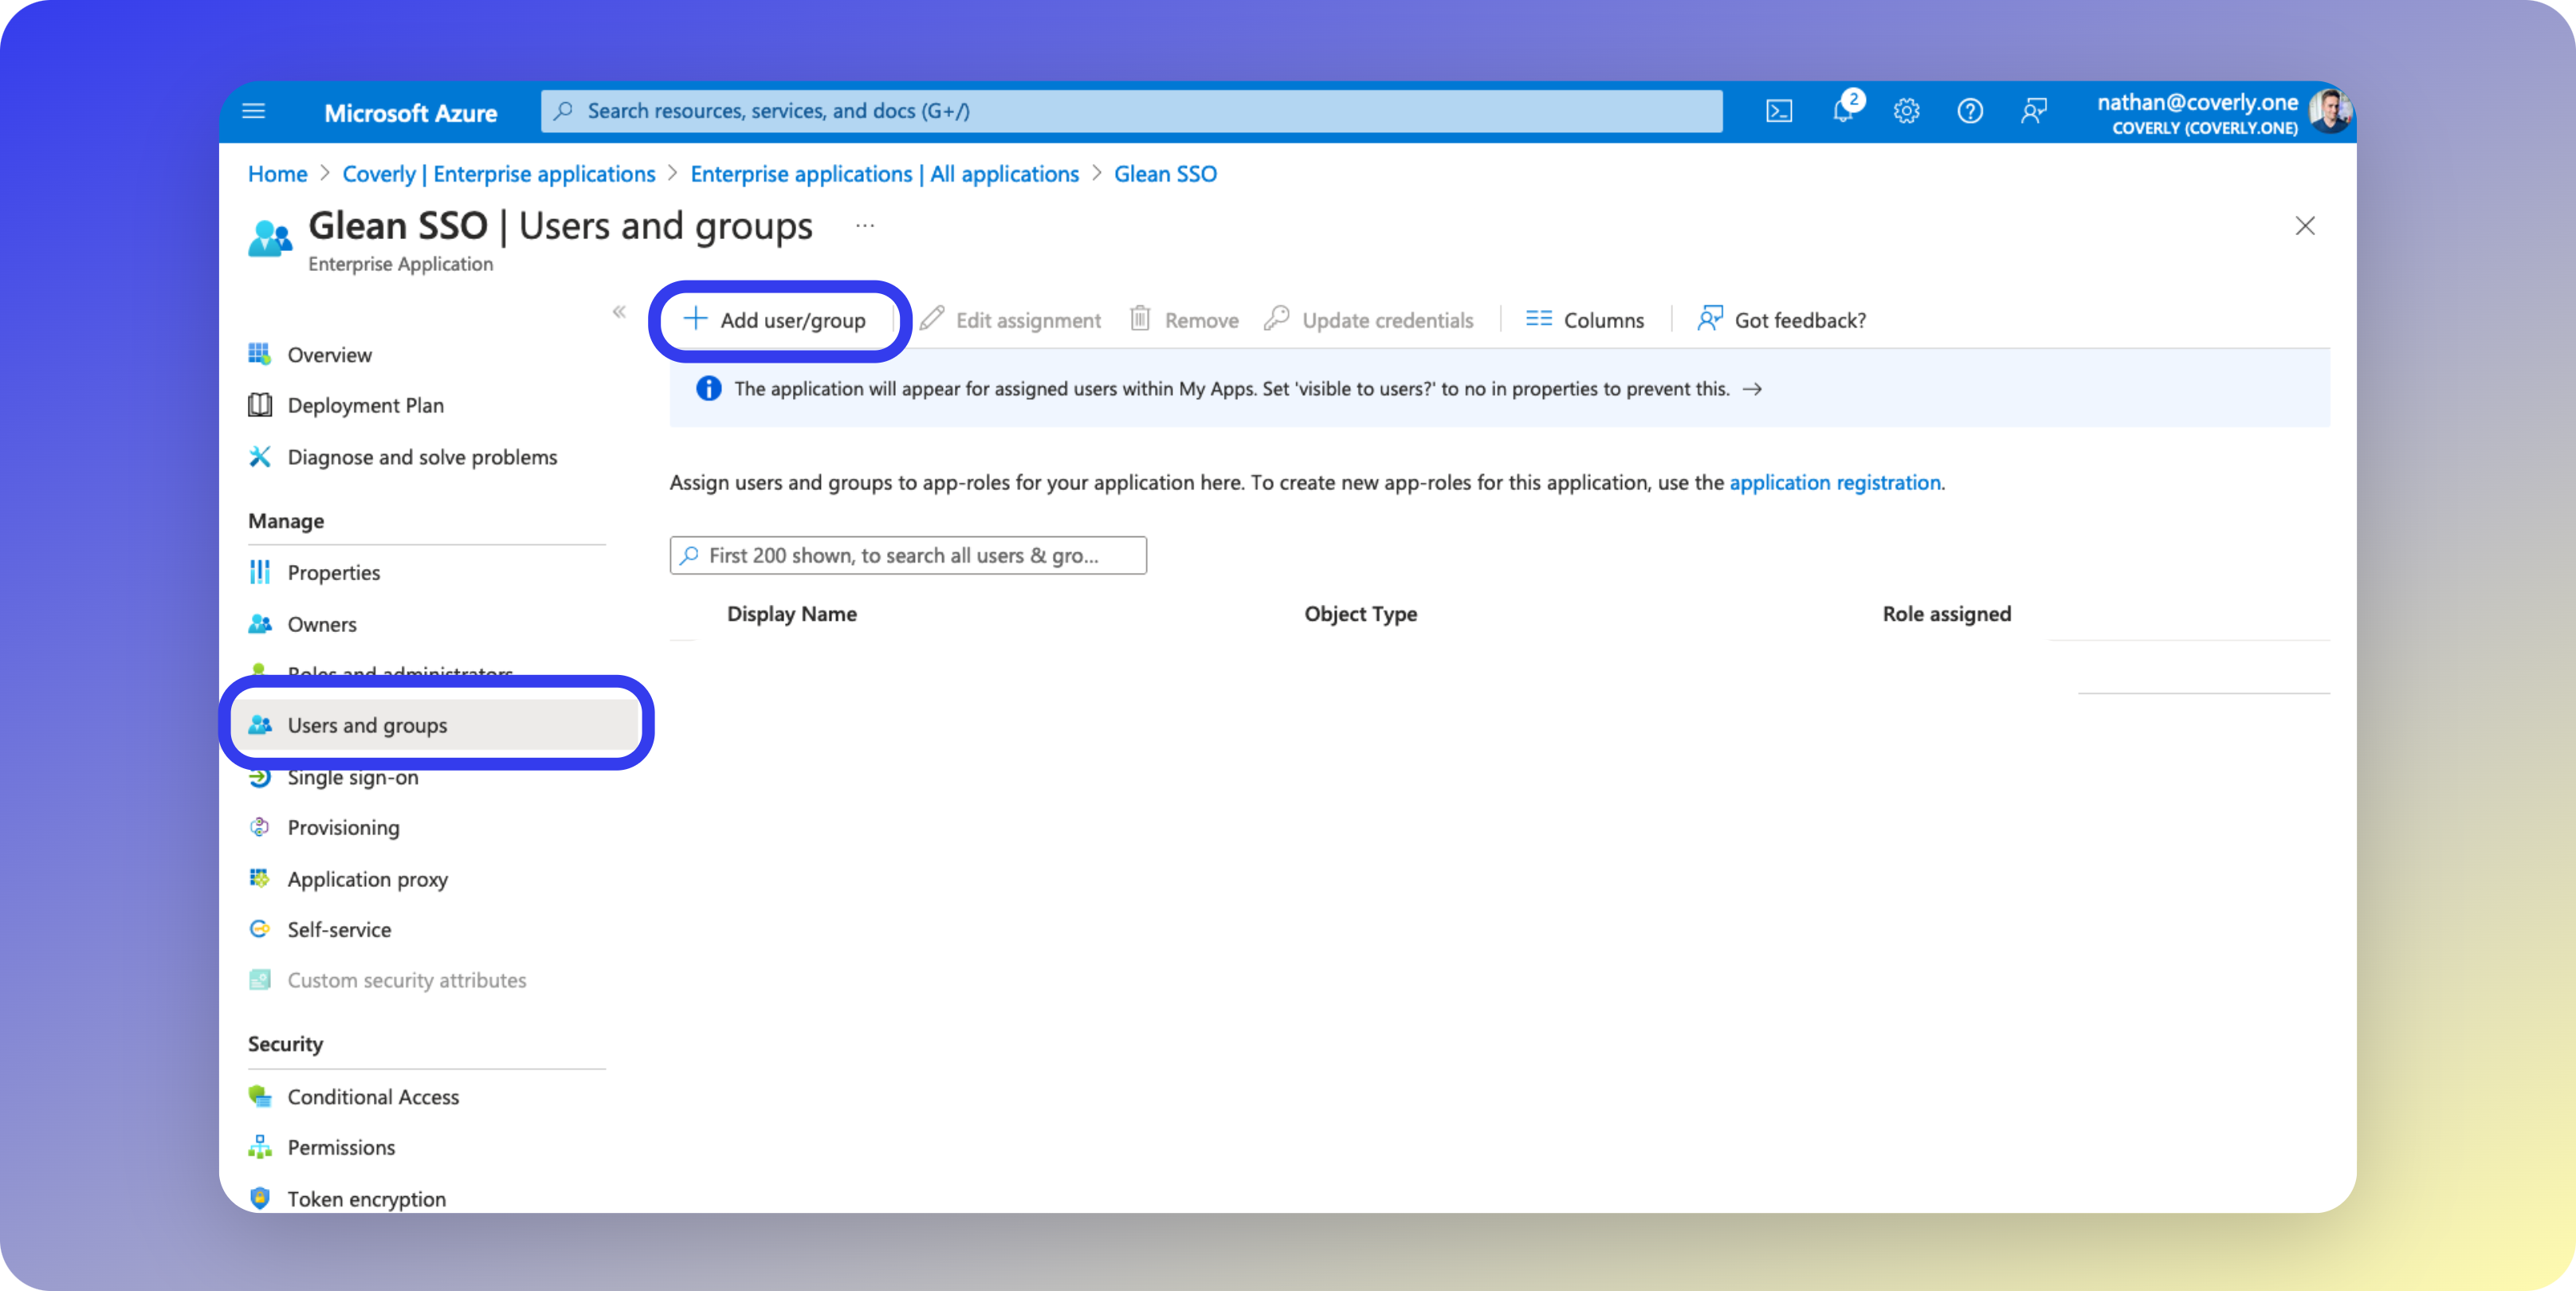
- From the left sidebar menu, select Users and groups, then click Add user/group.
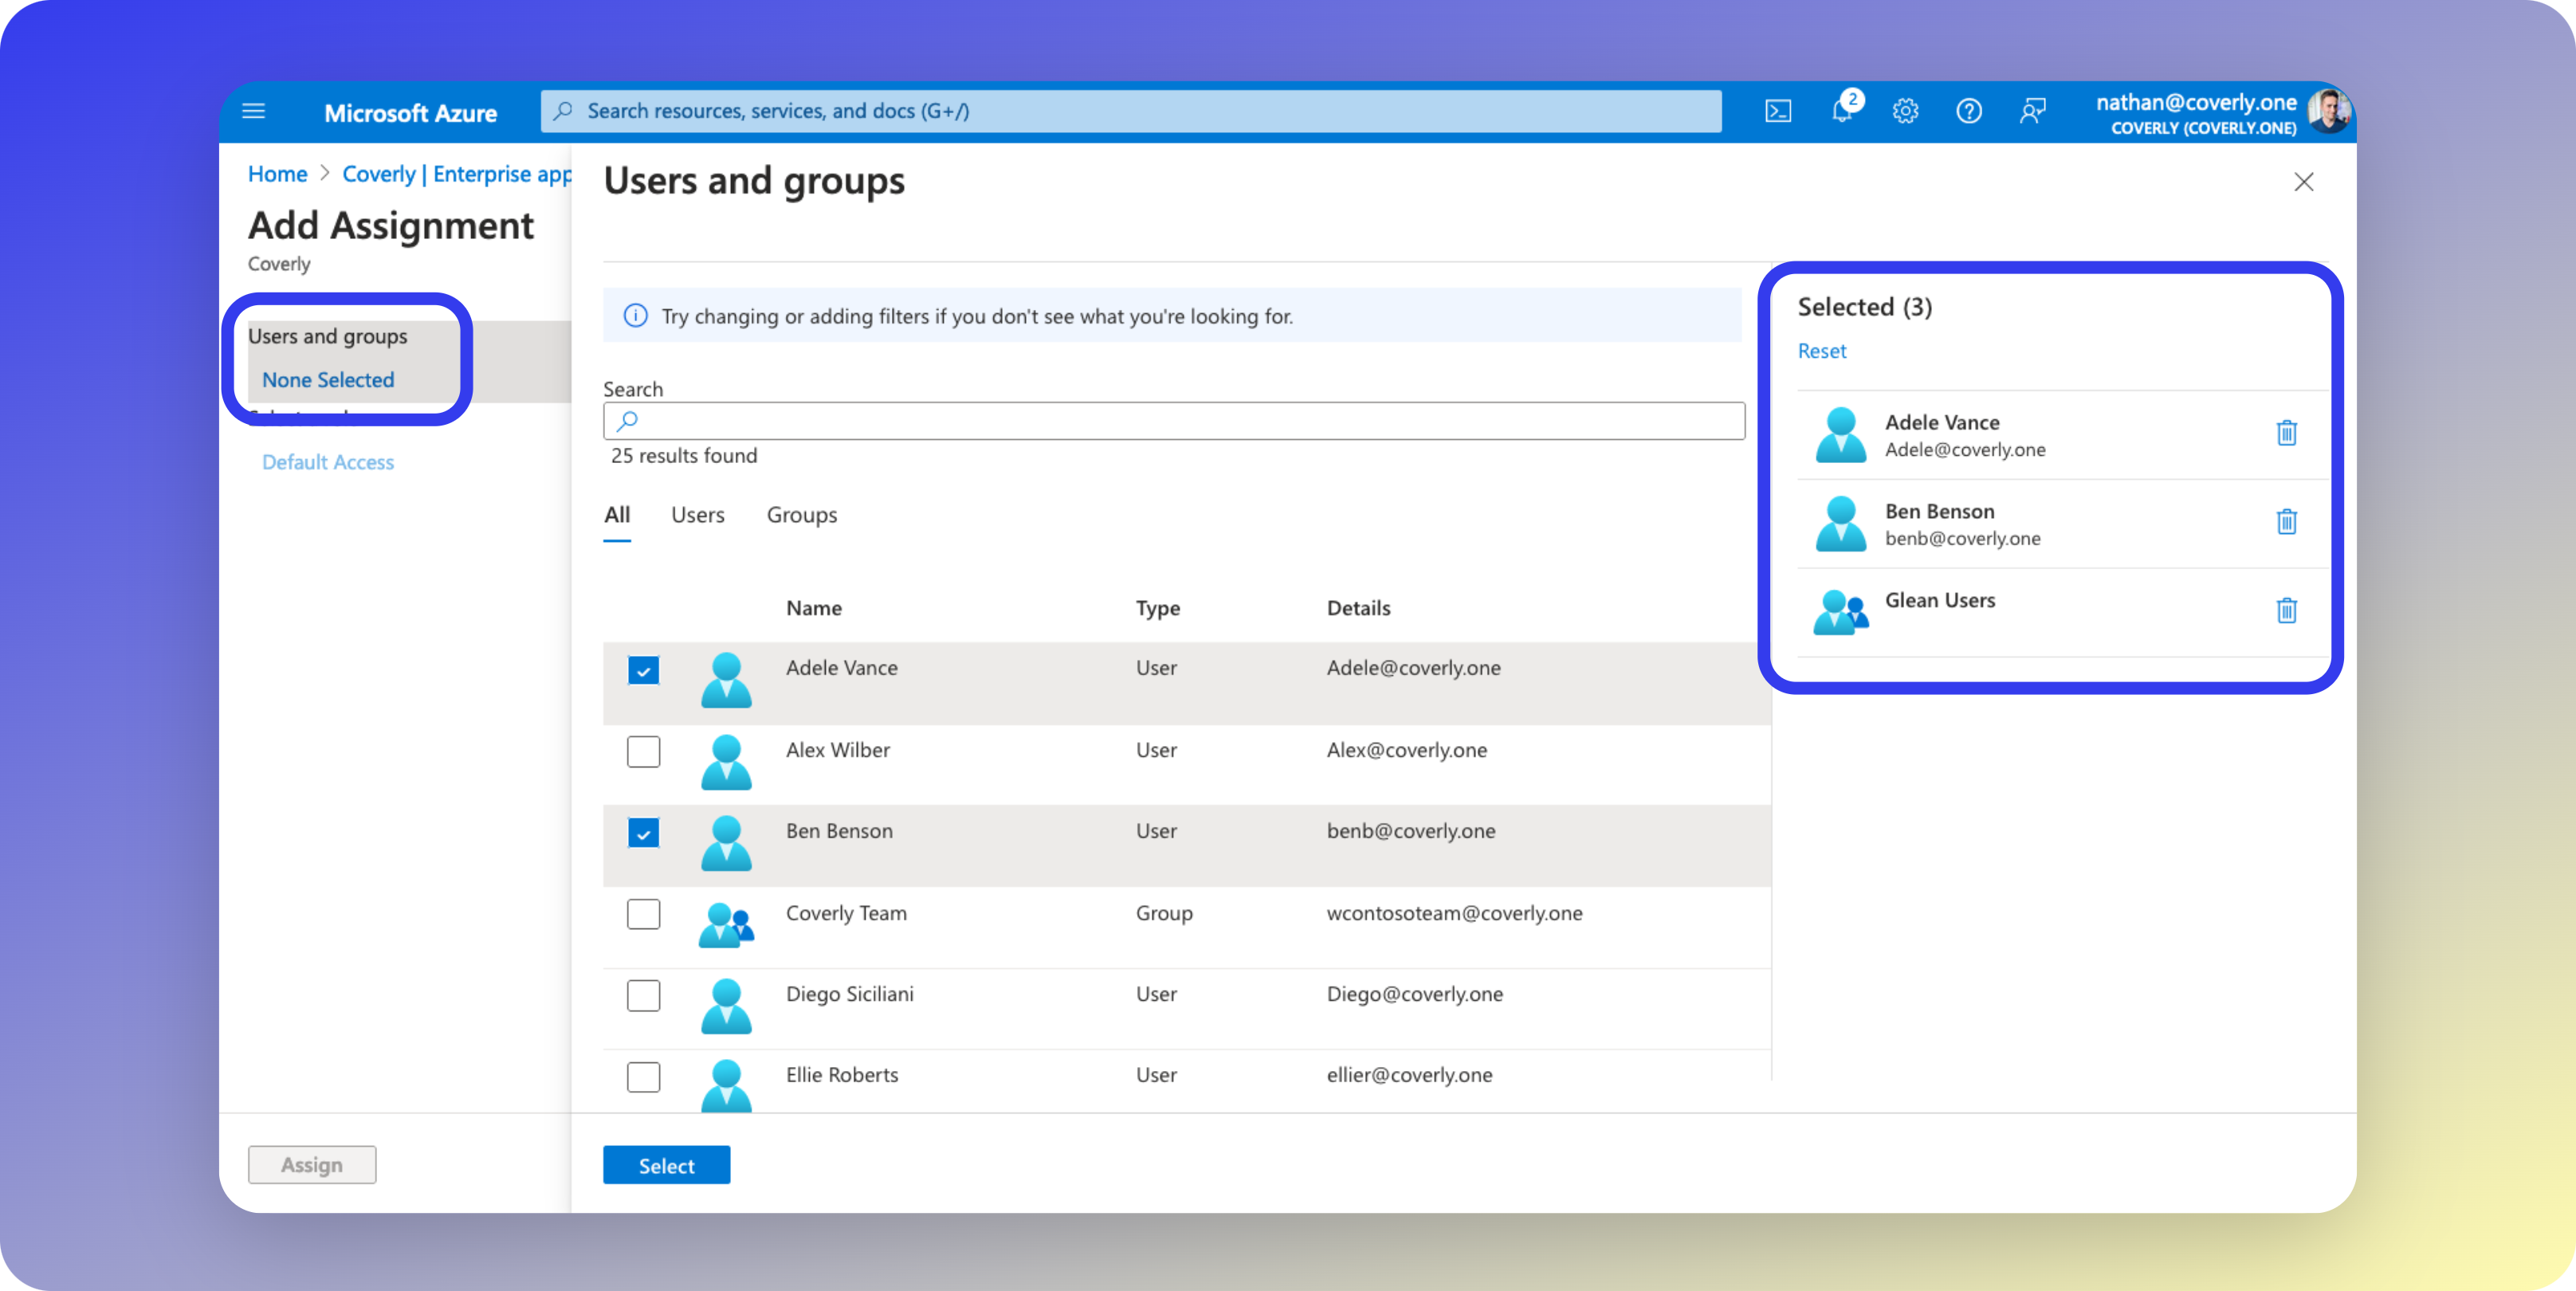
- Select the group(s) and/or individual users that you wish to restrict Glean access to, and then click Assign.
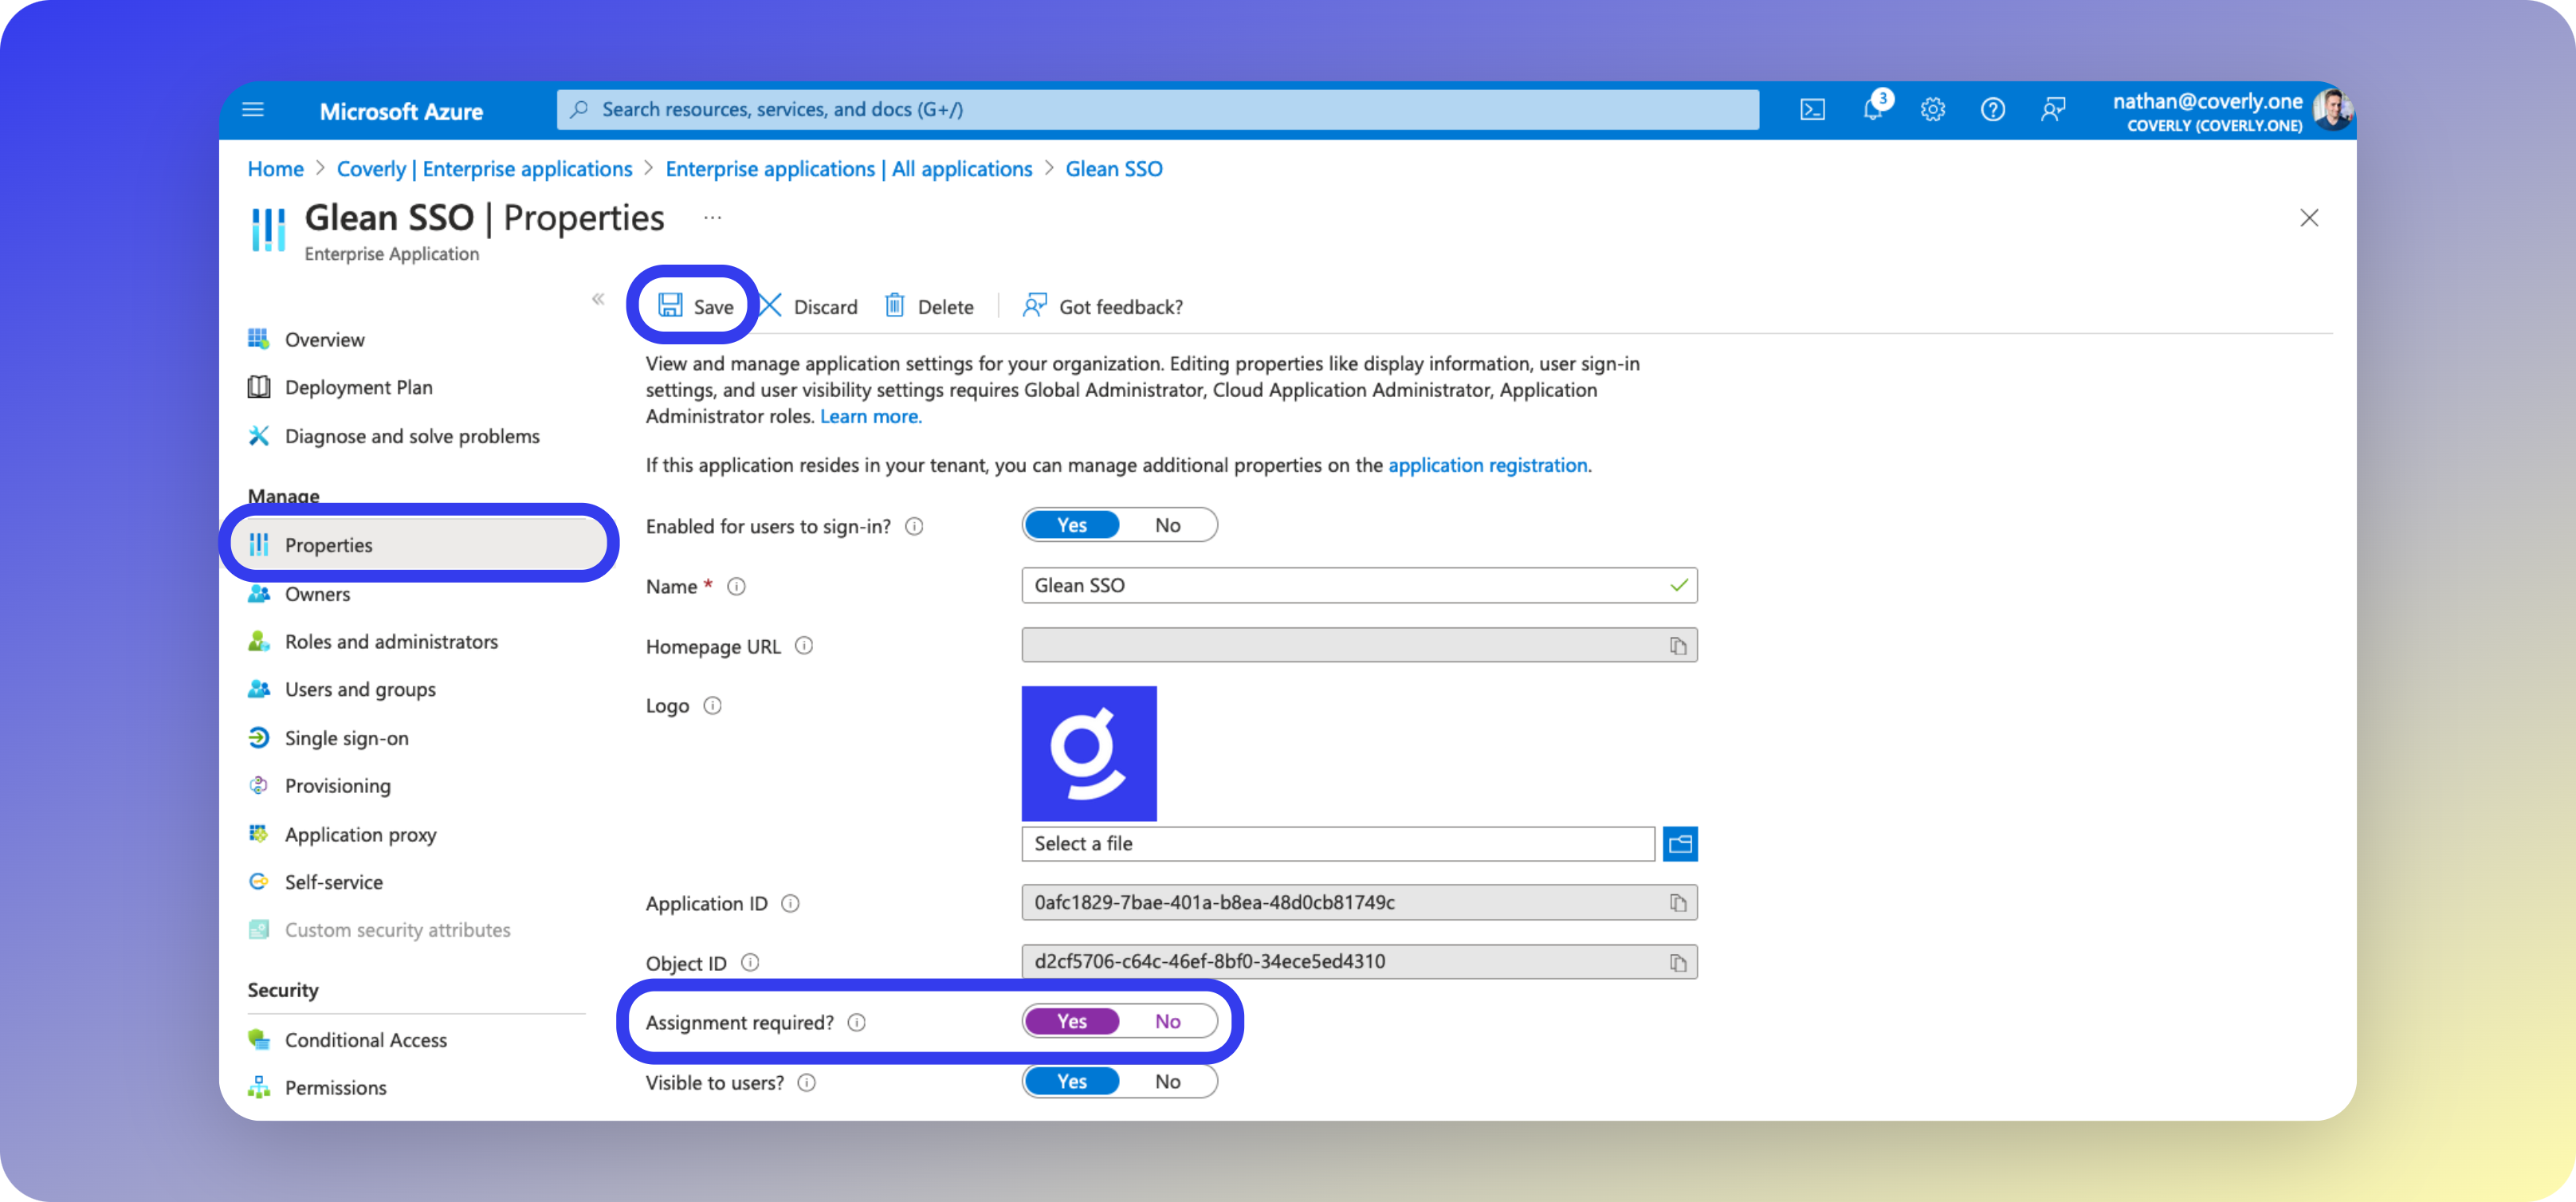
- From the left sidebar menu, click Properties.
- Set Assignment required? to Yes, then click Save. Access to Glean is now restricted to the assigned users/groups.
Glean Configuration
1 - Configure Azure SSO
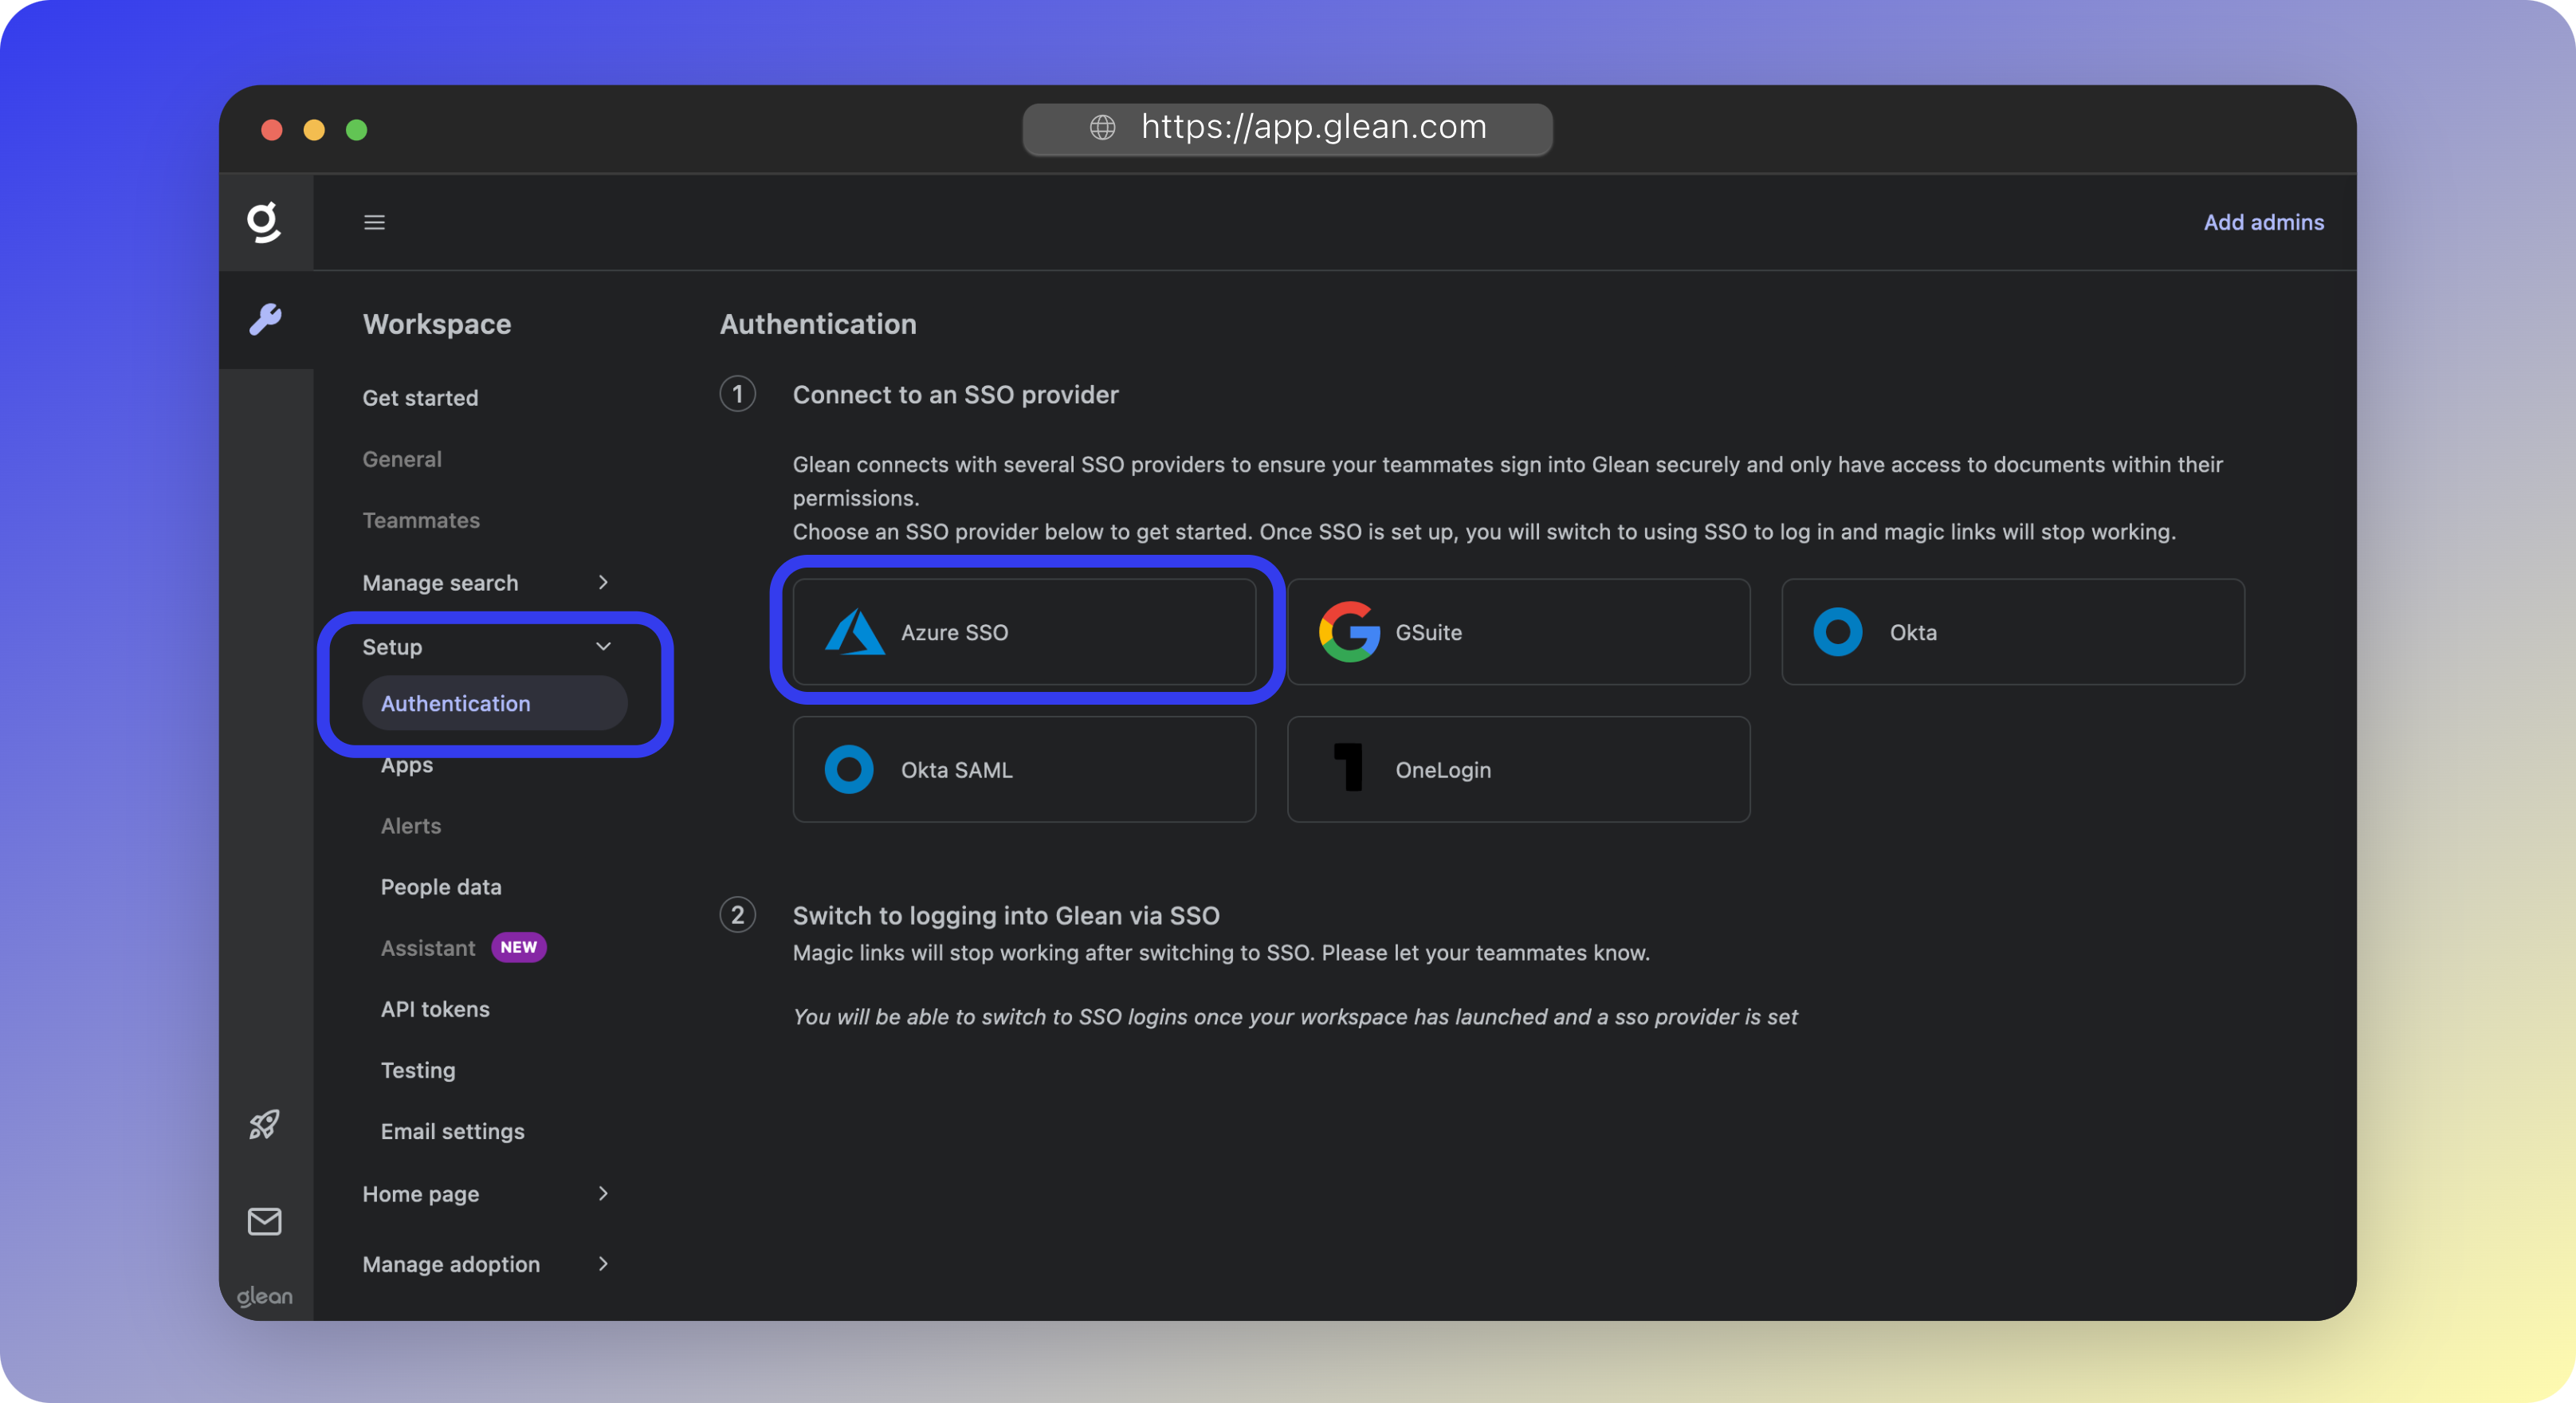
- In the Glean UI, navigate to Admin Console > Settings > Authentication
- Select Azure SSO from the list of SSO Providers.
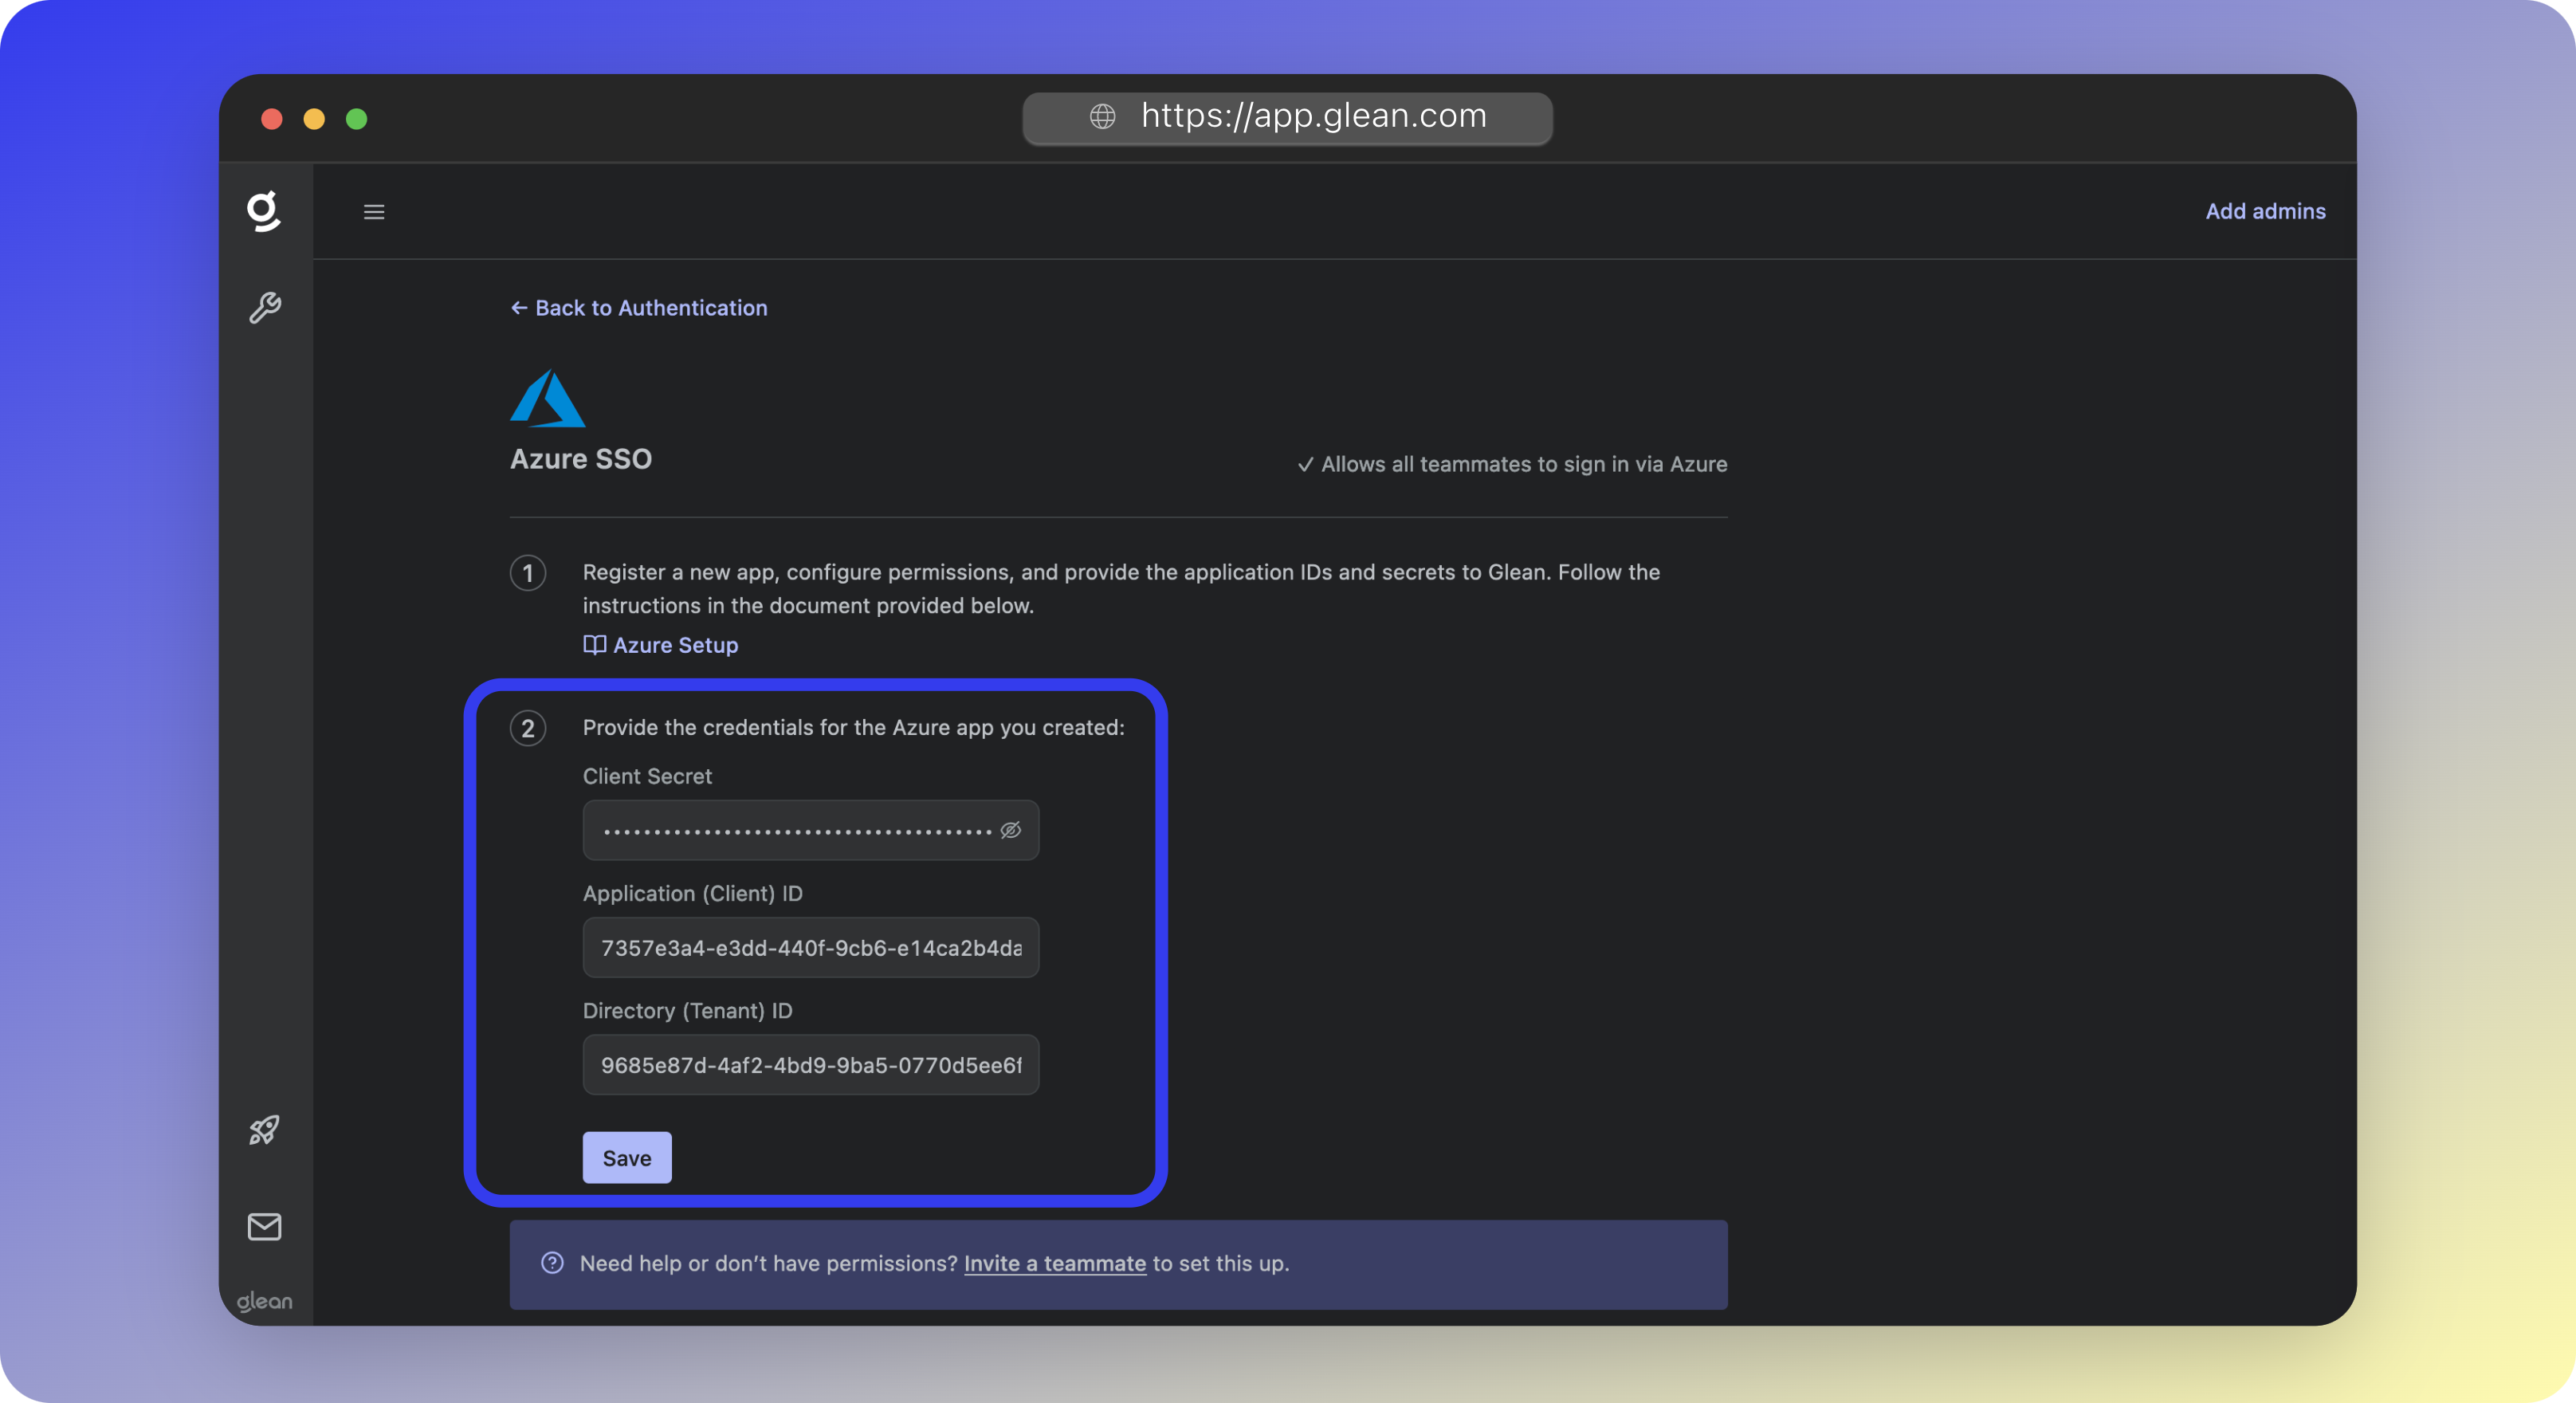
- Paste the Client secret, Client secret expiration date, Application (client) ID, and Directory (tenant) ID values copied from Entra ID into their respective fields in the Glean UI.
- Click Save.
2 - Activate SSO
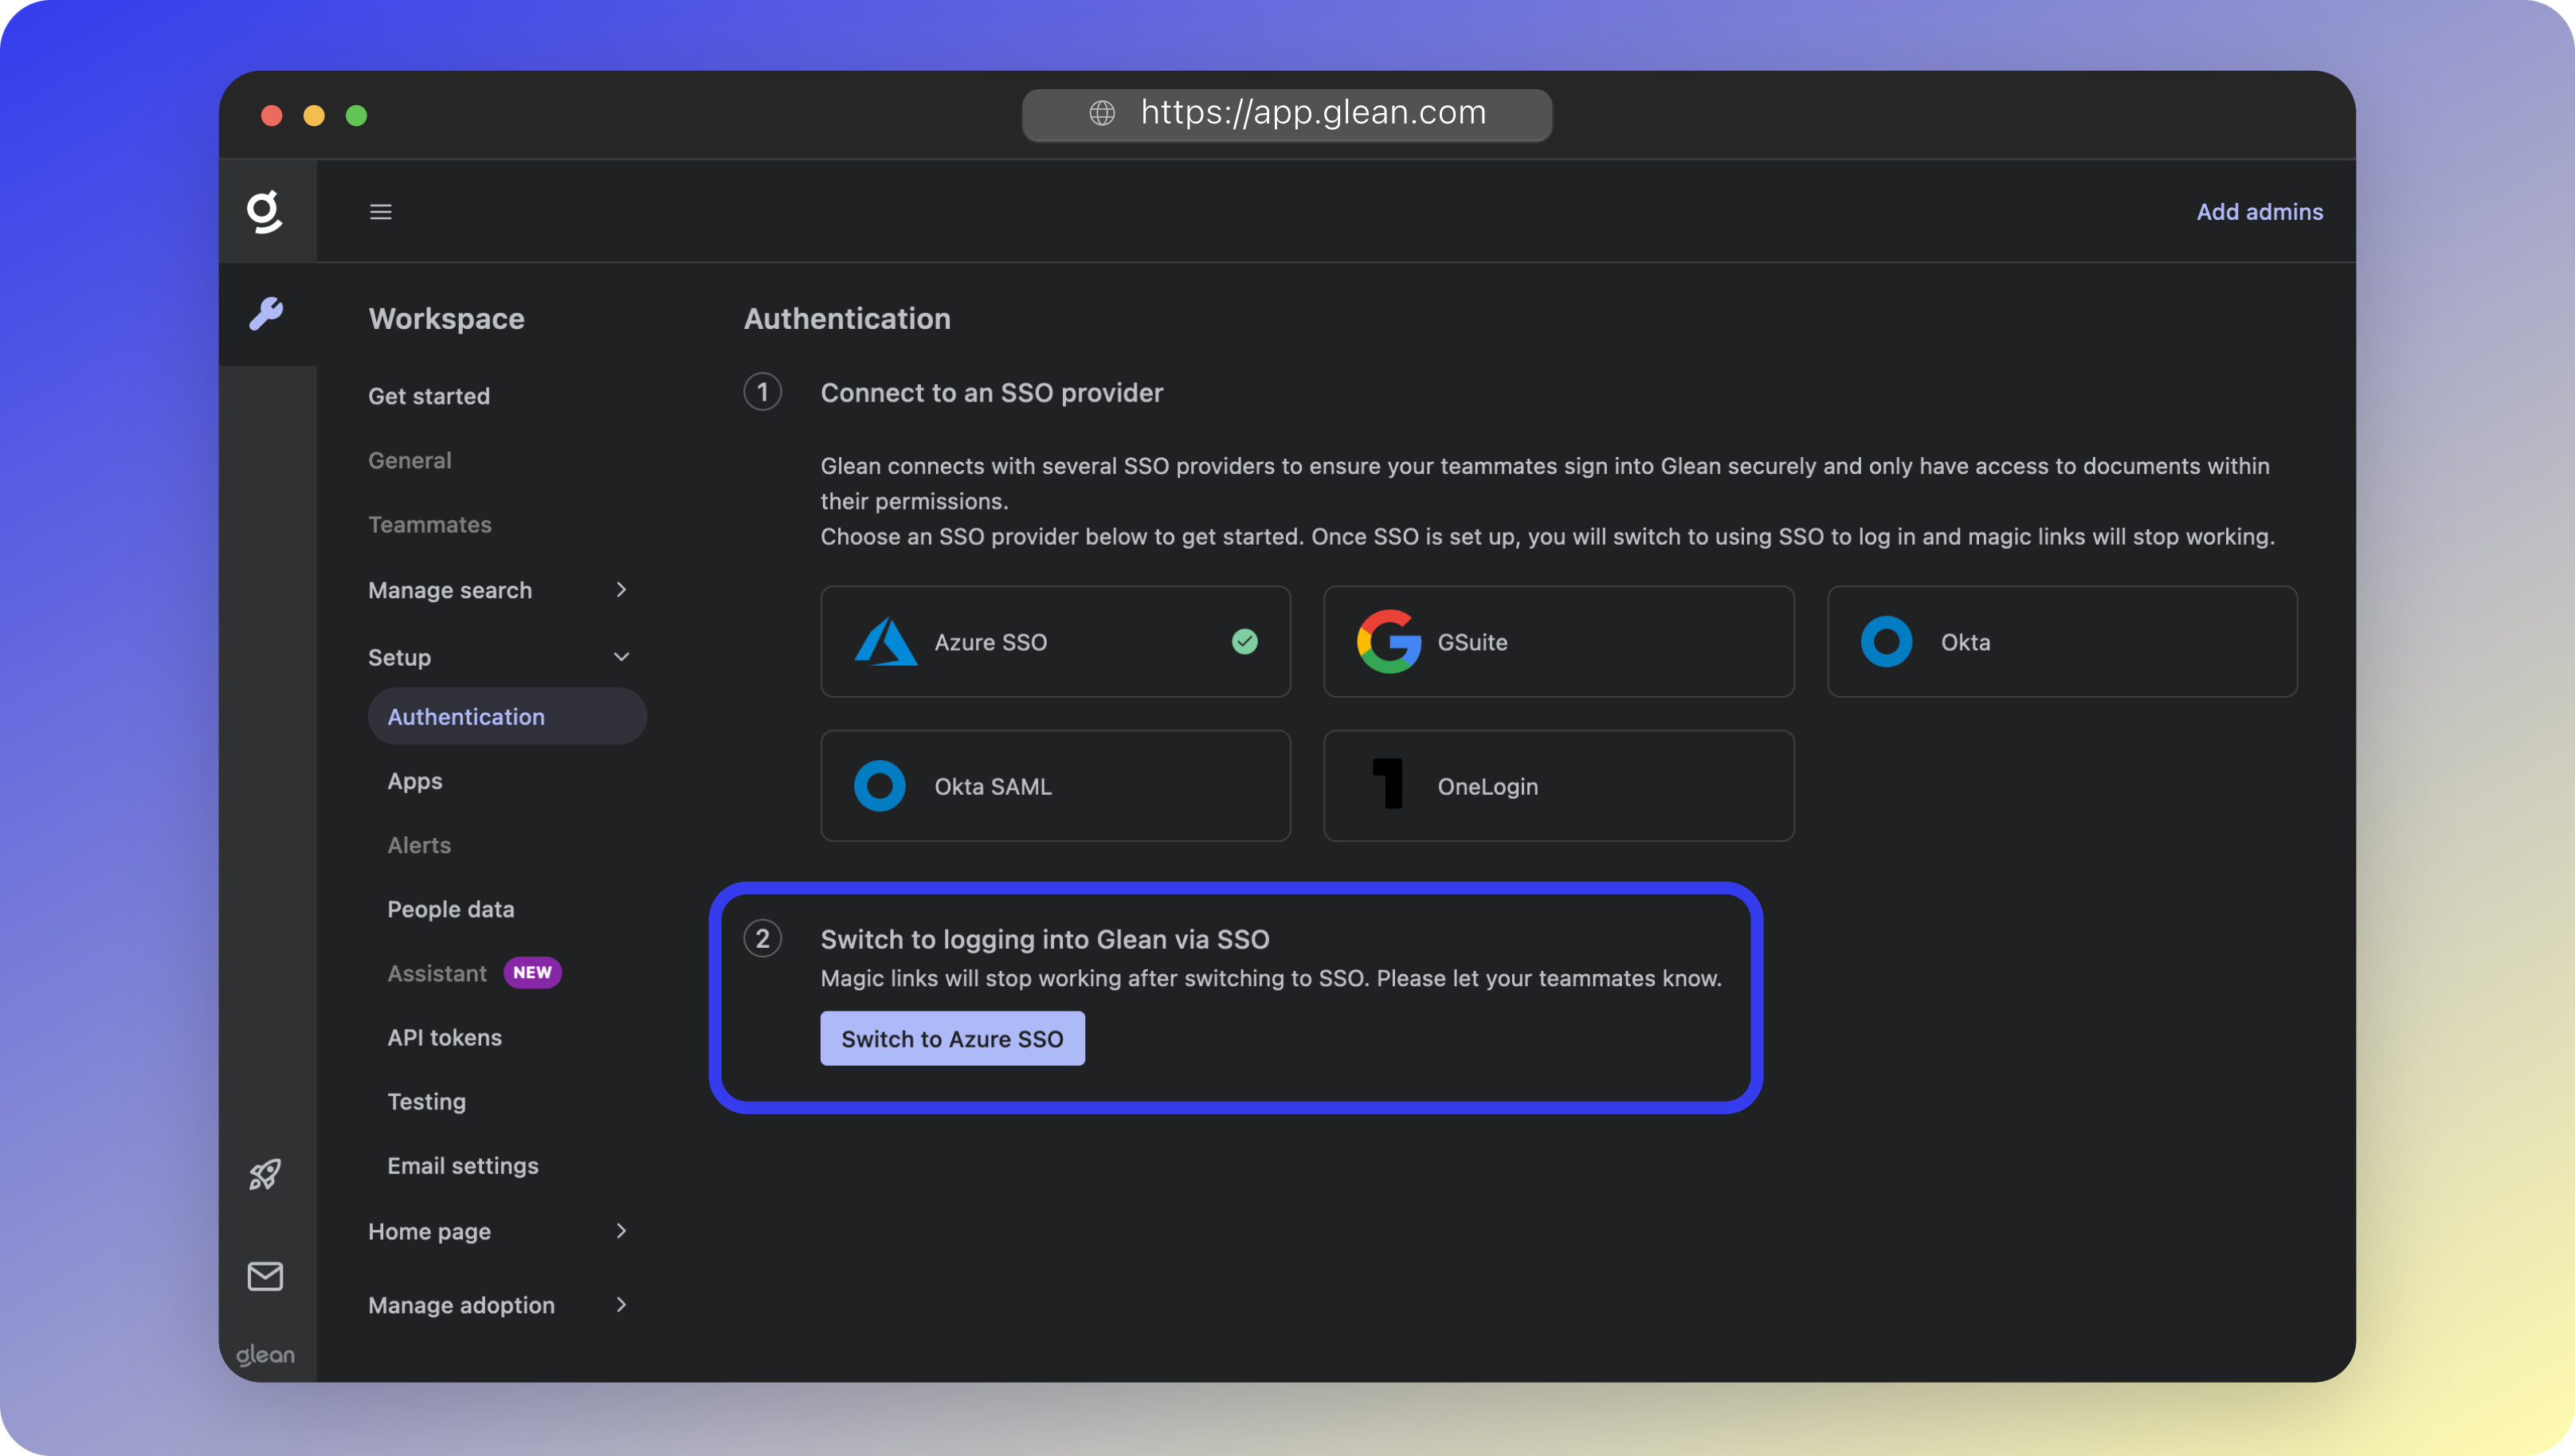
You must activate SSO in Workspace Settings before your users can sign in to Glean using SSO.- Return to the Admin Console > Settings > Authentication screen.
- Under the Switch to logging into Glean via SSO section, click the Switch to Azure SSO button.
- You will be prompted to confirm the switch.
- After SSO has been activated, you will see Azure SSO present in the list of Authentication apps with a Status of Connected.
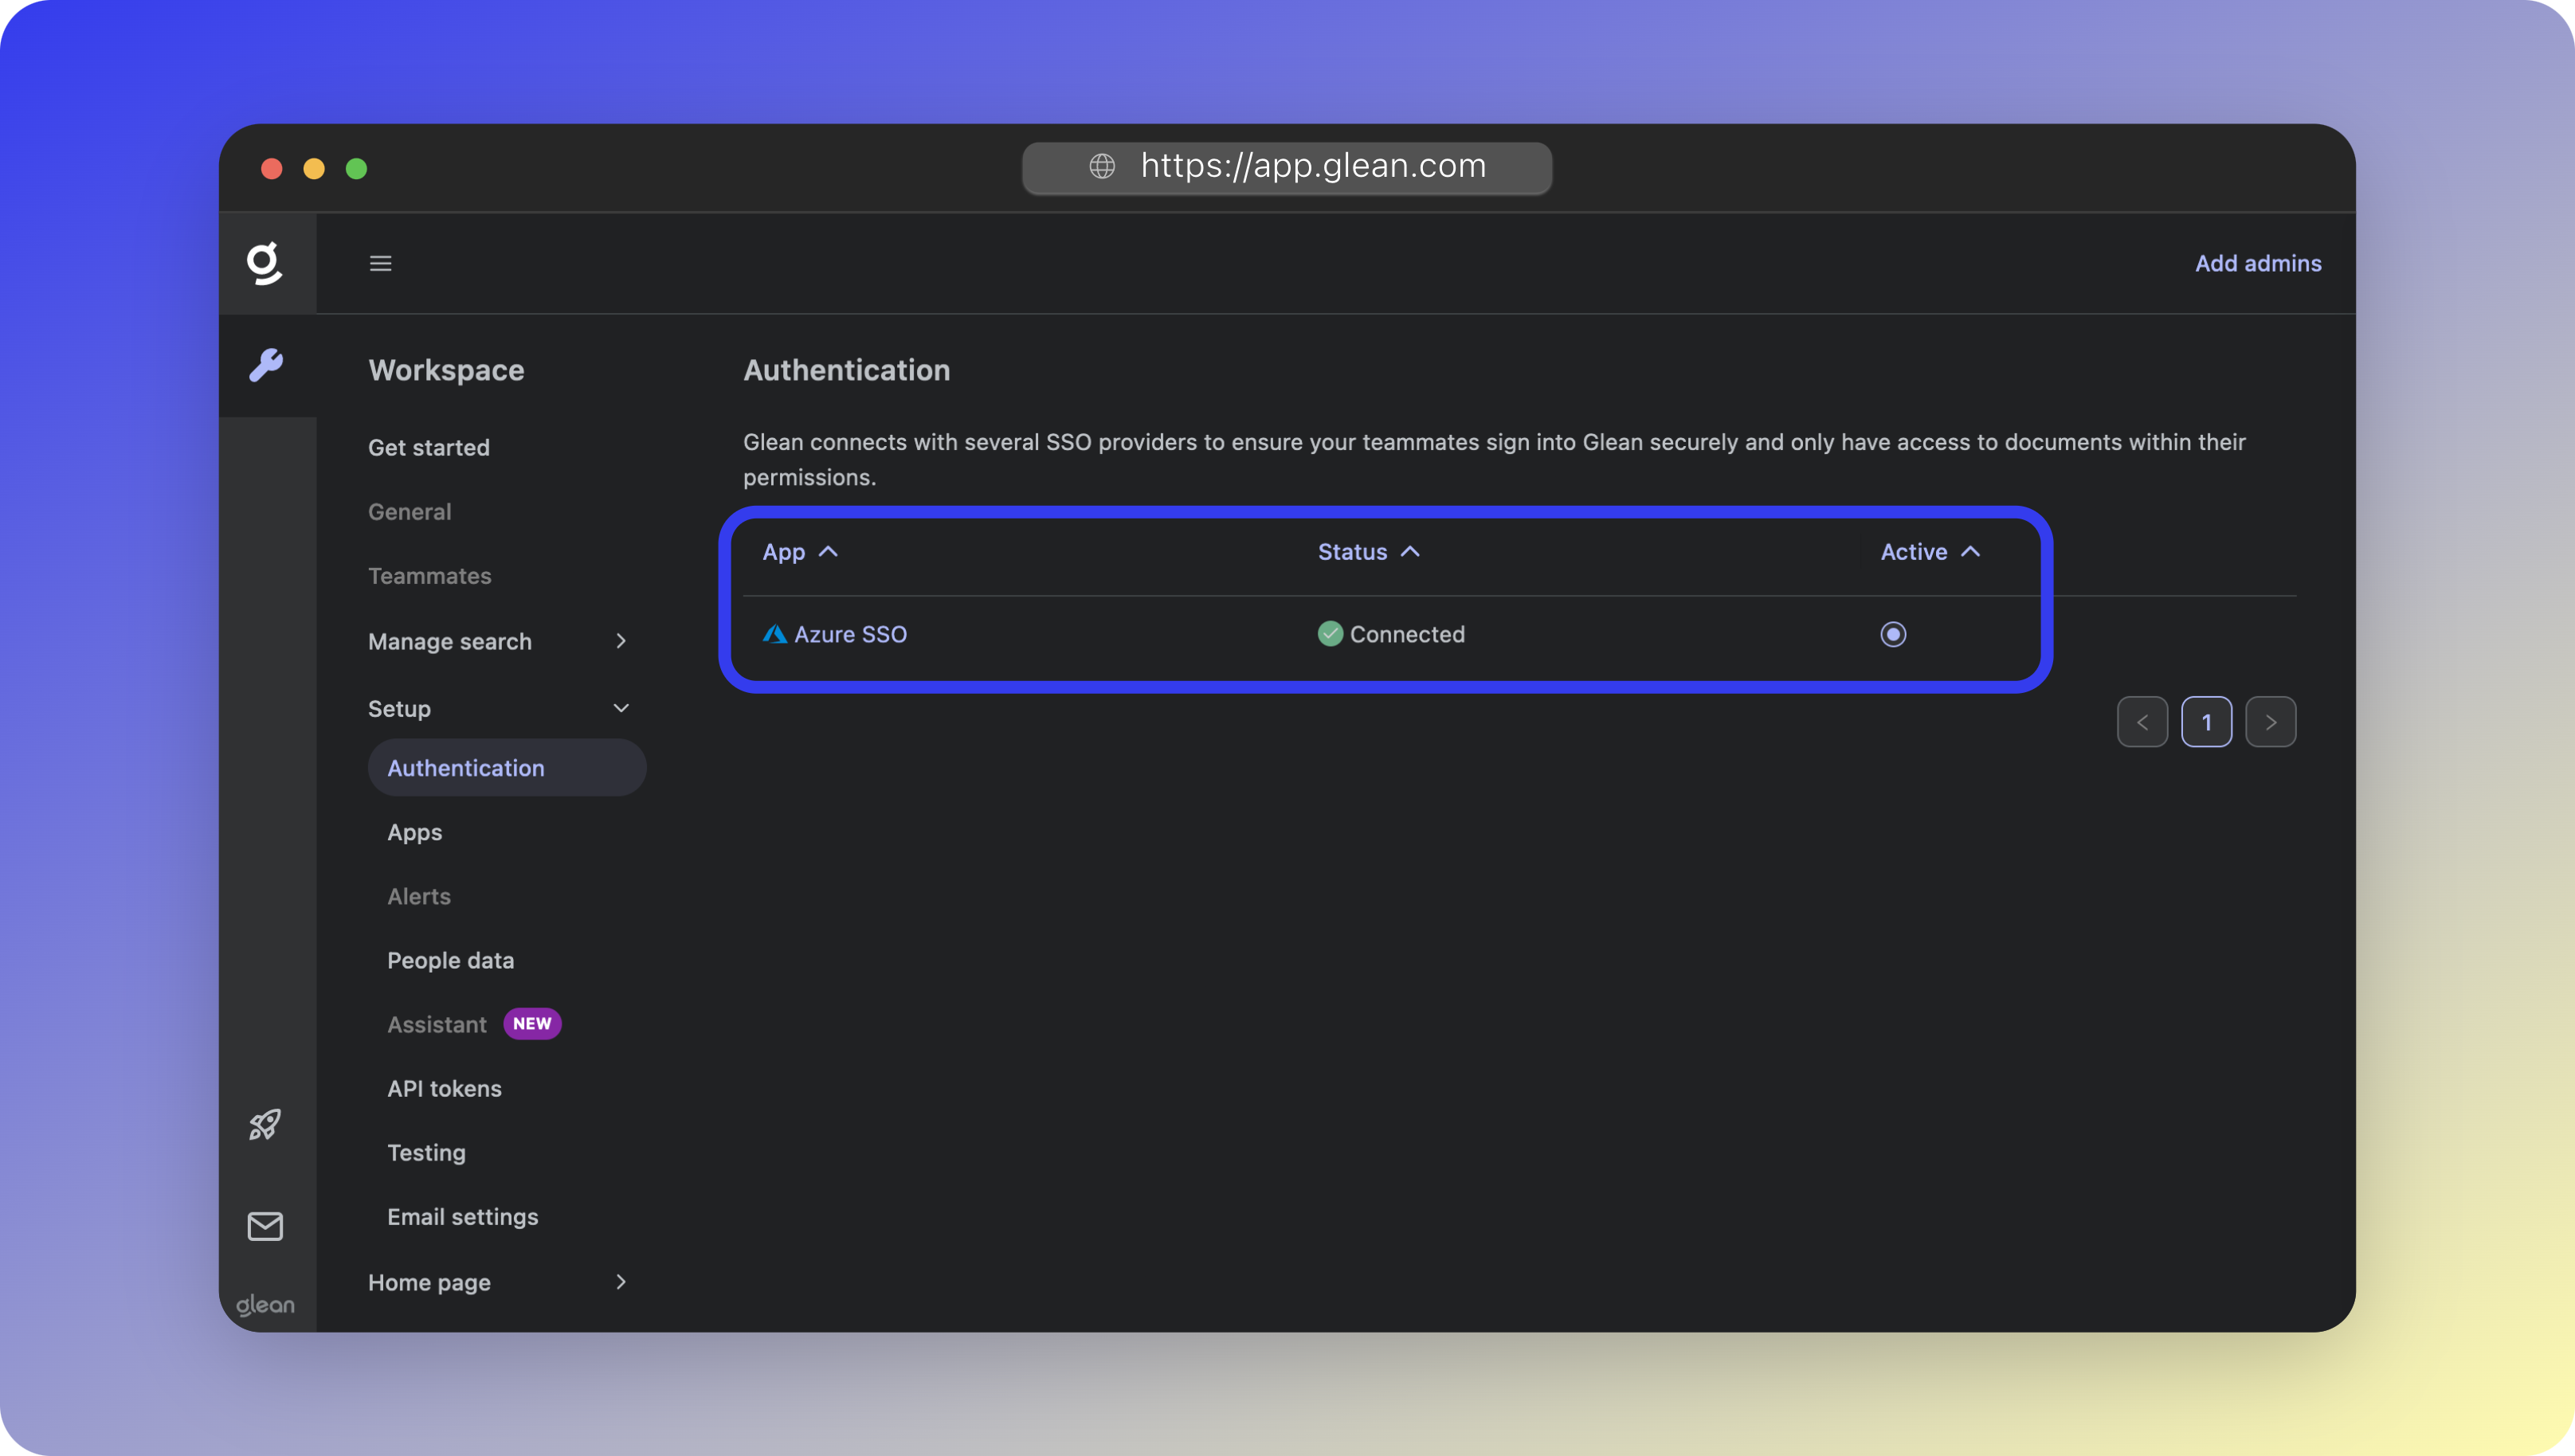
If you don’t see the Switch to Azure SSO button, it means that your Glean tenant is still provisioning and you will not be able to make the switch just yet.You can skip ahead to the Connect Data Sources section of the Getting Started guide and return to this point later.
3 - Sync People Data
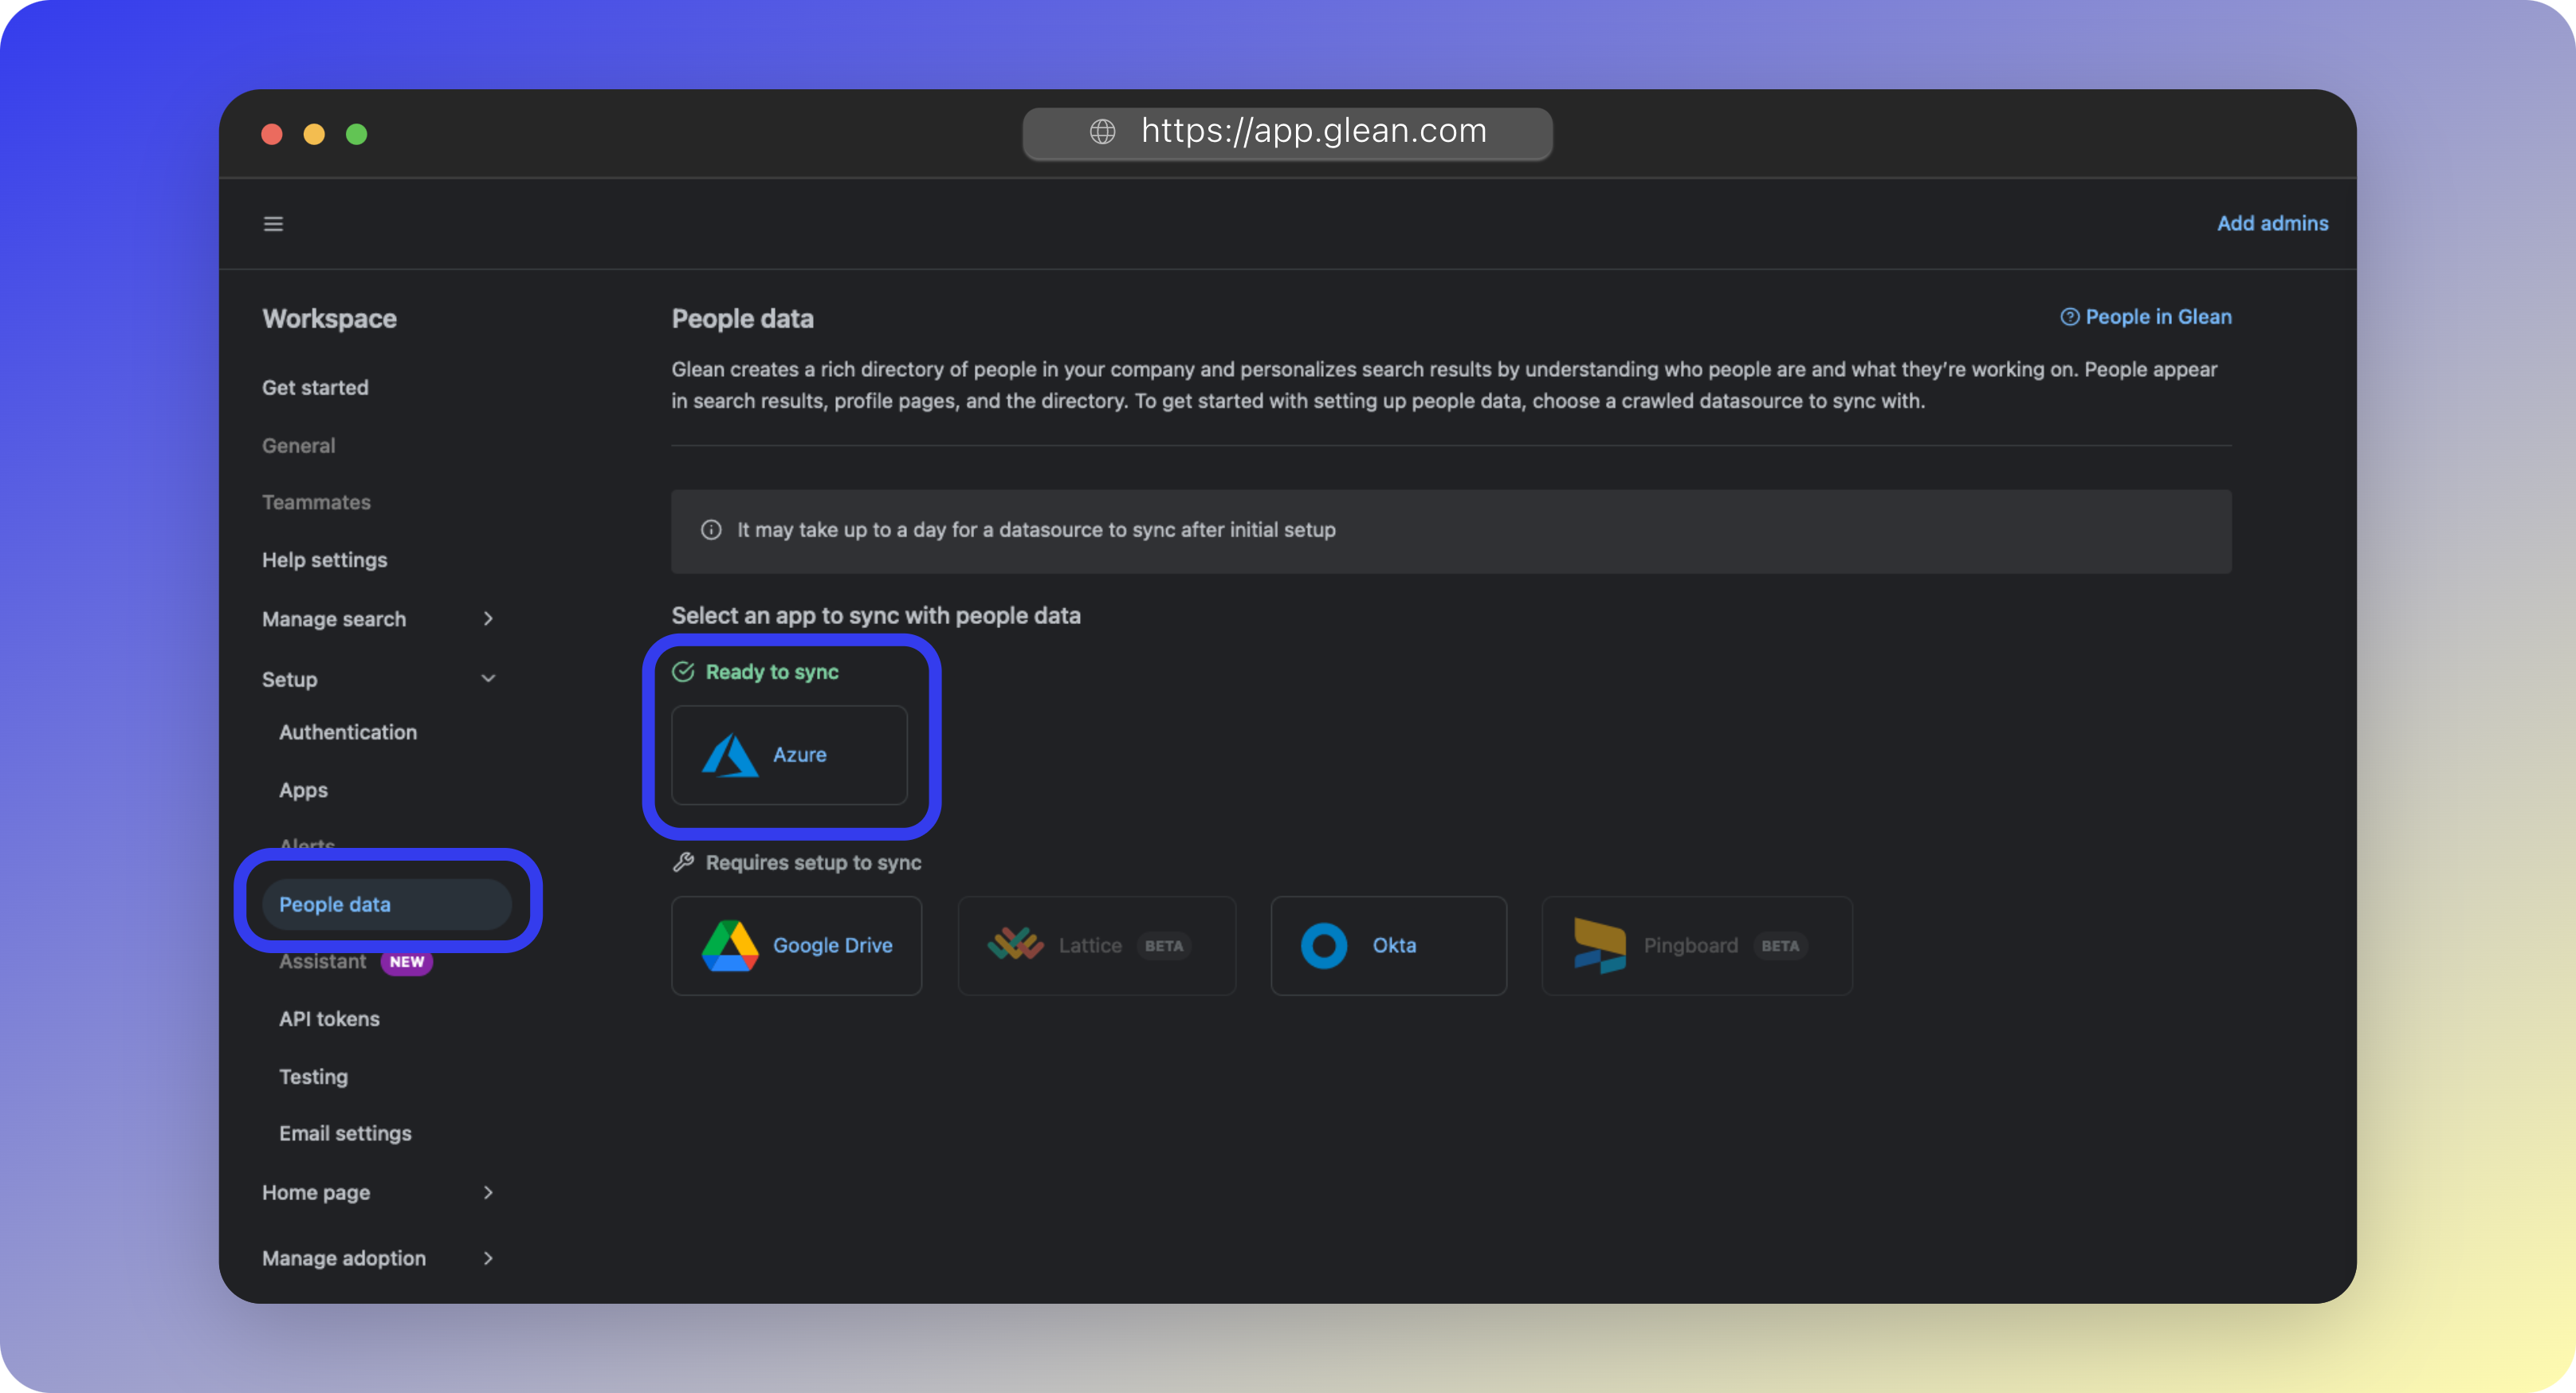
Glean synchronizes your directory from Entra ID so that it can properly map and honor user permissions when displaying search results. In this step, we will initialize the initial synchronization; after which the process will be automated.- In the Glean UI, navigate to Admin Console > Settings > People data
- Under Ready to sync you should see Azure listed. Click Azure.
-
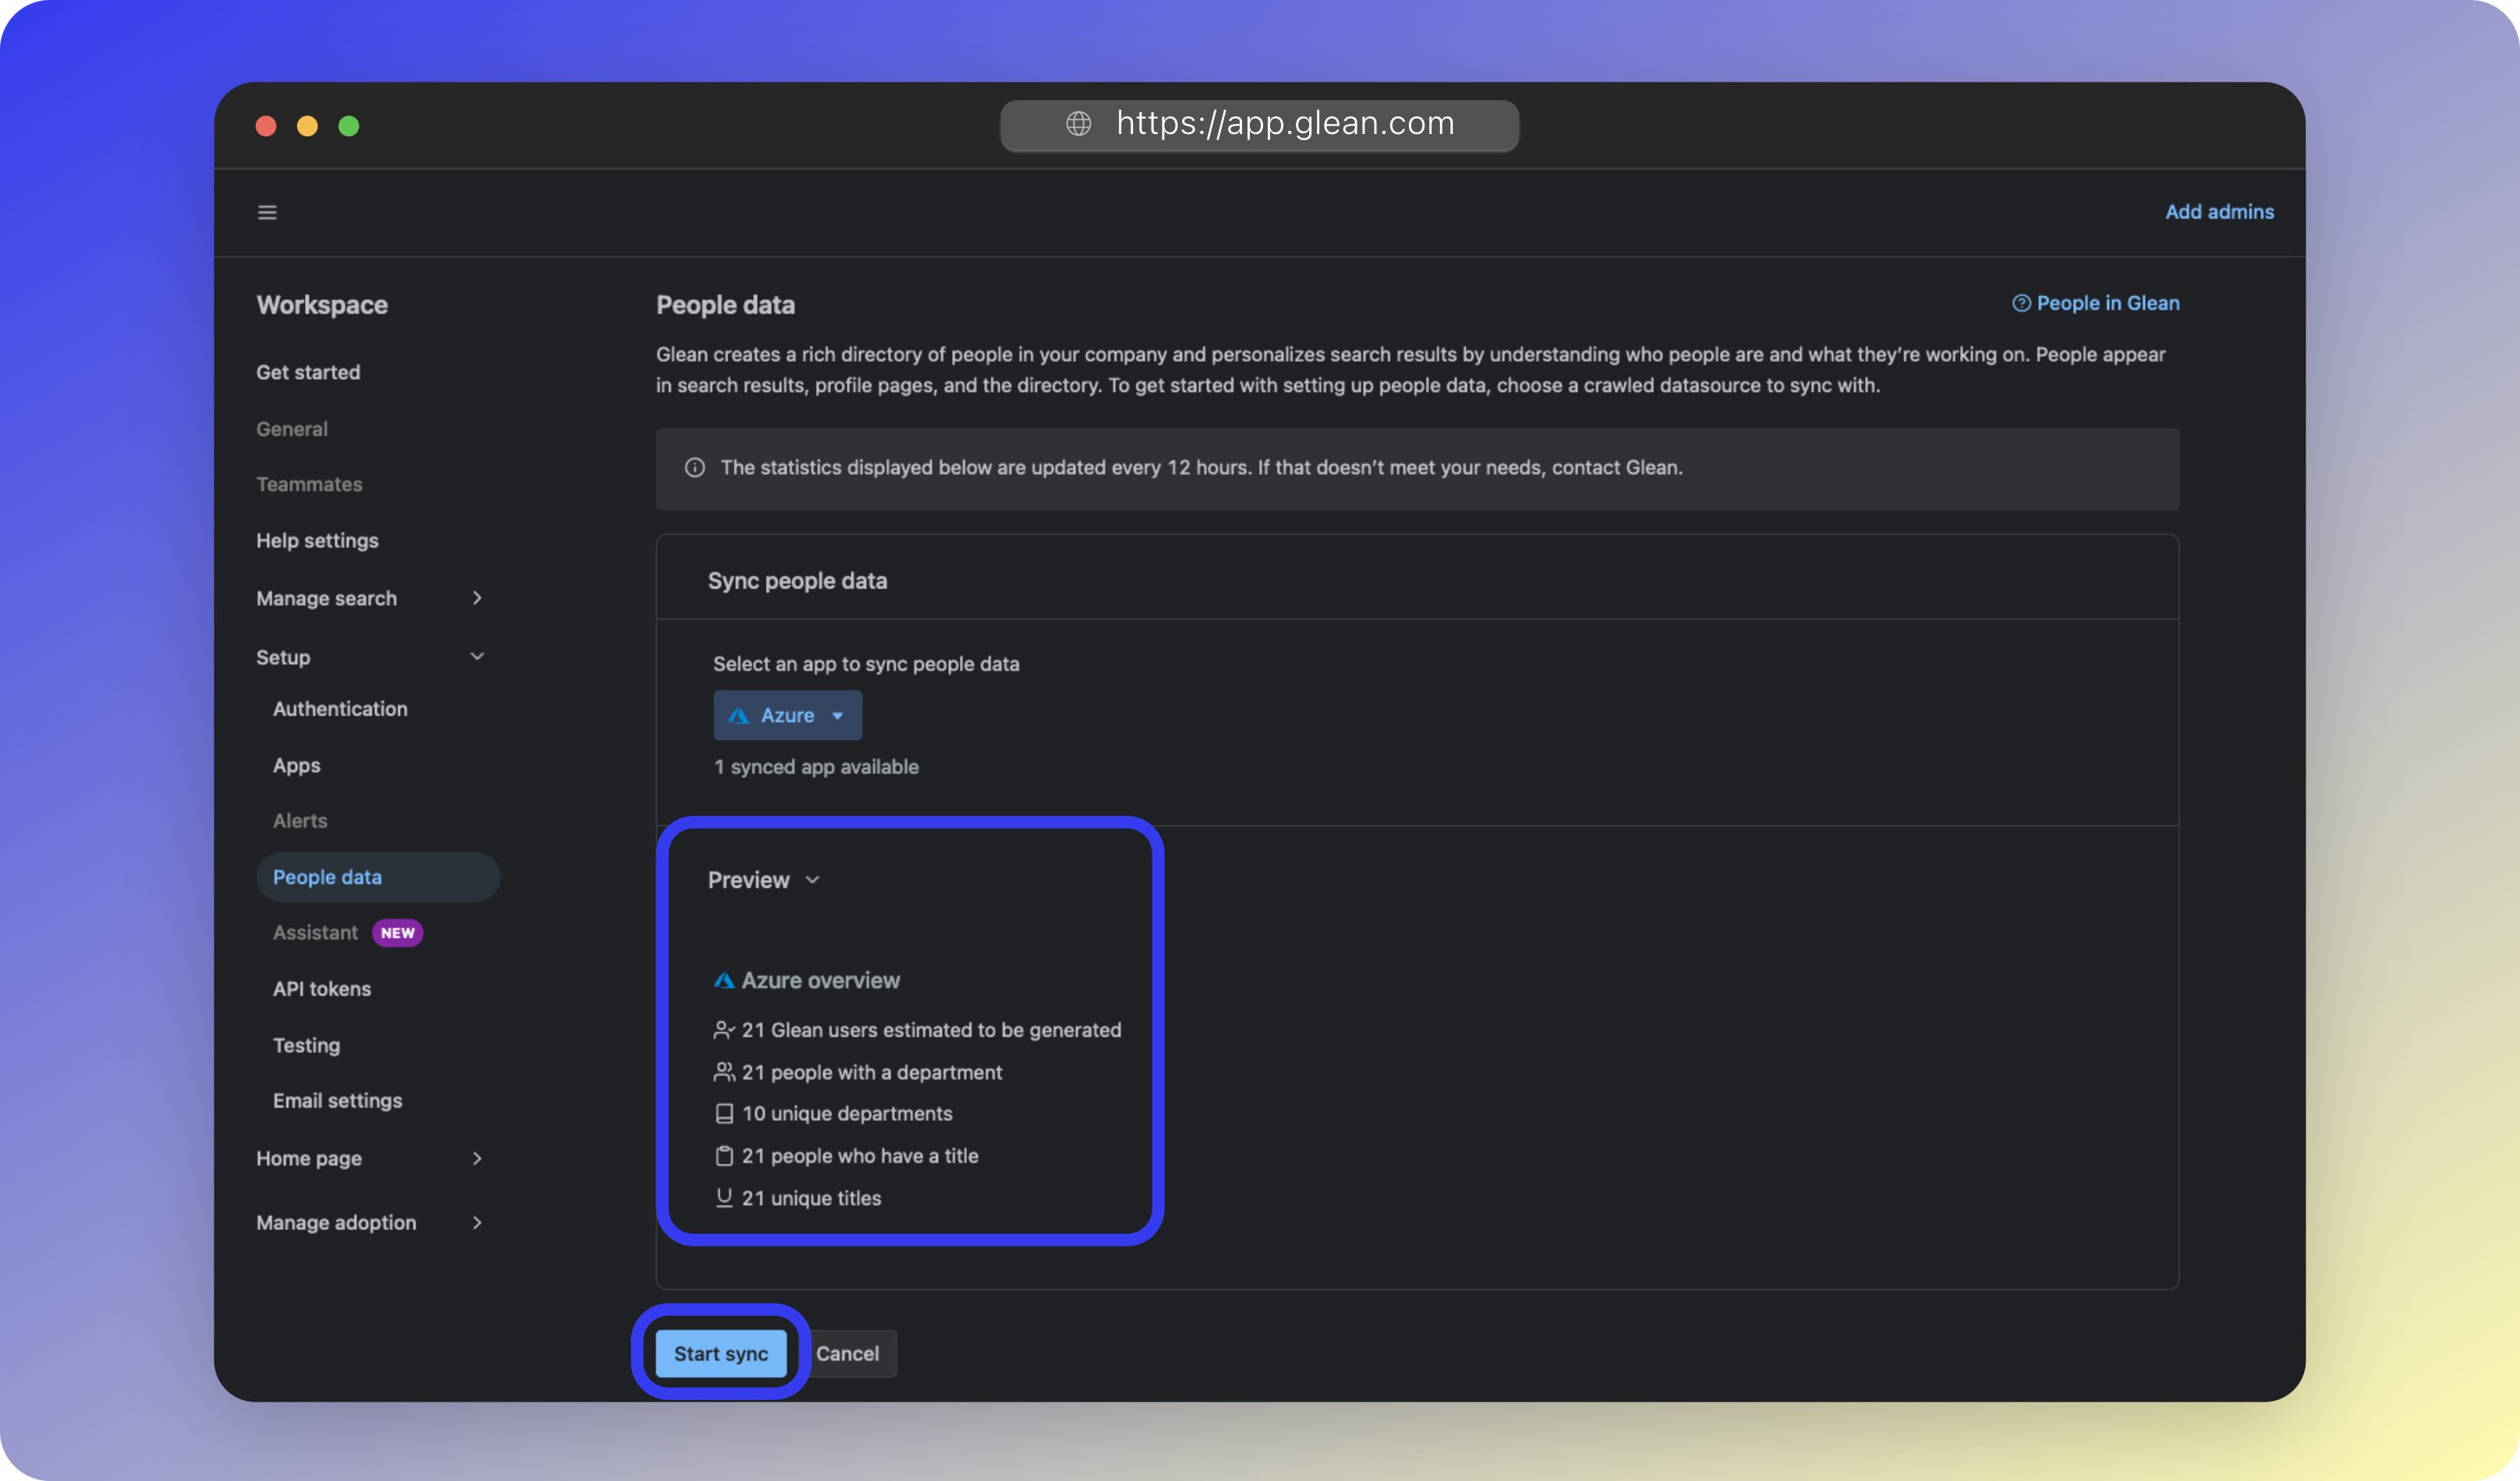
Glean will show you a summary of the data that will be synchronized.
-
If this does not look correct, check:
- That each user in your directory in Entra ID has their First Name, Last Name, Email, Title, Department, and (optionally) Manager fields populated.
- You have correctly provided the Glean SSO App Registration with the
Directory.Read.AllandUser.Read.AllApplication (not Delegated) permissions. - That your Client Secret, Directory ID, and Application ID are correct.
-
If this does not look correct, check:
- Click Start sync to begin the initial synchronization.
- Over the next few hours, you will start to see your users synchronized to Glean under Admin Console > Settings > People data. If 24 hours elapse without any data populating, please contact your Glean engineer or Glean support.
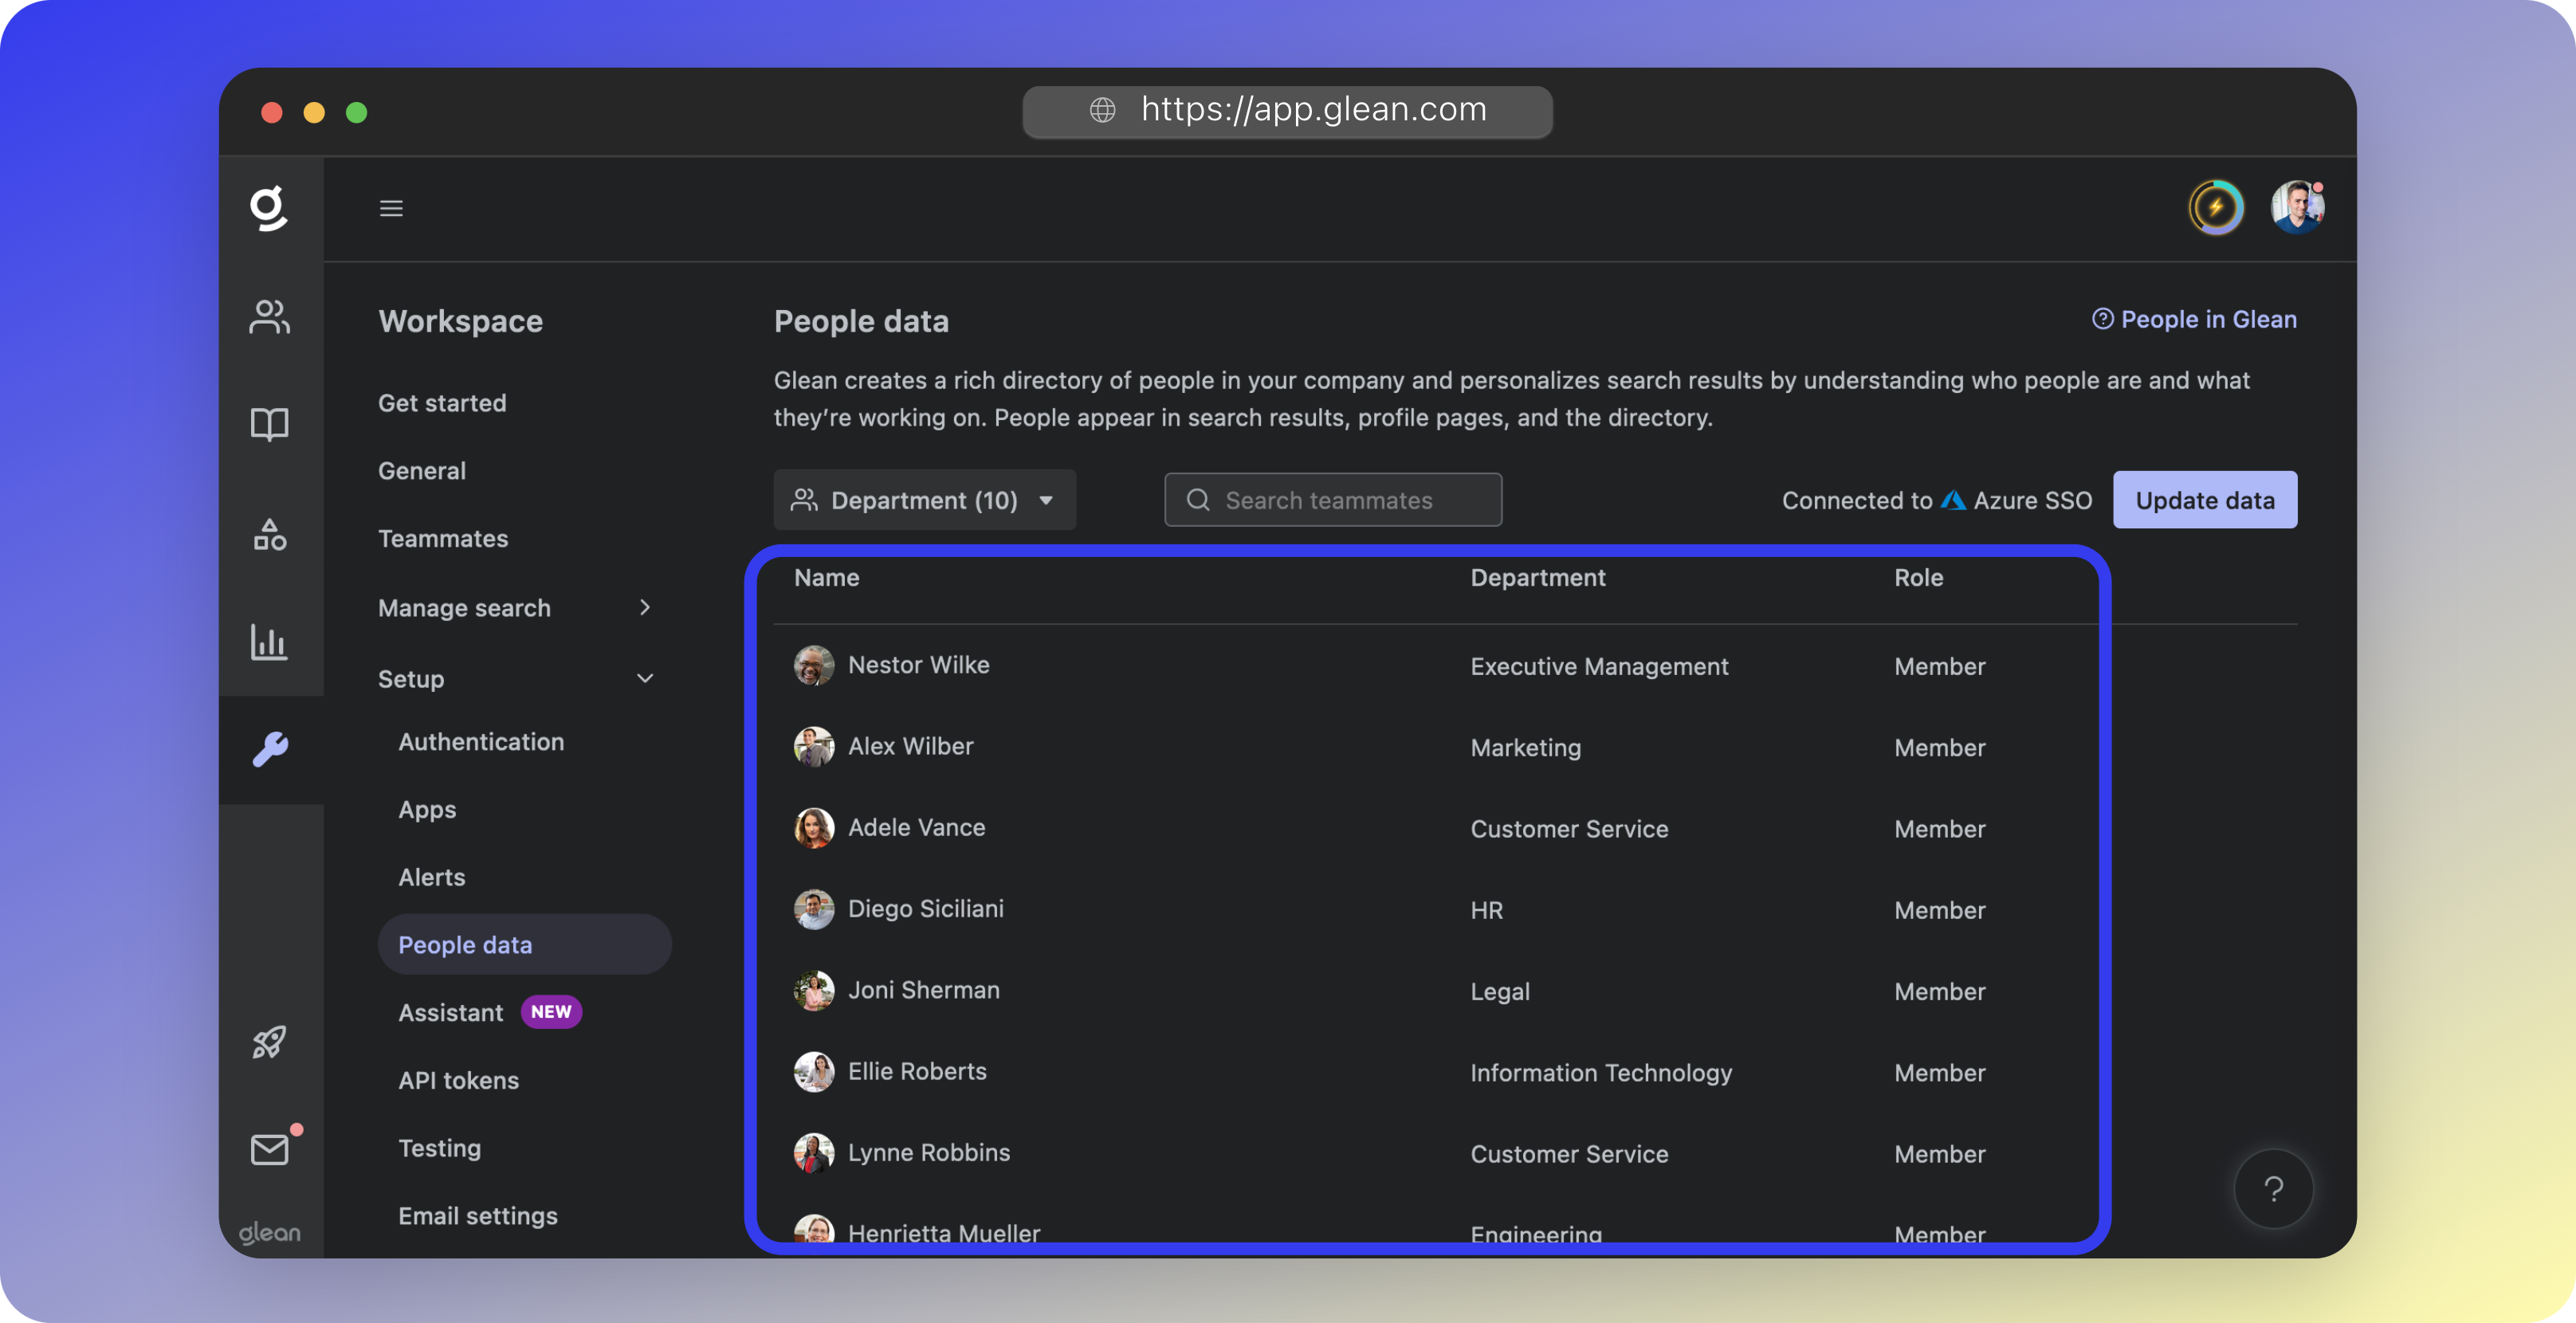
You have successfully configured SSO and directory synchronization for Glean with Entra ID.
Testing the Configuration
There are two key phases of SSO to test: The Glean to Microsoft Online redirect, and the Microsoft Online back to Glean redirect.Glean to Entra ID
To test your SSO configuration, open a new Incognito or Private Browsing window and navigate to https://app.glean.com. Enter your work email and click Log In. You should be redirected to your SSO platform successfully.Entra ID to Glean
When you have been redirected to Entra ID, attempt to sign in. You should be redirected back to Glean and successfully signed in.Troubleshooting
If any of the above SSO flows fail, consult the table below. If you have issues that persist, or issues not mentioned below, please contact Glean support.| Issue | Description | Fix |
|---|---|---|
| SSO code exchange failed [Error Code 13] | The Directory ID, Application ID, or Client Secret token is/are incorrect. | Double check that you have copied the Directory ID, Application ID, and Client Secret values correctly into the Glean UI. |
| Cannot authenticate user from access token [Error Code 14] | A key field that Glean needs to authenticate the user is missing from the access token provided by them on sign-in. | Check the profile of the user in Entra ID. Ensure that the Email attribute is populated, along with First Name, Last Name, Display Name, Department, and Title. |
| Cannot authenticate user from access token [Error Code 14] | In addition to the above, this error code may indicate that Glean cannot validate the email domain being used for sign-in. | Glean checks the email domain of every user that authenticates via SSO against a list of known company domains that are assigned to your tenant. If Glean is not aware of the email domain that your user is attempting to SSO with, it denies access to your Glean environment for security reasons. Notify your Glean engineer or Glean support of all email domains that your users will be authenticating from. |
| Microsoft error: “You can’t get there from here” | User authentication to Glean is being blocked by a Conditional Access policy. | Amend your Conditional Access policy to include and permit the Glean SSO Enterprise App. |
| Microsoft error: “Need admin approval” | Admin consent has not been granted to the permissions requested by the Glean SSO App Registration. | Ensure that you have granted admin consent for the Application and Delegated permissions requested under “API permissions” of the Glean SSO App Registration. |
| Users are being asked to approve permissions when signing in to Glean | The type of permissions granted to the Glean SSO App Registration are incorrect (or missing). | Ensure that the Directory.Read.All and User.Read.All permissions are assigned to the Glean SSO app registration and are of Application type.Ensure that the email, openid, offline_access, and profile permissions are assigned to the Glean SSO app registration and are of Delegated type. |
| SSO is successful, but the Glean is stuck at the login page | Glean cannot validate the email domain being used for sign-in. | Glean checks the email domain of every user that authenticates via SSO against a list of known company domains that are assigned to your tenant. If Glean is not aware of the email domain that your user is attempting to SSO with, it denies access to your Glean environment for security reasons. Notify your Glean engineer or Glean support of all email domains that your users will be authenticating from. |
| SSO is successful, but Glean returns an internal server error or some other error. | You likely have IP restrictions assigned to your Azure/Entra ID tenant which are preventing the access token from being validated. | Contact your Glean engineer or Glean support who can advise you on the static IP addresses assigned to your Glean tenant that you will need to allowlist. |